1. Introduction
This manual provides comprehensive instructions for the installation and maintenance of the X X-HOUSE 041C4220A Gear and Sprocket Kit. This kit is designed as a replacement for worn or damaged gear assemblies in compatible chain drive garage door openers, restoring proper function to your system.

Image 1.1: Complete 041C4220A Gear and Sprocket Kit components.
2. Product Compatibility
The 041C4220A Gear and Sprocket Kit is compatible with various chain drive garage door openers manufactured after 1993. It serves as a direct replacement for 1/3 and 1/2 horsepower LiftMaster, Chamberlain, Sears, and Craftsman chain drive models.
This kit is also known by the following part numbers: 41A2827, 41C4220C, 41C4220, and 41C4220A.

Image 2.1: Detailed compatibility list for the 041C4220A kit.
3. Package Contents
The X X-HOUSE 041C4220A Gear and Sprocket Kit includes all necessary components for a complete replacement:
- Helical Gear and Top Hat Assembly
- Worm Gear
- Wear Bushings (various types)
- Grease (for lubrication)
- Hardware (including spring washer, thrust washer, retaining ring, bearing plate, and roll pins)

Image 3.1: Overview of included kit components for replacement.
4. Safety Information
Before beginning any work on your garage door opener, observe the following safety precautions:
- Disconnect Power: Always unplug the garage door opener from its power source before performing any service or maintenance.
- Garage Door Position: Ensure the garage door is in the fully closed position to prevent unexpected movement during the repair process.
- Personal Protective Equipment: Wear appropriate safety glasses and gloves to protect against potential hazards.
- Consult Manual: Refer to your specific garage door opener's manual for additional safety guidelines and detailed diagrams.
5. Installation Instructions
5.1. Tools Required
- Flat head screwdriver
- 5/16" Nut driver or socket
- 1/4" Nut driver or socket
- Hammer
5.2. Step-by-Step Guide
Follow these steps carefully to replace the gear and sprocket assembly. Refer to the diagram (Image 5.1) for visual guidance.
- Prepare the Opener:
- Disconnect power to the garage door opener.
- Ensure the garage door is fully closed.
- Remove the outer trolley by pulling the emergency release rope.
- Manually pull the garage door to a closed position.
- Relax the belt tension by loosening the outer nut on the trolley assembly to the end of the threaded rod.
- Remove the belt cap.
- Remove belt from sprocket. Manually slide the inner trolley to a closed position until it engages the outer trolley.
- Remove belt on the end of the rail nearest sprocket. Tape the belt to the rail to prevent the belt from falling to the floor.
- Remove outer trolley from the track.
- Remove Limit Drive Gear, Limit Switch Assembly, and RPM Sensors:
- Remove the limit drive gear and retainer clip.
- Remove the limit switch assembly by squeezing the sides just below the motor assembly bracket.
- Remove the limit switch assembly by hanging by the wires.
- Unplug the wire harness from the RPM sensor.
- Remove Motor Assembly:
- Disconnect the 3 wires leading from the motor (RED, WHITE, BLUE) from their position.
- Remove the 4 screws (2 fine thread, 2 coarse thread) to the chassis.
- Using a 5/16" nut driver, hand support the motor to remove it.
- Remove motor/bracket assembly.
- Remove and Replace Worm Gear:
- Remove the 3 hub holding the motor/bracket to the chassis.
- Remove and hammer down to drive roll pin from motor shaft and slide worm gear off.
- Remove 'O' ring, 'C' ring, and washer.
- Replace with new components in proper sequence.
- Remove and Replace Sprocket Assembly:
- Remove the 3 screws from underneath with a 5/16" nut driver.
- Remove the sprocket assembly from the chassis and lift out the entire assembly.
- Apply grease generously to each tooth on the new helical gear.
- Reinstall the sprocket assembly.
- Reinstall motor assembly.
- Set Limit Settings:
- Run the motor until the sprocket has completed a clockwise cycle.
- Reinstall Belt and Set Belt Tension:
- Reinstall belt on drive sprocket.
- Reinstall belt cap and set belt tension.
- To tighten the belt, hold the belt at the trolley and pull the threaded rod up until the spring/trolley nut by hand on the shaft until finger tight.
- Tighten the 5/16" nut on the threaded rod.
- Run Opener and Test:
- Run the opener through its complete travel cycle.
- Does the door open and close completely?
- Does the door stay closed and not reverse?
- Adjust travel screws as needed.
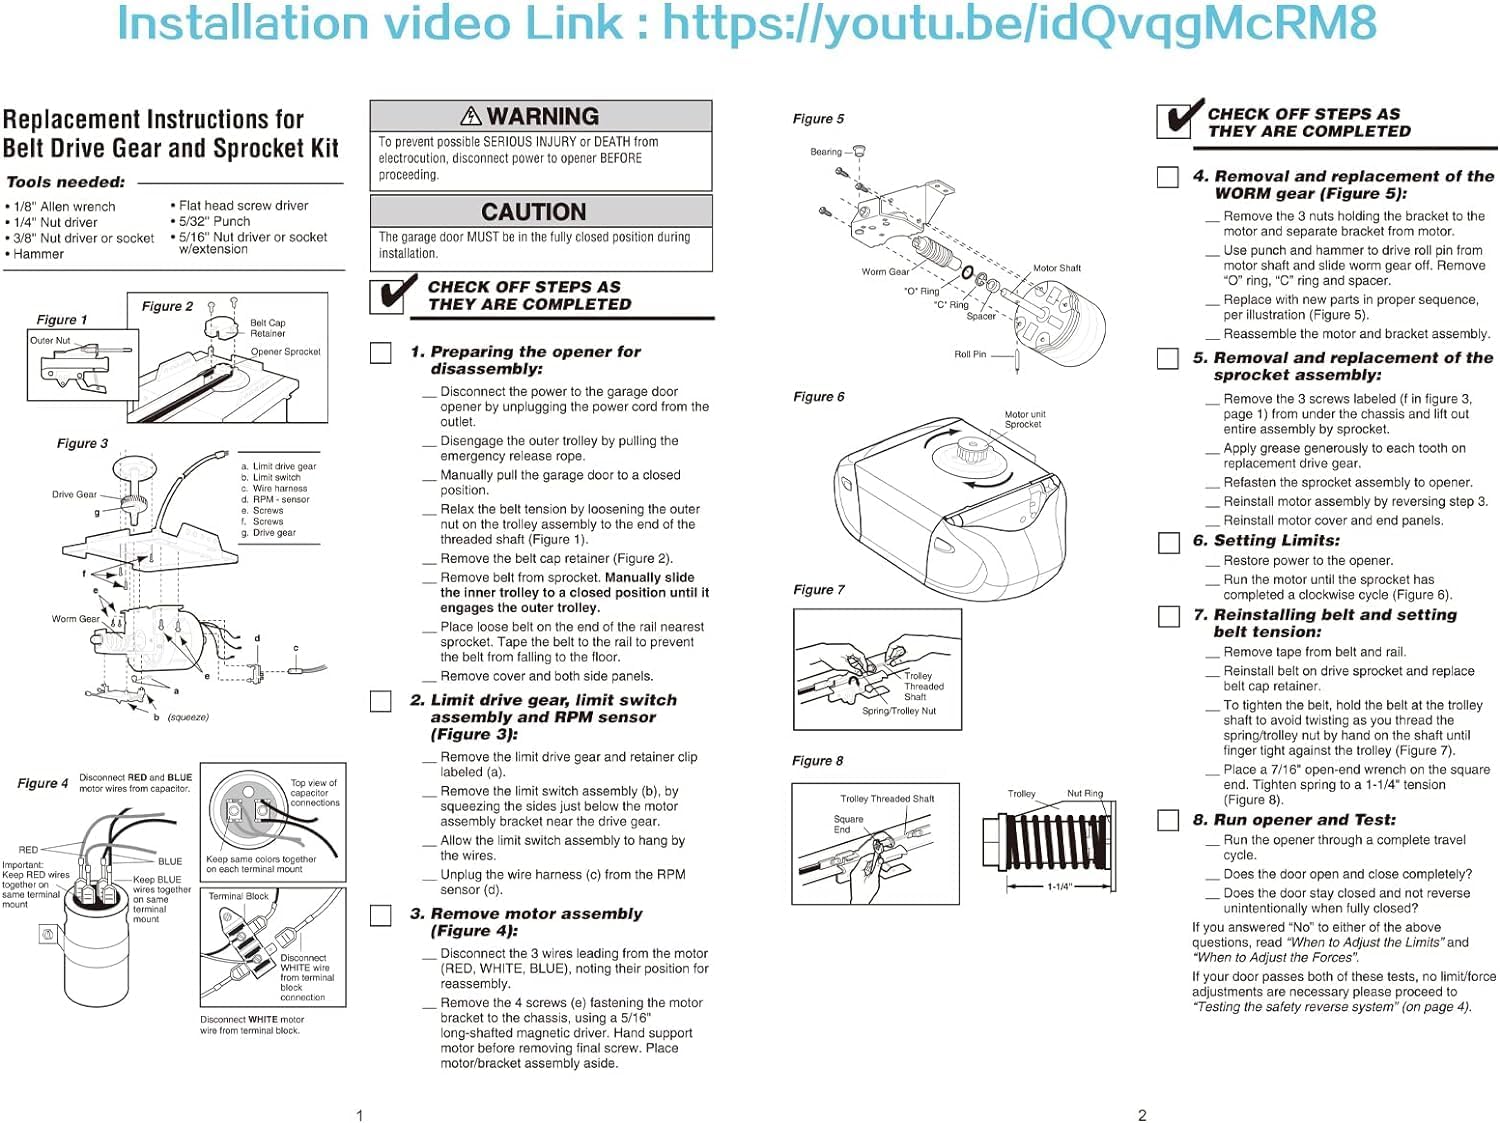
Image 5.1: Detailed diagram illustrating the steps for gear and sprocket replacement.

Image 5.2: Close-up of a hand installing a gear component.
6. Operating (Post-Installation)
After successful installation and adjustment, your garage door opener should operate smoothly. Perform several test cycles to ensure the door opens and closes fully without issues. Listen for any unusual noises and observe the chain tension.
7. Maintenance
To ensure the longevity and optimal performance of your garage door opener and the newly installed gear kit, periodic maintenance is recommended:
- Lubrication: Periodically inspect the gears and apply a small amount of garage door opener specific grease to the helical and worm gears. Avoid over-lubrication.
- Inspection: Regularly check the gear assembly for any signs of wear, cracks, or debris. Ensure all components are securely fastened.
- Chain Tension: Verify that the garage door chain maintains proper tension. Adjust if it appears too loose or too tight according to your opener's manual.
8. Troubleshooting
If you encounter issues after installing the gear and sprocket kit, consider the following:
- Opener Not Responding: Ensure the power is reconnected and the emergency release is not engaged. Check for any tripped circuit breakers.
- Door Not Opening/Closing Fully: Re-check the limit switch settings and adjust them as described in Section 5.2, Step 8.
- Unusual Noises: Verify that all gears are properly seated and lubricated. Check for any obstructions in the chain path or around the gears. Ensure the chain tension is correct.
- Door Reverses Unexpectedly: This could indicate an obstruction or incorrect force settings. Consult your opener's manual for adjusting force settings.
- Chain Slack: If the chain is too loose, re-adjust the tension as described in Section 5.2, Step 7.
If problems persist, it is recommended to consult a qualified garage door technician.
9. Product Specifications
- Model Number: 041C4220A (also known as es-door-16h-68)
- Manufacturer: GIANT (Brand: X X-HOUSE)
- Item Weight: 1.02 pounds (approximately 0.46 kg)
- Product Dimensions: 4.21 x 5.91 x 2.68 inches (10.7 x 15 x 6.8 cm)
- Installation Method: Screw-In
- Item Package Quantity: 1 kit

Image 9.1: Dimensions of the individual components within the kit.
10. Warranty and Support
The X X-HOUSE 041C4220A Gear and Sprocket Kit comes with a 1-Year Limited Warranty from the date of purchase. This warranty covers manufacturing defects and material flaws under normal use.
For warranty claims, technical assistance, or any questions regarding the product, please contact the seller or manufacturer through the platform where the purchase was made. Provide your order details and a description of the issue for prompt support.