
1. Introduction
This manual provides detailed instructions for the installation, operation, and maintenance of your GCSOAR MPPT Solar Charge Controller 60A, model GCIT6024. This controller is designed to efficiently manage power flow from your solar panels to your battery bank, ensuring optimal charging and extending battery life. It supports 12V/24V battery systems automatically and is compatible with various battery types, including Lead-Acid (Sealed, Gel, Flooded, AGM) and Lithium (LiFePO4, Li[NiCoMn]O2).
2. Safety Instructions
- Read all instructions carefully before installation and operation.
- Ensure all connections are tight and correct to avoid loose connections that may cause excessive heat.
- Install the controller in a well-ventilated area, away from flammable materials and direct sunlight.
- Always connect the battery first, then the load, and finally the solar panel. Disconnect in the reverse order: solar panel, then load, then battery.
- Use appropriate circuit breakers or fuses for all connections to protect against overcurrent.
- This device is common negative grounding. Ensure proper grounding for safety.
- Do not attempt to repair or modify the controller yourself. Contact technical support for assistance.
3. Product Features
- MPPT Technology: Maximum Power Point Tracking efficiency of 99.5% or above, with peak conversion efficiency up to 98%.
- Automatic System Voltage: Automatically identifies 12V/24V DC system voltage.
- High PV Input: Supports Max. PV (Voc) 100V and Max input power of 780W for 12V systems / 1560W for 24V systems.
- Battery Compatibility: Supports Sealed (SEL), Gel (GEL), Flooded (FLD), User-defined (USE) batteries, and Lithium (LiFePO4, Li[NiCoMn]O2) batteries.
- Temperature Compensation: Battery temperature compensation function to optimize charging and prolong battery life.
- Comprehensive Protections: Multiple electronic protections against reverse polarity, overcharging, over-discharging, overloading, battery-shedding, short-circuiting, and reverse current.
- Monitoring Options: Optional Bluetooth module (BT02) for APP remote monitoring (SolarMate) and parameter adjustment, and PC monitoring via RS485-USB cable.
- Parallel Functionality: Dual RJ45 port design/RS485 protocol allows for parallel connection of multiple controllers (e.g., two controllers for 120A, three for 180A system).
- LCD Display: High-definition LCD provides real-time PV input, DC load output, battery information, charging dynamics, working states, date, and fault codes.
4. Package Contents
Upon unpacking, please verify that all items listed below are present and in good condition:
- 1 X GCSOAR 60A MPPT Solar Charge Controller (Model GCIT6024)
- 1 X Temperature sensor cable
- 1 X User Manual (English)
- 1 X Bag of installation screws

Figure 4.1: Contents included in the product package.
5. Setup and Installation
Follow these steps carefully to ensure proper and safe installation of your solar charge controller.
5.1 Wiring Diagram

Figure 5.1: General wiring diagram for the solar charge controller in a typical solar power system.
5.2 Connection Order
It is critical to follow the correct connection and disconnection sequence to prevent damage to the controller or other components.
- Connect Battery: First, connect the battery to the controller's battery terminals. Ensure correct polarity.
- Connect Load: Next, connect the DC load to the controller's load terminals. Ensure correct polarity.
- Connect PV Array: Finally, connect the solar panel array to the controller's PV terminals. Ensure correct polarity.
Disconnection Order: To disconnect the system, reverse the order: first disconnect the PV array, then the load, and finally the battery.
5.3 Common Negative Grounding
The GCSOAR MPPT Solar Charge Controller features common negative grounding. This means that the negative terminals of the solar panel, battery, and load are internally connected to a common negative bus bar within the controller, which is then connected to the system ground.
6. Operating Instructions
This section details how to interact with your controller through its LCD display and external monitoring options.
6.1 LCD Display Interface
The controller features a high-definition LCD that provides real-time system information. Press any button to wake up the display.

Figure 6.1: LCD display interface and information categories.
The display typically shows:
- PV Information: PV voltage, PV current, PV power, PV total energy.
- BAT Information: Battery voltage, battery current, battery power, battery percentage, battery temperature, battery type, device address.
- DC Load Information: Load voltage, load current, load power, load total energy, load working mode.
- System Information: Realtime, date, system voltage, S01-S14 (status codes).
6.2 App Monitoring (SolarMate)
The controller supports remote monitoring and parameter adjustment via the SolarMate mobile application, requiring an optional BT-02 Bluetooth module.

Figure 6.2: Bluetooth module (BT-02) connection for app monitoring.
Steps for App Monitoring:
- Download SolarMate App: Search for 'SolarMate' in your device's app store.
- Connect BT-02 Module: Plug the BT-02 Bluetooth module into one of the RJ45 ports on the controller.
- Pair with App: Open the SolarMate app, enable Bluetooth on your phone, and follow the in-app instructions to connect to the BT-02 module.
- Monitor and Adjust: Once connected, you can view real-time data, historical records, and adjust various parameters of the controller.
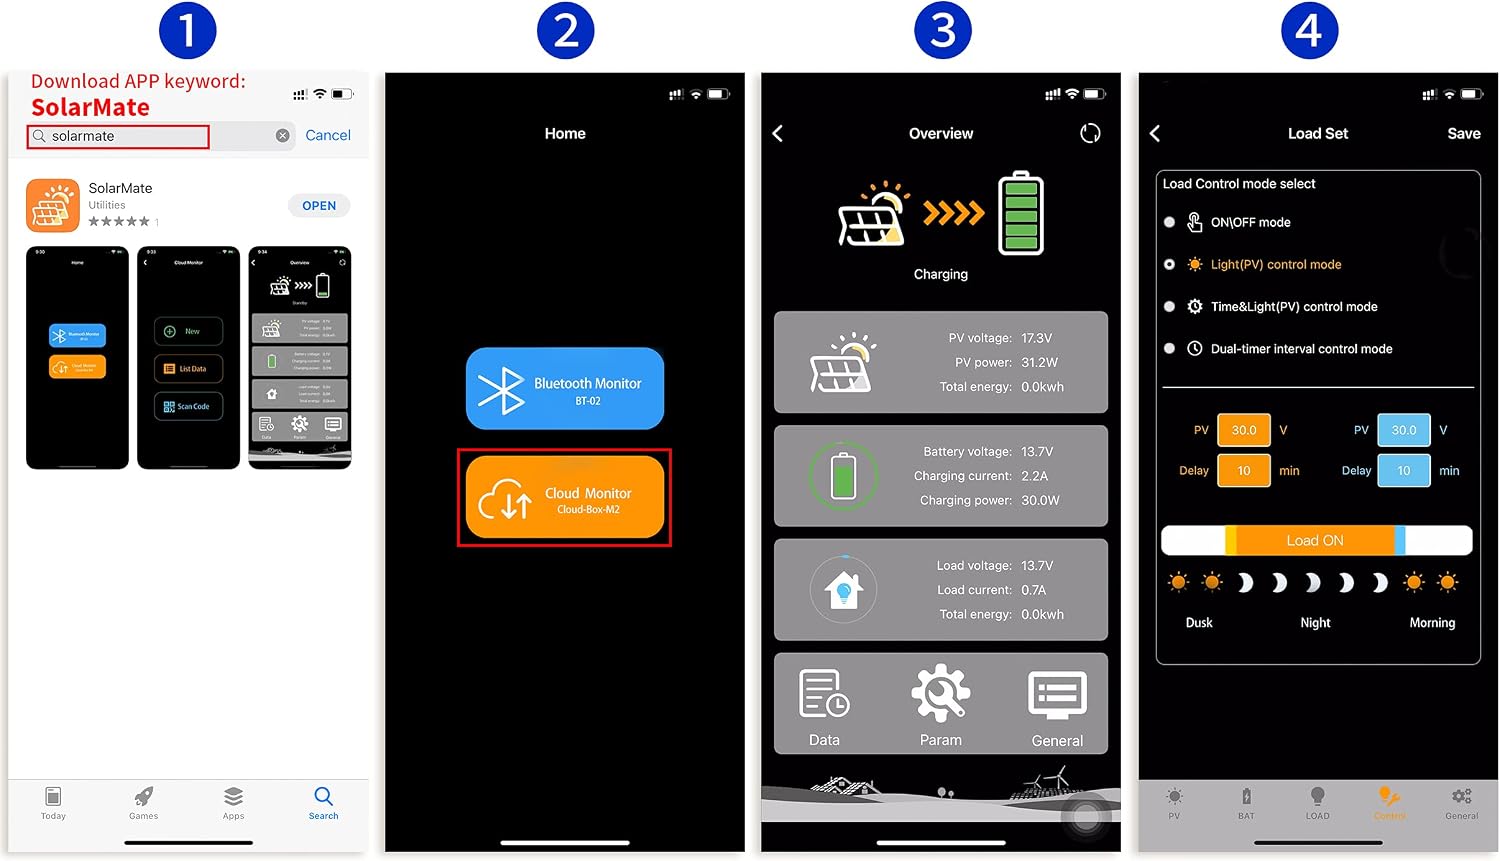
Figure 6.3: SolarMate App interface and functionality.
6.3 PC Monitoring
For detailed monitoring and configuration on a computer, you can use the PC software with an RS485-USB cable.

Figure 6.4: PC monitoring setup with RS485-USB cable. Note: PC software only supports Windows systems.
Steps for PC Monitoring:
- Obtain PC Software: Contact GCSOAR technical support to acquire the PC monitoring software.
- Connect RS485-USB Cable: Connect one end of the RS485-USB cable to an RJ45 port on the controller and the other end to a USB port on your Windows computer.
- Install Drivers (if necessary): Install any required drivers for the RS485-USB cable.
- Launch Software: Open the PC monitoring software and configure the COM port settings to establish communication with the controller.
7. Battery Type Settings
The controller supports various battery types. It is crucial to select the correct battery type for optimal charging and battery longevity. This can be configured via the LCD display, SolarMate app, or PC software.
- Sealed (SEL): For sealed lead-acid batteries.
- Gel (GEL): For gel-type lead-acid batteries.
- Flooded (FLD): For flooded/wet cell lead-acid batteries.
- LiFePO4 (LIT): For Lithium Iron Phosphate batteries.
- Li[NiCoMn]O2 (LIT): For Lithium Nickel Manganese Cobalt Oxide batteries.
- User-defined (USE): Allows for custom charging parameters for specific battery chemistries.
8. Load Work Modes
The controller offers several load work modes to manage the DC output to your connected loads:
- On/Off: Manual control to turn the load on or off.
- PV Voltage Control: The load is controlled based on the solar panel voltage (e.g., turns on at dusk, off at dawn).
- Dual-time Control: Allows setting two distinct time periods for the load to be active.
- PV + Time Control: Combines PV voltage control with a timed duration (e.g., turns on at dusk for a set number of hours).
9. Maintenance
Regular maintenance ensures the longevity and optimal performance of your solar charge controller.
- Cleanliness: Keep the controller clean and free from dust and debris. Use a dry cloth for cleaning.
- Ventilation: Ensure the installation area remains well-ventilated to prevent overheating. Periodically check that the heatsink fins are not obstructed.
- Connections: Periodically inspect all wiring connections for tightness and corrosion. Loose connections can lead to power loss and overheating.
- Firmware Updates: Check the GCSOAR website or contact support for any available firmware updates that may improve performance or add features.

Figure 9.1: Rear view of the controller showing the heatsink.
10. Troubleshooting
This section addresses common issues you might encounter with your GCSOAR MPPT Solar Charge Controller.
| Problem | Possible Cause | Solution |
|---|---|---|
| Controller not charging battery | Incorrect wiring polarity; PV input voltage too low or too high; Battery voltage too low; Faulty PV panel or battery. | Check all wiring connections for correct polarity. Verify PV voltage is within acceptable range (Max 100V). Check battery voltage. Test PV panel and battery independently. |
| Load not working | Load output disabled; Overload protection activated; Incorrect load work mode setting; Faulty load. | Check load work mode settings. Reduce load if overloaded. Test load independently. Ensure battery has sufficient charge. |
| Bluetooth/App connection issues | BT-02 module not connected properly; Bluetooth not enabled on phone; App issues; Module malfunction. | Ensure BT-02 module is securely plugged into the controller. Verify Bluetooth is enabled on your mobile device. Restart the app and controller. Reinstall the app if necessary. |
| PC software not connecting | RS485-USB cable not connected; Incorrect COM port selected; Driver issues; Software malfunction. | Ensure RS485-USB cable is properly connected. Verify correct COM port in device manager and software settings. Install/update USB drivers. Restart PC and controller. |
| LCD display not working | No power to controller; Display fault. | Check battery connection and voltage. If power is present and display remains off, contact support. |
If the problem persists after attempting these solutions, please contact GCSOAR technical support.
11. Specifications
Technical specifications for the GCSOAR MPPT Solar Charge Controller 60A (Model GCIT6024).
| Parameter | Value |
|---|---|
| Model | GCIT6024 |
| Rated Charge Current | 60 Amp |
| Nominal System Voltage | 12V/24V DC Auto Work |
| Max. PV Input Power | 780W (12V system) / 1560W (24V system) |
| Max. PV Open Circuit Voltage (Voc) | 100V |
| Battery Type Support | Sealed, GEL, AGM, Flooded, LiFePO4, Li[NiCoMn]O2, User-defined |
| Battery Voltage Range | 8V ~ 32V |
| Grounding | Common Negative |
| Communication | APP (via Cloud Box M2 or Bluetooth module), PC (via RS485-USB cable), Dual RJ45/RS485 protocol |
| Rated Discharge Current | 30A |
| Load Work Mode | On/Off, PV voltage control, Dual-time control, PV+Time control |
| MPPT Efficiency | ≥99.5% |
| Working Environment Temperature | -20°C ~ +50°C (-4°F ~ 122°F) |
| Dimensions | 245 x 170 x 68.5 mm (9.65 x 6.69 x 2.7 inches) |
| Item Weight | 2.4 KG (5.29 lbs) |
| UPC | 791751080563 |
12. Warranty and Support
GCSOAR is committed to providing reliable products and excellent customer service.
12.1 Technical Assistance
For any technical questions, installation guidance, or troubleshooting assistance, please do not hesitate to contact GolandCentury technical support. Our experienced engineers are available to provide free technical assistance.
12.2 Contact Information
You can reach our support team via email:
Email: mysgreenservice@hotmail.com
Please include your product model (GCIT6024) and a detailed description of your issue when contacting support to ensure a prompt and effective response.