
1. Introduction
1.1 Overview
This manual provides essential information for the safe and efficient operation of your Sony VHS to DVD Recorder VCR Combo. This unit is designed to play both VHS tapes and DVDs, and to record content from VHS tapes or external sources directly onto blank DVDs. Please read this manual thoroughly before using the product.
1.2 What's in the Box
- Sony VHS to DVD Recorder VCR Combo Unit
- Remote Control
- User Manual (this document)
- HDMI Cable
- AV Cables (RCA type)
- Blank DVDs (quantity may vary)
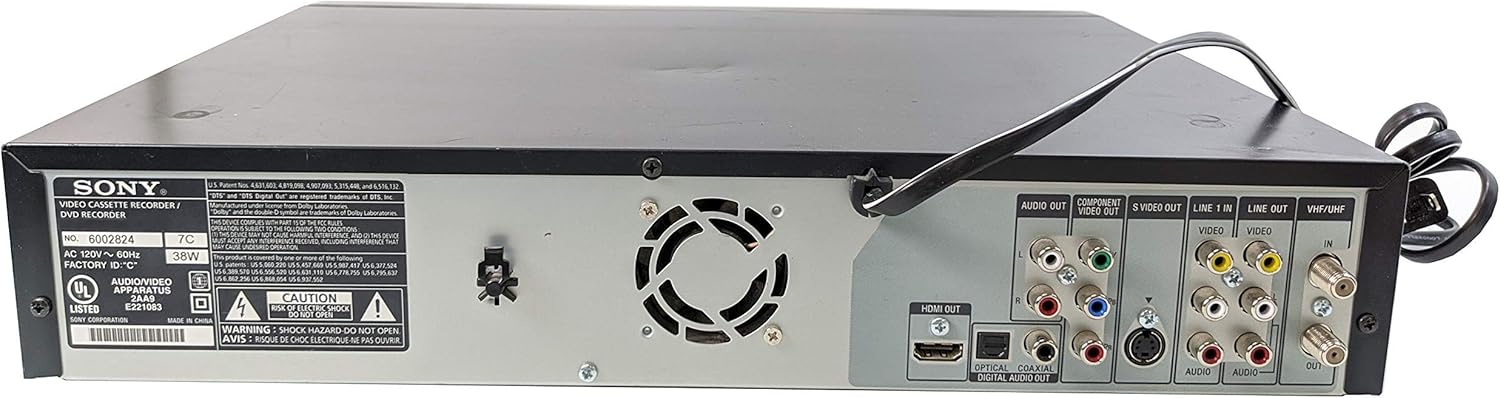
Figure 1.1: Sony VHS to DVD Recorder VCR Combo unit with included accessories. This image displays the main unit, a remote control, a user manual, various connection cables, and a stack of blank DVDs.
2. Safety Information
To ensure safe operation and prevent damage, please observe the following precautions:
- Power Source: Connect the unit only to the specified power supply.
- Ventilation: Do not block ventilation openings. Ensure adequate space around the unit for proper airflow.
- Moisture: Do not expose the unit to rain, moisture, or excessive humidity.
- Heat: Keep the unit away from heat sources such as radiators, heat registers, stoves, or other heat-producing appliances.
- Cleaning: Unplug the unit from the wall outlet before cleaning. Use a dry cloth for cleaning.
- Servicing: Do not attempt to service this product yourself. Refer all servicing to qualified service personnel.
- Placement: Place the unit on a stable, level surface to prevent it from falling.
3. Setup
3.1 Connecting the Device
Follow these steps to connect your Sony VHS to DVD Recorder VCR Combo to your television:
- Power Off: Ensure both the recorder combo unit and your television are powered off and unplugged from the wall outlet.
- HDMI Connection: For optimal video and audio quality, connect one end of the HDMI cable to the HDMI OUT port on the rear of the recorder combo unit and the other end to an available HDMI IN port on your television. Note the HDMI input number on your TV (e.g., HDMI 1, HDMI 2).
- AV (RCA) Connection (Alternative/Additional): If your TV does not have HDMI, or for connecting external devices, use the AV cables. Connect the yellow (video), white (left audio), and red (right audio) plugs to the corresponding AUDIO/VIDEO OUT ports on the recorder combo unit and to the AUDIO/VIDEO IN ports on your television.
- External Device Connection (for recording): To record from an external device (e.g., camcorder), connect its AV OUT ports to the AV IN ports on the front or rear of the recorder combo unit.
- Power On: Plug both the recorder combo unit and your television back into their respective wall outlets.

Figure 3.1: Rear panel connections of the Sony VHS to DVD Recorder VCR Combo. This image highlights the HDMI OUT, Component Video Out, S-Video Out, Audio Out, Video Out, and RF In/Out ports, along with power input.
3.2 Initial Power-On
After connecting the unit:
- Turn on your television and select the correct input source (e.g., HDMI 1, AV 1) that corresponds to your connection.
- Press the POWER button on the recorder combo unit or its remote control to turn it on.
- The unit's display should light up, and you should see the Sony logo or a setup screen on your TV.
4. Operating Instructions
4.1 Playing VHS Tapes
- Ensure the unit is powered on and your TV is set to the correct input.
- Insert a VHS tape into the VCR slot. The unit should automatically load the tape.
- Press the VCR button on the remote or front panel to select VCR mode.
- Press the PLAY button. The tape will begin to play on your television.
- Use the REW (Rewind), FFWD (Fast Forward), STOP, and PAUSE buttons for control.
- To eject the tape, press the EJECT button.
4.2 Playing DVDs
- Ensure the unit is powered on and your TV is set to the correct input.
- Press the OPEN/CLOSE button for the DVD tray.
- Place a DVD disc onto the tray with the label side facing up.
- Press the OPEN/CLOSE button again to close the tray. The unit will load the disc.
- Press the DVD button on the remote or front panel to select DVD mode.
- The DVD should begin playing automatically or display a menu. Use the navigation buttons (arrows, OK) and PLAY, STOP, PAUSE buttons for control.
- To eject the disc, press the OPEN/CLOSE button.
4.3 Recording VHS to DVD
This unit allows for one-touch recording from VHS to DVD.
- Insert the VHS tape you wish to copy into the VCR slot.
- Insert a blank, recordable DVD (e.g., DVD-R, DVD-RW) into the DVD tray.
- Press the VCR button to select VCR mode.
- Play the VHS tape to the point where you want to start recording.
- Press the RECORD button (often labeled 'REC') on the unit or remote. The unit will automatically switch to DVD recording mode and begin recording the VHS content onto the DVD.
- To stop recording, press the STOP button.
- Finalize the DVD if prompted by the unit to ensure it can be played on other DVD players. Refer to the on-screen menu for finalization options.
4.4 Recording External Sources to DVD
To record from an external device (e.g., camcorder, another VCR):
- Connect the external device's AV OUT ports to the AV IN ports on the front or rear of the recorder combo unit.
- Insert a blank, recordable DVD into the DVD tray.
- Select the appropriate input source on the recorder combo unit (e.g., Line 1, Line 2) using the INPUT SELECT or SOURCE button.
- Start playback on your external device.
- Press the RECORD button on the recorder combo unit or remote to begin recording.
- Press the STOP button to end recording.
- Finalize the DVD if prompted by the unit.
5. Maintenance
5.1 Cleaning
- Exterior: Wipe the exterior of the unit with a soft, dry cloth. Do not use liquid cleaners or aerosol cleaners.
- Disc Tray: Keep the disc tray clean and free of dust.
- VCR Head: If VHS playback quality deteriorates, a VCR head cleaner tape may be used. Follow the instructions provided with the cleaning tape.
5.2 Storage
- Store the unit in a cool, dry place away from direct sunlight and extreme temperatures.
- When not in use for extended periods, unplug the unit from the power outlet.
6. Troubleshooting
If you encounter issues, refer to the following table for common problems and solutions:
| Problem | Possible Cause | Solution |
|---|---|---|
| No power | Power cord unplugged; Power outlet not active | Check power connections; Test outlet with another device |
| No picture/sound on TV | Incorrect TV input selected; Loose AV/HDMI cables | Select correct TV input (e.g., HDMI 1, AV 1); Secure all cable connections |
| VHS tape won't play/eject | Tape jammed; Unit malfunction | Try gently pressing EJECT multiple times; Do not force the tape; Contact support if issue persists |
| DVD won't play/eject | Disc dirty/scratched; Incorrect disc type; Unit malfunction | Clean disc; Ensure disc is compatible (DVD-Video); Contact support if issue persists |
| Recording fails or is poor quality | Incorrect blank DVD type; Disc full; Source signal issue | Use compatible blank DVDs (e.g., DVD-R, DVD-RW); Use a new blank disc; Check source connections and signal quality |
7. Specifications
| Feature | Detail |
|---|---|
| Brand | Sony |
| Model Name | VHS to DVD Recorder VCR Combo |
| Media Type | DVD, VHS |
| Special Feature | Recording |
| Resolution | 1280x720 |
| Connector Type | HDMI |
| Connectivity Technology | HDMI |
| Color | Black |
| Audio Output Mode | Stereo |
| Item Weight | 12.38 pounds |
| Package Dimensions | 20 x 16.4 x 6.4 inches |
| Batteries | 2 AA batteries required (included for remote) |
8. Warranty and Support
This product is an Amazon Renewed item. Renewed products are professionally inspected and tested to work and look like new. If you are not satisfied with your purchase, renewed products are eligible for replacement or refund under the Amazon Renewed Guarantee.
- Return Policy: Eligible for refund or replacement within 90 days of receipt.
- For specific support or warranty claims, please contact Amazon Customer Service or the Amazon Renewed program directly.