1. Introduction
Thank you for choosing the Anlapus 8-Channel H.265+ 1080P DVR Video Recorder. This manual provides detailed instructions for setting up, operating, and maintaining your DVR system. Please read this manual thoroughly before use to ensure proper installation and functionality.
2. What's in the Box
Upon opening the package, please verify that all the following items are included:
- 1 x Anlapus 8-Channel 2MP DVR
- 1 x 12VDC 2A Power Adapter
- 1 x USB Mouse
- 1 x User Manual (this document)

Image: Included components of the Anlapus DVR system.
3. Product Overview
The Anlapus DVR is designed for reliable video surveillance recording. Familiarize yourself with the front and rear panels of the device.
3.1 Front and Rear Panels

Image: Front and rear panel layout of the Anlapus DVR.
3.2 Port Descriptions and Dimensions

Image: Detailed view of DVR ports and dimensions.
- Video Input (1-8): BNC connectors for connecting analog cameras (TVI, AHD, CVI, CVBS).
- Audio In/Out: RCA connectors for audio input from cameras (if supported) and audio output to a speaker/monitor.
- VGA/HDMI: Video output ports for connecting to a monitor or TV.
- Network: RJ45 port for connecting to your local network/router for remote access.
- USB 2.0: Ports for connecting the included mouse or a USB flash drive for backup.
- DC 12V: Power input port.
4. Setup
4.1 Hard Drive Installation (Optional)
The Anlapus DVR does not include a hard drive. A 2.5/3.5 inch SATA surveillance hard drive (up to 8TB) is required for video recording. PC hard drives are not recommended. Refer to the separate hard drive installation guide for detailed steps.
4.2 Connecting Cameras
The DVR supports 800-3000TVL, 720P-1080P AHD, CVI, and TVI cameras. Thanks to self-adaptive technology, connected cameras are automatically recognized.

Image: Camera compatibility and connection diagram.
- Connect your analog cameras to the BNC video input ports (1-8) on the rear panel of the DVR.
- Ensure cameras are powered on.
4.3 Connecting to a Monitor/TV
- Connect a monitor or TV to the DVR using either the VGA or HDMI port.
- Connect the included USB mouse to one of the USB ports on the DVR.
4.4 Network Connection
For remote viewing and network features, connect the DVR to your router using an Ethernet cable.
4.5 Powering On
- Connect the 12VDC 2A power adapter to the DC 12V input port on the DVR.
- Plug the power adapter into a power outlet. The DVR will power on automatically.
5. Operating the DVR
5.1 Recording Modes
The DVR supports various recording modes to suit your surveillance needs:
- Continuous Recording: Records 24/7.
- Scheduled Recording: Records during specific time periods.
- Motion Detection Recording: Records only when motion is detected, saving storage space.
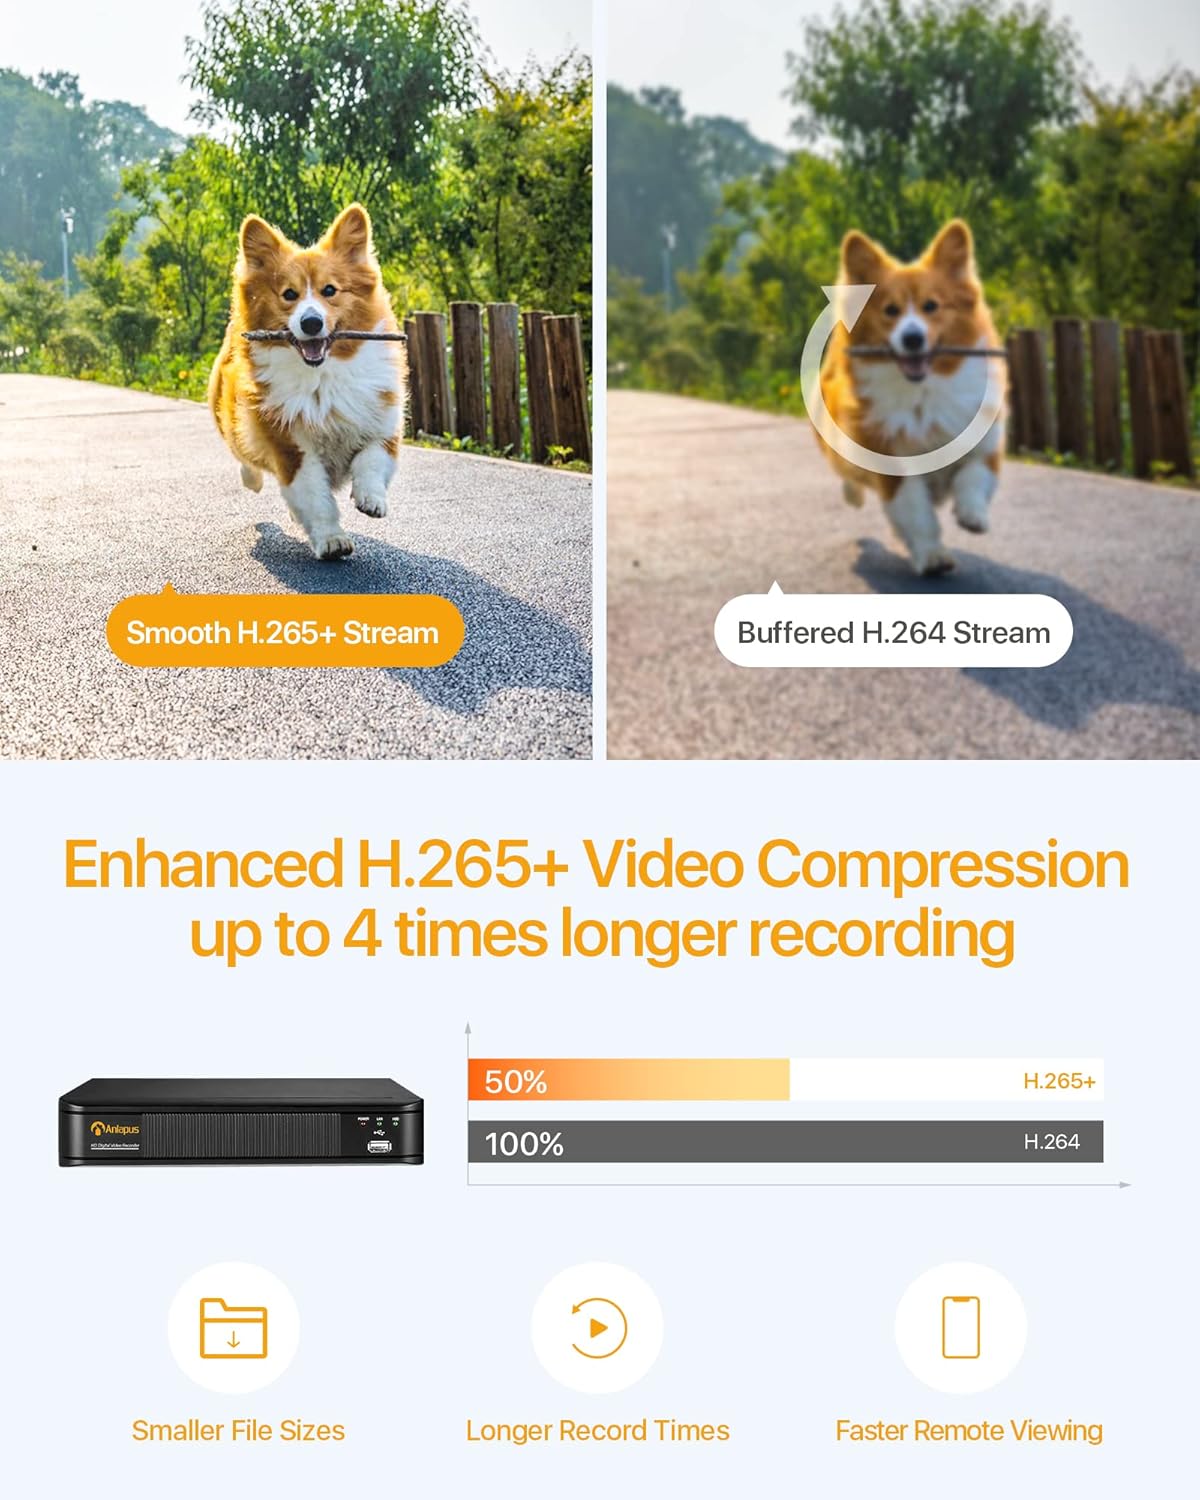
Image: Multiple recording modes supported by the DVR.
5.2 H.265+ Video Compression
The DVR utilizes advanced H.265+ video compression technology, which efficiently encodes video streams. This results in smaller file sizes, longer recording times, and faster remote viewing, optimizing your storage and bandwidth usage.

Image: Benefits of H.265+ video compression.
5.3 Remote Viewing and Alerts
Access your DVR and view live or recorded footage from anywhere using the free Anlapus Cloud App on your smartphone, tablet, laptop, or PC. The app also provides push notifications for motion-triggered events, keeping you informed.

Image: Customized motion detection and alerts via the app.

Image: Live view on multiple devices.
5.4 Playback
Review recorded footage directly from the DVR or remotely via the mobile application. The intuitive interface allows for easy navigation through timelines and events.

Image: Playback and remote viewing interface.
6. Maintenance
- Cleaning: Use a soft, dry cloth to clean the DVR's exterior. Do not use liquid or aerosol cleaners.
- Ventilation: Ensure the DVR is placed in a well-ventilated area to prevent overheating. Do not block ventilation openings.
- Firmware Updates: Periodically check the Anlapus official website for any available firmware updates to ensure optimal performance and security.
- Data Backup: Regularly back up important video footage to an external USB drive or cloud storage.
7. Troubleshooting
| Problem | Possible Cause | Solution |
|---|---|---|
| No video output on monitor | Loose cable connection; Incorrect input source on monitor; DVR not powered on. | Check VGA/HDMI cable connections; Select correct input source on monitor; Verify DVR power indicator is on. |
| No recording | No hard drive installed or detected; Hard drive full; Incorrect recording schedule. | Install a compatible hard drive; Format/delete old recordings; Check recording settings and schedule. |
| Cannot access DVR remotely | No network connection; Incorrect network settings; Firewall blocking access. | Check Ethernet cable connection; Verify network settings (IP address, gateway); Configure router firewall/port forwarding if necessary. |
| Poor image quality | Camera resolution mismatch; Dirty camera lens; Poor lighting. | Ensure cameras are 1080P compatible; Clean camera lenses; Improve lighting conditions. |
8. Specifications
| Feature | Specification |
|---|---|
| Model Number | 6973225210377 |
| Video Compression | H.265+ |
| Video Input | 8 Channels |
| Video Resolution | Up to 1080P (2.0MP) at 15fps |
| Compatible Cameras | 800-3000TVL, 720P-1080P AHD, CVI, TVI (Analog) |
| Hard Drive Support | 1x SATA Port, up to 8TB (Hard drive not included) |
| Video Output | VGA, HDMI |
| Audio Input/Output | RCA Ports |
| Network Interface | RJ45 Ethernet |
| USB Interface | 2 x USB 2.0 |
| Power Supply | DC 12V |
| Dimensions (L x W x H) | Approx. 230mm x 250mm x 43mm |
| Weight | 1.35 Kilograms |
9. Warranty and Support
Anlapus products are designed for reliability and performance. For warranty information, technical support, or any inquiries, please refer to the contact details provided in your product packaging or visit the official Anlapus website. Please retain your purchase receipt for warranty claims.


