Introduction
This manual provides detailed instructions for the installation, operation, maintenance, and troubleshooting of your RBROHANT Matte Black Wall Mount Bathroom Faucet. Please read this manual thoroughly before installation and retain it for future reference. Proper installation and care will ensure optimal performance and longevity of your faucet.
Safety Information
- Always turn off the main water supply before beginning any installation or repair work.
- Wear appropriate personal protective equipment, such as safety glasses and gloves, during installation.
- If you are unsure about any part of the installation process, consult a qualified plumber.
- Ensure all connections are secure and leak-free before restoring water supply.
- Do not use abrasive cleaners or harsh chemicals on the faucet finish, as this may damage the surface.
Package Contents
Verify that all components are present before beginning installation:
- Faucet Spout (1)
- Lever Handles (2)
- Rough-in Valve (1)
- Installation Manual (1)
- Mounting Hardware (Screws, Anchors, etc.)
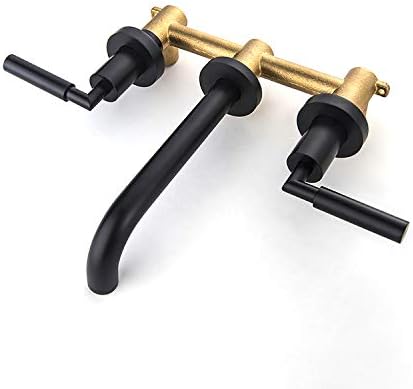
Image: The rough-in valve and internal components, essential for the wall-mounted installation.
Specifications
| Feature | Specification |
|---|---|
| Brand | RBROHANT |
| Mounting Type | Wall Mount |
| Finish Type | Matte Black |
| Material | Brass (Body), Zinc (Handles) |
| Number of Handles | 2 |
| Hole Count | 3 |
| Maximum Flow Rate | 1.5 Gallons Per Minute (GPM) |
| Spout Reach | 6.69 Inches |
| Product Dimensions | 17.3 x 9.8 x 3 inches |
| Item Weight | 4.16 pounds |

Image: A technical drawing illustrating the key dimensions of the faucet for accurate installation planning.
Setup and Installation
Follow these steps for proper installation of your wall-mounted faucet:
- Prepare the Wall: Ensure the wall where the faucet will be mounted is structurally sound and has adequate blocking for support. Mark the desired locations for the spout and handles, ensuring they are level and properly spaced according to the rough-in valve dimensions.
- Install the Rough-in Valve: Secure the rough-in valve within the wall cavity. Connect the hot and cold water supply lines to the designated inlets on the valve. Ensure all connections are tight and sealed to prevent leaks. The rough-in valve must be installed flush with the finished wall surface.
- Connect the Spout and Handles: Once the wall is finished, connect the faucet spout and handle assemblies to the rough-in valve outlets. The spout typically connects to the central outlet, and the handles to the side outlets.
- Secure Faceplates: Install the decorative faceplates or escutcheons over the rough-in valve connections, ensuring they sit flush against the finished wall.
- Test for Leaks: Slowly turn on the main water supply. Check all connections for any signs of leaks. If leaks are detected, turn off the water supply and tighten the connections as needed.
- Verify Operation: Test the hot and cold water flow and the functionality of both lever handles.

Image: The RBROHANT wall mount faucet elegantly installed, demonstrating its functional appearance with water flowing into a sink.
Operating Instructions
Your RBROHANT Matte Black Wall Mount Bathroom Faucet features dual lever handles for precise control of water temperature and flow.
- Turning On/Off: Rotate either lever handle away from the wall to turn on the water. Rotate towards the wall to turn off the water.
- Adjusting Water Temperature: The left handle controls hot water, and the right handle controls cold water. Adjust the desired temperature by mixing hot and cold water using both handles.
- Adjusting Water Flow: The further you rotate the handles, the greater the water flow.

Image: A clear view of the faucet's design, highlighting the spout and the two lever handles for water control.
Maintenance
To maintain the matte black finish and ensure the longevity of your faucet, follow these cleaning and care guidelines:
- Regular Cleaning: Clean the faucet regularly with a soft, damp cloth and mild soap. Rinse thoroughly with clean water and dry with a soft cloth to prevent water spots.
- Avoid Harsh Cleaners: Do not use abrasive cleaners, scouring pads, ammonia-based cleaners, bleach, or other harsh chemicals, as these can damage the finish and internal components.
- Aerator Maintenance: If water flow decreases, the aerator may be clogged. Unscrew the aerator from the end of the spout, clean any debris, and rinse it before reattaching.
- Handle Tightness: If handles become loose over time, gently tighten the set screws located at the base of each handle.
Troubleshooting
Refer to the table below for common issues and their solutions:
| Problem | Possible Cause | Solution |
|---|---|---|
| Low Water Flow | Clogged aerator; partially closed shut-off valves; debris in supply lines. | Clean or replace aerator; ensure shut-off valves are fully open; flush supply lines. |
| Leaks from Spout | Worn cartridge; debris in cartridge. | Replace or clean the ceramic disc cartridge. |
| Leaks from Handle Base | Loose packing nut; worn O-rings. | Tighten packing nut; replace O-rings. |
| Water Temperature Issues | Incorrect hot/cold supply connections; water heater issues. | Verify supply line connections; check water heater settings. |
Warranty and Support
RBROHANT offers a lifetime warranty for this product. This warranty covers defects in material and workmanship under normal use. In the event of any issues with installation or usage, RBROHANT provides lifetime after-sale service.
For free replacements of any part or further assistance, please contact RBROHANT customer support. We adhere to Amazon's Return Policy and are committed to providing excellent service.
Contact Information: Please refer to your purchase documentation or the RBROHANT brand store on Amazon for the most current contact details.
Note: Always protect the finish carefully when installing or performing maintenance on the faucet fixtures.


