
FLAMMA FS01
FLAMMA FS01 Drum Machine & Phrase Loop Pedal Instruction Manual
Model: FS01 | Brand: FLAMMA
1. Introduction
The FLAMMA FS01 is a versatile drum machine and phrase loop pedal designed for musicians. It combines a high-capacity looper with a comprehensive drum machine, offering a wide range of rhythmic possibilities for practice, performance, and creative exploration. With its intuitive controls and multiple operation modes, the FS01 provides a powerful tool for guitarists and other instrumentalists.

Figure 1: FLAMMA FS01 Drum Machine & Phrase Loop Pedal
2. Safety Information
- Power Supply: Use only a 9V DC power supply with a minimum of 305mA, center negative. Incorrect voltage or polarity may damage the unit.
- Environment: Do not expose the unit to rain, moisture, direct sunlight, or extreme temperatures. Avoid placing it near heat sources.
- Handling: Do not drop or subject the unit to strong impacts. Do not attempt to disassemble or repair the unit yourself. Refer all servicing to qualified personnel.
- Cleaning: Clean only with a dry, soft cloth. Do not use liquid cleaners.
3. Package Contents
Please check the package contents upon opening to ensure all items are present:
- FLAMMA FS01 Drum Machine & Phrase Loop Pedal
- User Manual
Note: Power supply is not included and must be purchased separately.
4. Controls and Features
The FS01 features a straightforward layout for easy operation. Familiarize yourself with the following controls:
4.1. Top Panel Controls
- LOOPER Knob: Adjusts the playback volume level of the recorded loop.
- DRUM Knob: Adjusts the volume level of the drum machine.
- GENRE Knob: Selects one of the 11 drum rhythm styles.
- PATTERN Knob: Selects one of the 11 drum patterns within the chosen genre.
- TAP Button: Used for tap tempo input for the drum machine.
- Mode Toggle Switch: Selects the operation mode:
- Looper: Only the looper function is active.
- Drum: Only the drum machine is active.
- L+D (Mix Mode): Both looper and drum machine are active simultaneously.
- LOOPER LENGTH Indicator: A visible bar with blue LEDs that indicates the current length of the recorded loop.

Figure 2: FS01 Mode Toggle Switch and Looper Length Indicator
4.2. Footswitch Control
The single footswitch controls various functions depending on the current mode and state:
- Single Press: Starts/stops recording, playback, or overdubbing.
- Double Press: Stops playback.
- Press and Hold: Undoes/Redoes the last recorded layer.

Figure 3: Footswitch Control Functions
5. Setup
Follow these steps for initial setup:
- Power Connection: Connect a 9V DC power adapter (center negative, 305mA minimum) to the DC IN jack on the pedal.
- Instrument Connection: Connect your instrument (e.g., guitar) to the INPUT-L (Mono) jack using a standard 1/4-inch instrument cable. If using a stereo setup, connect the right channel to INPUT-R.
- Amplifier/Mixer Connection: Connect the OUTPUT-L (Mono) jack to your amplifier or mixer. For stereo output, connect both OUTPUT-L and OUTPUT-R.
- Power On: The pedal will power on automatically once connected to a power supply.
6. Operating Modes
The FS01 offers three distinct operation modes, selectable via the toggle switch:
6.1. Looper Mode
In Looper mode, only the looping functionality is active. The drum machine is disabled.
- Recording: Press the footswitch once to start recording. The LOOPER LENGTH indicator will light up as you record.
- Playback: Press the footswitch again to stop recording and immediately start playback of your loop.
- Overdubbing: During playback, press the footswitch once to start overdubbing. Press again to stop overdubbing and continue playback.
- Undo/Redo: Press and hold the footswitch to undo the last recorded layer. Press and hold again to redo it.
- Stop: Double-press the footswitch to stop playback.
- Clear Loop: While stopped, press and hold the footswitch to clear the current loop.
6.2. Drum Machine Mode
In Drum Machine mode, only the drum machine is active. The looper functionality is disabled.
- Select Genre: Use the GENRE knob to choose from 11 different rhythm styles.
- Select Pattern: Use the PATTERN knob to select one of the 11 drum patterns within the chosen genre.
- Start/Stop Drums: Press the footswitch once to start or stop the drum pattern.
- Tap Tempo: Press the TAP button repeatedly to set the tempo of the drum machine.
6.3. Mix Mode (Looper + Drum)
In Mix mode, both the looper and drum machine are active simultaneously, allowing for synchronized performance.
- Synchronized Operation: The looper will automatically synchronize with the drum machine's tempo.
- Independent Volume Control: Use the LOOPER knob to adjust loop volume and the DRUM knob to adjust drum volume independently.
- Looping Functions: All looper functions (record, play, overdub, undo/redo, stop, clear) operate as described in Looper Mode, but synchronized with the drum tempo.
- Drum Functions: Drum genre, pattern, and tap tempo functions operate as described in Drum Machine Mode.

Figure 4: Looper and Drum Machine working together in Mix Mode
7. Rhythm Styles and Drum Grooves
The FS01 features 11 different rhythm styles (genres), each containing 11 unique drum patterns, totaling 121 drum grooves. The table below outlines the styles, common rhythms, and typical BPM ranges.
| Style | Rhythm | BPM |
|---|---|---|
| Pop | 4/4;4/6;4/8 | 90;100;110;120;130 |
| Funk | 4/4;3/4;6/8 | 90;100;110;120;130 |
| Blues | 4/4;6/8 | 90;120;130;150;170 |
| Rock | 4/4;6/8 | 120;130;140;150;160 |
| Metal | 4/4;6/8 | 120;140;150;160;170;180;190 |
| Jazz | 4/4;6/8 | 90;130;140;150;160;170;180;190 |
| Fusion | 4/4;3/4;5/4;7/8;9/8;11/8 | 70;110;120;130;140;150 |
| Punk | 4/4;3/4;6/8 | 100;110;140;160;170;180;190;210 |
| Latin | 4/4 | 90;100;110;120;140 |
| Hip Hop | 4/4 | 70;80;90;100 |
| Disco | 4/4 | 100;110;120;130;140;150 |
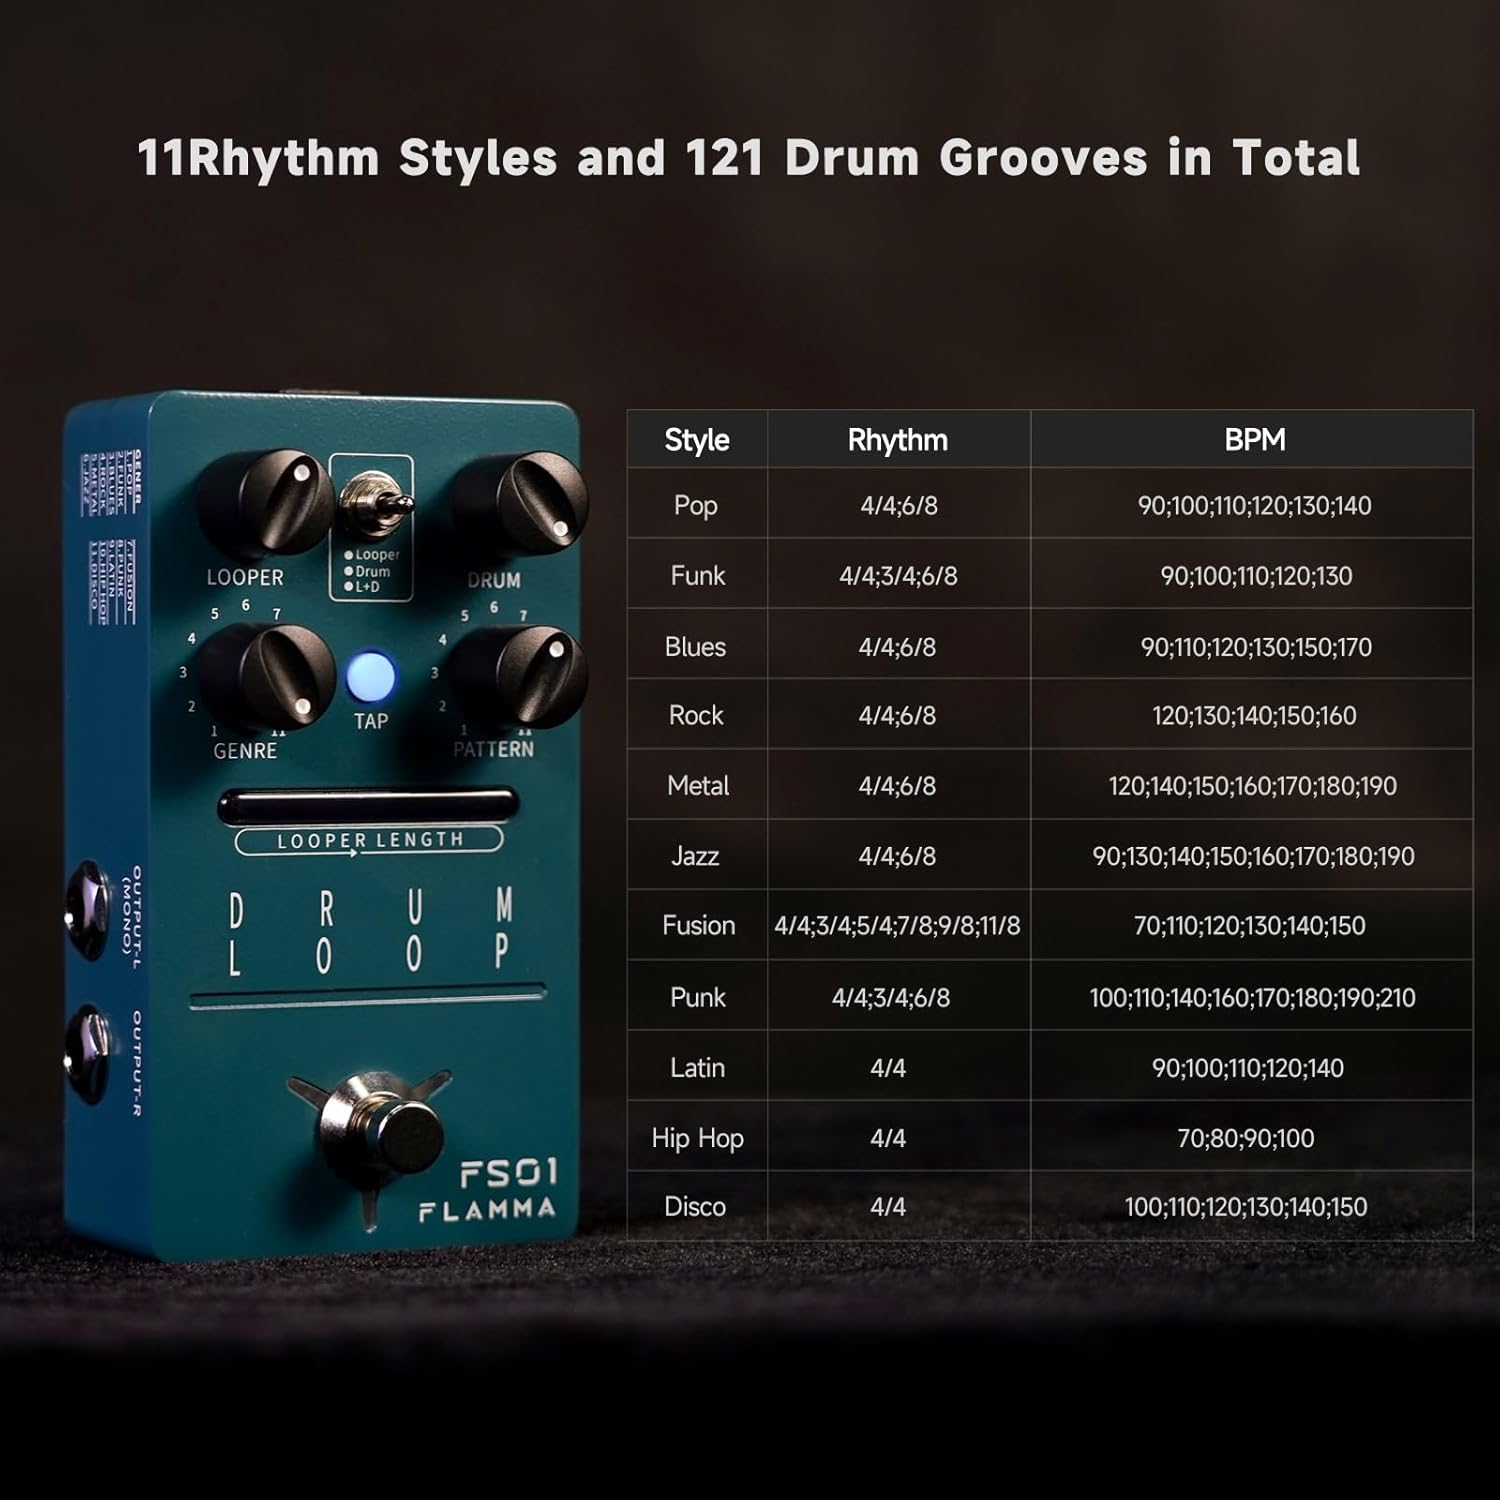
Figure 5: Overview of Drum Rhythm Styles and BPM Ranges
8. Maintenance
To ensure the longevity and optimal performance of your FLAMMA FS01 pedal, follow these maintenance guidelines:
- Cleaning: Use a soft, dry cloth to wipe down the pedal's exterior. Avoid abrasive cleaners or solvents that could damage the finish or internal components.
- Storage: When not in use for extended periods, store the pedal in a cool, dry place away from direct sunlight and extreme temperatures. Disconnect the power supply.
- Connections: Periodically check all cable connections for wear and tear. Ensure jacks are free of dust and debris.
9. Troubleshooting
If you encounter issues with your FS01 pedal, refer to the following common problems and solutions:
- No Power:
- Ensure the 9V DC power adapter is correctly connected and providing sufficient current (minimum 305mA).
- Verify the power outlet is functional.
- No Sound Output:
- Check all instrument and amplifier cable connections.
- Ensure the LOOPER and DRUM knobs are not set to minimum volume.
- Verify the correct mode is selected (Looper, Drum, or L+D).
- Test with different cables and instruments to rule out external issues.
- Looping Issues (e.g., not recording, poor quality):
- Ensure the pedal is in Looper or L+D mode.
- Check input signal level; adjust your instrument's volume if too low or too high.
- Verify sufficient loop capacity is available (up to 20 minutes).
- Drum Machine Not Playing:
- Ensure the pedal is in Drum or L+D mode.
- Check the DRUM knob volume.
- Verify a genre and pattern are selected.
If the problem persists after attempting these solutions, please contact FLAMMA customer support for further assistance.
10. Specifications
- Model: FS01
- Dimensions: 4.92"L x 3.41"W x 2.36"H (12.5 cm x 8.66 cm x 5.99 cm)
- Weight: 12.5 ounces (354.37 grams)
- Looper Capacity: 20 minutes
- Drum Rhythms: 11 Genres, 11 Patterns per genre (121 total)
- Power Requirement: 9V DC, 305mA (center negative)
- Material: Metal
- Input/Output: 1/4-inch Audio (Mono/Stereo)
11. Warranty and Support
FLAMMA products are designed for reliability and performance. This product is covered by a limited warranty against defects in materials and workmanship. For detailed warranty information, product support, or service inquiries, please refer to the official FLAMMA website or contact your local distributor.
Please retain your proof of purchase for warranty claims.
Related documentsFS01


Ask a question about this manual
Ask about setup, troubleshooting, compatibility, parts, safety, or missing instructions. Manuals+ will review the question and use this page’s manual context to help answer it.