
1. Introduction and Overview
The Starfrit Electric Bread Maker is designed to simplify the process of baking fresh bread at home. This appliance allows for the creation of 1.5lb or 2lb loaves and features 13 pre-programmed options, including settings for white, quick, French, whole wheat, and gluten-free breads. It includes a user-friendly LCD display, a 13-hour delay bake timer, adjustable crust settings, and an automatic nut and fruit dispenser. The removable non-stick baking pan facilitates easy cleanup.

Image: The Starfrit Electric Bread Maker, showcasing its sleek silver design, alongside a freshly baked and sliced loaf of bread with butter curls, and a small pile of nuts and dried fruit.
2. Important Safety Instructions
- Read all instructions before using the appliance.
- Do not touch hot surfaces. Use handles or knobs.
- To protect against electric shock, do not immerse cord, plugs, or appliance in water or other liquid.
- Close supervision is necessary when any appliance is used by or near children.
- Unplug from outlet when not in use and before cleaning. Allow to cool before putting on or taking off parts.
- Do not operate any appliance with a damaged cord or plug or after the appliance malfunctions or has been damaged in any manner.
- The use of accessory attachments not recommended by the appliance manufacturer may cause injuries.
- Do not use outdoors.
- Do not let cord hang over edge of table or counter or touch hot surfaces.
- Do not place on or near a hot gas or electric burner, or in a heated oven.
- Extreme caution must be used when moving an appliance containing hot oil or other hot liquids.
- Do not use appliance for other than intended use.
- The baking pan and kneading blade are designed for hand washing only.
3. Product Components
Familiarize yourself with the components of your Starfrit Electric Bread Maker:

Image: An exploded view diagram of the Starfrit Electric Bread Maker, labeling its various parts including the main unit, non-stick removable baking pan, measuring cup, measuring spoon, hook for kneading blade removal, and the removable single mixing blade.
- Main Unit: The primary housing of the bread maker, featuring the control panel, LCD display, viewing window, and automatic nut/fruit dispenser.
- Non-Stick Removable Baking Pan: The container where ingredients are mixed and baked. It has a non-stick coating for easy bread removal and cleaning.
- Removable Single Mixing Blade: A blade located at the bottom of the baking pan that kneads the dough.
- Automatic Nut & Fruit Dispenser: A compartment on top of the lid that automatically dispenses ingredients like nuts or fruits into the dough at the appropriate time during the baking cycle.
- Measuring Cup: Used for accurate measurement of liquid ingredients.
- Measuring Spoon: Used for accurate measurement of smaller ingredients like yeast, salt, or sugar.
- Hook for Kneading Blade Removal: A tool to safely remove the kneading blade from the baked bread.
4. Setup
- Unpacking: Carefully remove the bread maker and all accessories from the packaging.
- Initial Cleaning: Before first use, wash the baking pan, kneading blade, measuring cup, and measuring spoon with warm, soapy water. Rinse thoroughly and dry all parts completely. Wipe the exterior of the bread maker with a damp cloth.
- Placement: Place the bread maker on a stable, flat, heat-resistant surface, away from direct sunlight and heat sources. Ensure adequate ventilation around the appliance.
- Insert Baking Pan: Place the non-stick baking pan into the bread maker cavity. Press down firmly until it clicks into place.
- Attach Kneading Blade: Securely attach the kneading blade onto the shaft inside the baking pan.
5. Operating Instructions
Basic Operation
- Add ingredients to the baking pan in the order specified by your recipe (typically liquids first, then dry ingredients, with yeast last).
- Close the lid.
- Plug the bread maker into a grounded electrical outlet.
- Select your desired program using the 'MENU' button.
- Choose the loaf size (1.5lb or 2lb) and crust setting (Light, Medium, Dark) if applicable for the selected program.
- Press the 'START/STOP' button to begin the baking cycle.
Preset Programs
The Starfrit Electric Bread Maker offers 13 pre-programmed options to cater to various bread types and baking needs:

Image: A visual representation of the 13 preset programs available on the bread maker, including White, French, Whole Wheat, Gluten Free, Cake, Quick, Ultra-Fast, Dough, Bake, Sandwich, Jam, Knead, and Customize.
- White
- French
- Whole Wheat
- Gluten Free
- Cake
- Quick
- Ultra-Fast
- Dough
- Bake
- Sandwich
- Jam
- Knead
- Customize

Image: A circular icon with a crossed-out wheat stalk, indicating a gluten-free setting.
Loaf Size and Crust Control
You can select between 1.5lb and 2lb loaf sizes and choose from Light, Medium, or Dark crust settings to achieve your preferred bread texture and color.

Image: Two images side-by-side. The top image shows a single loaf of bread with a gradient from light to dark crust, illustrating the three adjustable crust settings. The bottom image shows two loaves of bread, one smaller (1.5lb) and one larger (2lb), demonstrating the adjustable loaf sizes.
Delay Timer and Keep Warm Function
The 13-hour delay bake timer allows you to program the bread maker to start baking at a later time, ensuring fresh bread when you need it. After baking, the bread maker automatically enters a 60-minute keep warm cycle.
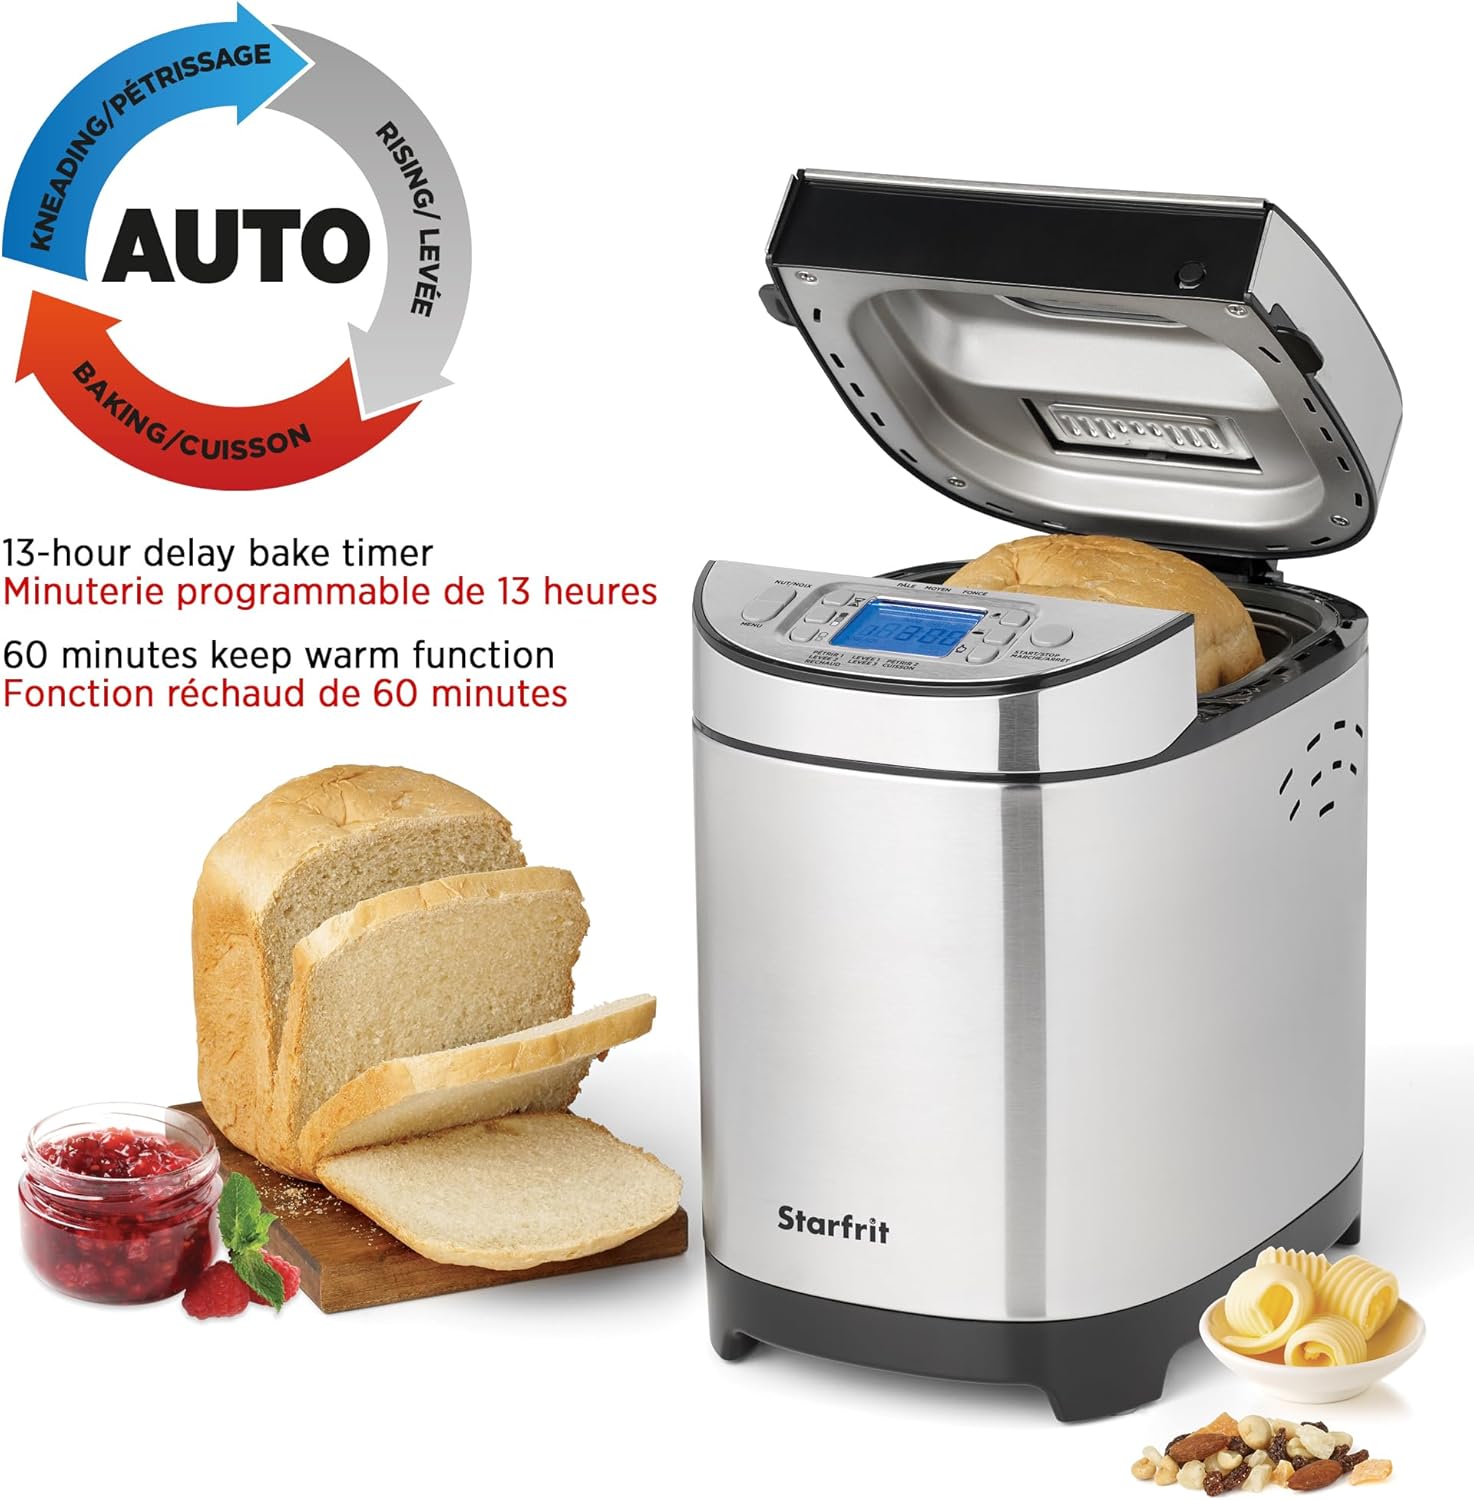
Image: The Starfrit Electric Bread Maker with its lid open, showing a baked loaf inside. Text overlays highlight the 13-hour delay bake timer and 60-minute keep warm function, along with an 'AUTO' cycle diagram showing kneading, rising, and baking phases.
Automatic Nut & Fruit Dispenser
The integrated dispenser automatically adds nuts, fruits, or other mix-ins to your dough at the optimal time during the kneading cycle, ensuring even distribution without manual intervention.

Image: A close-up view of the automatic nut and fruit dispenser on top of the bread maker, with a scoop pouring mixed nuts and dried fruits into it.
Viewing Window and LCD Display
Monitor the baking process through the large viewing window on the lid. The LCD display provides clear information on the selected program, time remaining, and other settings.

Image: A detailed close-up of the bread maker's control panel, showing the digital LCD display with a time of 3:00 and various program options listed on the panel.
6. Maintenance and Cleaning
Proper cleaning and maintenance will extend the life of your bread maker.
- Baking Pan and Kneading Blade: The removable non-stick baking pan and single kneading blade are designed for effortless cleanup. Wash them by hand with warm, soapy water. Do not use abrasive cleaners or scouring pads, as this can damage the non-stick coating. Rinse thoroughly and dry completely before storing.
- Exterior: Wipe the exterior of the bread maker with a soft, damp cloth. Do not immerse the main unit in water or any other liquid.
- Viewing Window: Clean the viewing window with a soft, damp cloth.
- Automatic Dispenser: Clean the automatic nut and fruit dispenser after each use to prevent residue buildup.

Image: The removable non-stick baking pan of the Starfrit Electric Bread Maker, shown with a freshly baked loaf of bread inside, emphasizing its ease of removal for cleaning.
7. Troubleshooting
If you encounter issues with your bread maker, refer to the following common problems and potential solutions:
- Bread does not rise:
- Check yeast expiration date.
- Ensure water temperature is correct (not too hot or cold).
- Verify correct ingredient measurements.
- Ensure yeast is added last and not in direct contact with liquids or salt initially.
- Bread is too dense/heavy:
- Too much flour or not enough liquid.
- Yeast may be inactive.
- Incorrect program selected.
- Crust is too dark/light:
- Adjust the crust setting (Light, Medium, Dark) for your next bake.
- Bread sticks to the pan:
- Ensure the non-stick coating is not damaged.
- Allow bread to cool in the pan for a few minutes after baking before attempting to remove.
- Machine beeps continuously or displays an error code:
- Unplug the unit, wait 10-15 minutes, then plug it back in and try again.
- Refer to the full product manual for specific error code meanings if available.
8. Specifications
| Feature | Specification |
|---|---|
| Model Number | 024707-001-0000 |
| Color | Silver |
| Product Dimensions (D x W x H) | 9.06"D x 13.07"W x 11.46"H (23cm D x 33.2cm W x 29.1cm H) |
| Wattage | 550W |
| Number of Programs | 13 |
| Item Weight | 8.68 pounds |
| UPC | 069858247074 |
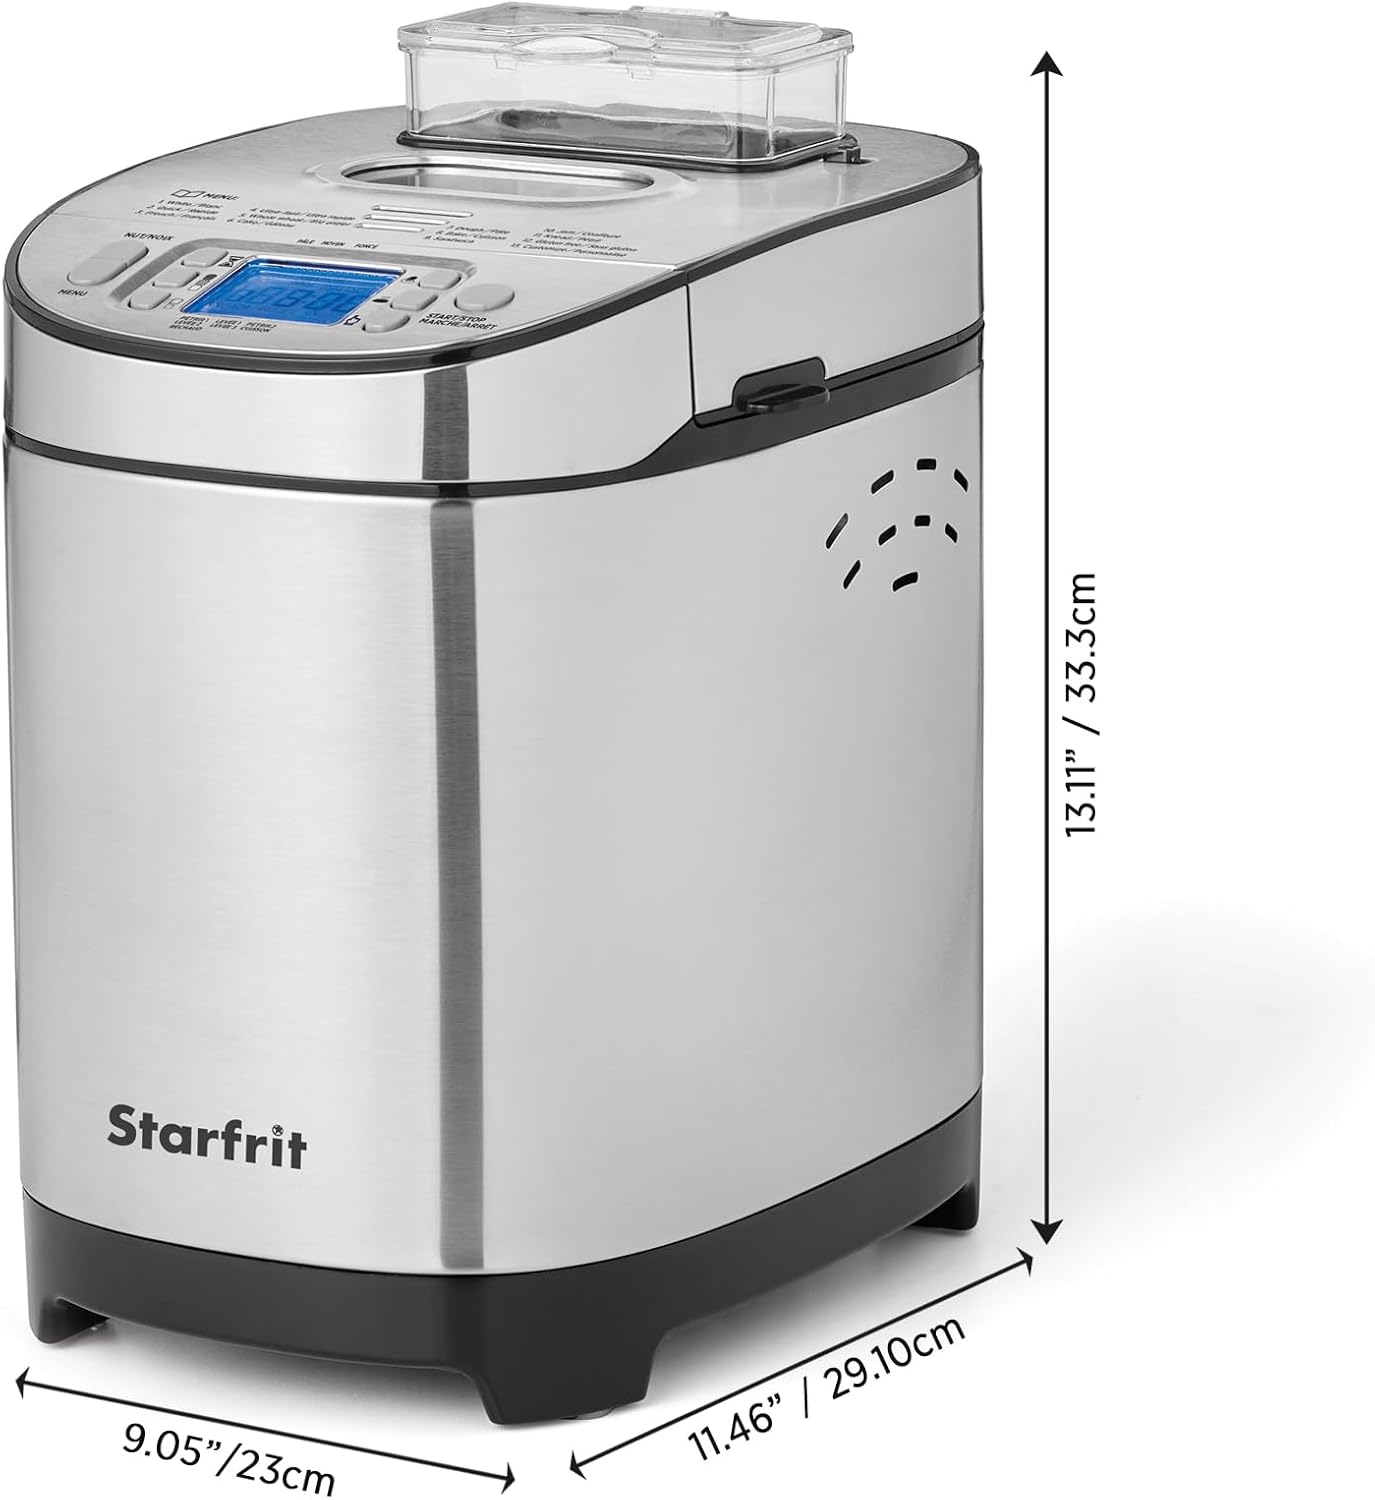
Image: A side view of the Starfrit Electric Bread Maker with its dimensions clearly marked: 9.05 inches (23cm) deep, 11.46 inches (29.10cm) wide, and 13.11 inches (33.3cm) high.
9. Warranty and Support
For information regarding the product warranty, please refer to the warranty card included with your purchase or visit the official Starfrit website. For technical support or service inquiries, please contact Starfrit customer service through the contact information provided in your product packaging or on their official website.

