1. Introduction
The Mr. Coffee Iced Coffee Maker simplifies the process of creating refreshing iced coffee at home. This single-serve machine utilizes a precise measuring system to ensure a bold, flavorful coffee concentrate that is not diluted when brewed over ice. Designed for convenience, it supports a pod-free brewing method, reducing waste. Enjoy customized iced coffee quickly and efficiently.
2. Important Safety Information
Please read all instructions before operating this appliance. Failure to follow these instructions may result in product damage, personal injury, or electric shock.
- Always ensure the appliance is unplugged before cleaning or when not in use.
- Do not immerse the appliance, cord, or plug in water or other liquids.
- Keep the appliance out of reach of children.
- Do not operate any appliance with a damaged cord or plug, or after the appliance malfunctions or has been damaged in any manner.
- Use only cold, fresh water in the water reservoir.
- Do not open the brew basket lid during the brewing cycle. Hot water and steam may escape.
- Always place the tumbler or a suitable mug on the drip tray before brewing.
- Avoid contact with moving parts.
3. What's Included
Your Mr. Coffee Iced Coffee Maker package includes the following components:
- Iced coffee brewer
- Coffee scoop
- Reusable filter
- Reusable BPA-free Tritan™ tumbler with lid and straw

Image: All components of the Mr. Coffee Iced Coffee Maker are displayed, including the main brewer unit, a clear reusable tumbler with lid and straw, a white coffee scoop, and a black reusable coffee filter.
4. Setup
4.1 Initial Cleaning
Before first use, wash the reusable filter, coffee scoop, tumbler, lid, and straw in warm, soapy water. Rinse thoroughly and dry. Wipe the exterior of the brewer with a soft, damp cloth.
4.2 Placement
Place the coffee maker on a flat, stable, heat-resistant surface. Ensure there is adequate clearance above the unit for opening the lid.
4.3 Power Connection
Plug the power cord into a standard electrical outlet. The appliance is now ready for use.
5. Operation
5.1 Making Iced Coffee
- Fill Tumbler with Ice: Fill the reusable tumbler with ice cubes up to the "ICE" line indicated on the tumbler.
- Measure Water: Fill the tumbler with cold water up to the "WATER" line.
- Add Water to Reservoir: Open the lid of the coffee maker and pour the measured water from the tumbler into the water reservoir.
- Add Coffee Grounds: Place the reusable filter into the brew basket. Use the included coffee scoop to add your desired amount of ground coffee into the filter. The scoop has markings for different strengths.
- Place Tumbler: Place the ice-filled tumbler directly onto the drip tray.
- Start Brewing: Close the lid securely. Press the "OVER ICE" button to begin the brewing cycle. The indicator light will illuminate.
- Customize and Enjoy: Once brewing is complete (approximately 3-4 minutes), the machine will automatically shut off. Remove the tumbler, add your preferred flavorings, milk, or sweeteners, and stir.
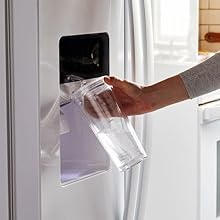
Image: A hand pours water from the reusable tumbler into the water reservoir of the Mr. Coffee Iced Coffee Maker.

Image: A hand uses the provided scoop to add coffee grounds into the reusable filter within the Mr. Coffee Iced Coffee Maker's brew basket.

Image: The clear reusable tumbler, filled with ice, is positioned on the drip tray beneath the coffee maker's dispenser.

Image: A hand pours milk into the tumbler of freshly brewed iced coffee, ready for customization.
5.2 Making Hot Coffee
- Measure Water: Fill your desired coffee mug with cold water.
- Add Water to Reservoir: Open the lid of the coffee maker and pour the measured water from the mug into the water reservoir.
- Add Coffee Grounds: Place the reusable filter into the brew basket. Use the included coffee scoop to add your desired amount of ground coffee into the filter.
- Place Mug: Place your empty coffee mug directly onto the drip tray.
- Start Brewing: Close the lid securely. Press the "HOT BREW" button to begin the brewing cycle. The indicator light will illuminate.
- Enjoy: Once brewing is complete, the machine will automatically shut off. Carefully remove your hot coffee.
6. Maintenance
Regular cleaning ensures optimal performance and longevity of your Mr. Coffee Iced Coffee Maker.
- Removable Parts: The reusable filter, coffee scoop, tumbler, lid, and straw are top-rack dishwasher safe or can be hand-washed with warm, soapy water.
- Brewer Exterior: Wipe the exterior of the brewer with a soft, damp cloth. Do not use abrasive cleaners or scouring pads.
- Water Reservoir: The water reservoir can be wiped clean with a damp cloth. Do not immerse the brewer in water.
- Descaling: Over time, mineral deposits can build up in your coffee maker. To descale, fill the water reservoir with 1 part white vinegar and 2 parts water. Place an empty mug on the drip tray and run a brew cycle. Repeat with fresh water until the vinegar smell is gone.
7. Troubleshooting
| Problem | Possible Cause | Solution |
|---|---|---|
| Coffee not brewing. | No water in reservoir; Lid not closed properly; Power not connected. | Ensure water reservoir is filled; Close lid securely; Check power cord connection. |
| Weak coffee. | Insufficient coffee grounds; Too much water. | Use more coffee grounds; Ensure water is measured correctly using the tumbler lines. |
| Coffee overflows. | Mug/tumbler too small; Too much water. | Use a larger mug/tumbler; Ensure water is measured correctly. |
8. Specifications
- Brand: Mr. Coffee
- Model Name: Mr. Coffee Iced Coffee Maker
- Model Number: BVMC-ICMBL-AM
- Color: Black
- Product Dimensions: 11.4"D x 7.3"W x 14.5"H
- Item Weight: 3.74 pounds
- Power Source: AC adapter
- Coffee Input Type: Ground Coffee
- Special Feature: Programmable
- Operation Mode: Fully Automatic
- UPC: 053891147118
9. Warranty & Support
For warranty information or product support, please refer to the documentation included with your purchase or visit the official Mr. Coffee website. Keep your proof of purchase for any warranty claims.


