
Introduction
The RecPro RV Water Management Panel Nautilus P1 serves as a central control hub for various functions within your RV's water system. This panel is designed to simplify water management tasks, offering multiple operational modes for convenience and efficiency. Please read this manual thoroughly before installation and operation to ensure proper usage and longevity of the product.

Figure 1: Front view of the RecPro RV Water Management Panel Nautilus P1. This image displays the various ports, valves, and the operational diagram on the panel face.
Specifications
- Manufacturer: RecPro
- Brand: RecPro
- Model: RP-1172-P1
- Cutout Size: 10 inches (width) x 15 inches (height)
- Overall Dimensions: 11 1/2 inches (width) x 16 3/4 inches (height) x 5 1/2 inches (depth)
- Hose Connections: All 1/2 inch NPT
- Color: White
- Additional Connections: SAT, Cable, AUX cables

Figure 2: Dimensional drawing of the Nautilus P1 panel, showing overall height, width, and depth, as well as the recommended rough cutout opening for installation.
Installation
Proper installation is crucial for the safe and effective operation of your RecPro RV Water Management Panel. It is recommended that installation be performed by a qualified technician if you are unfamiliar with RV plumbing and electrical systems.
Mounting the Panel
- Select a suitable location on your RV for the panel, ensuring adequate space for the panel's dimensions (11 1/2"W x 16 3/4"H x 5 1/2"D) and access to plumbing and electrical connections.
- Using the provided cutout dimensions (10"W x 15"H), carefully create the opening in the RV wall.
- Insert the panel into the cutout and secure it using appropriate fasteners (not included with this specific variant).
Plumbing Connections
All hose connections on the Nautilus P1 panel are 1/2 inch NPT. Ensure all connections are properly sealed to prevent leaks.
- Connect your RV's freshwater tank inlet to the designated port.
- Connect the city water supply line to the 'City Water Connection' port.
- Connect the RV's pump inlet and outlet lines to their respective ports.
- Connect the black tank flush line to the 'Tank Flush' port.
- Connect the hot/cold faucet lines if utilizing the exterior rinse feature.
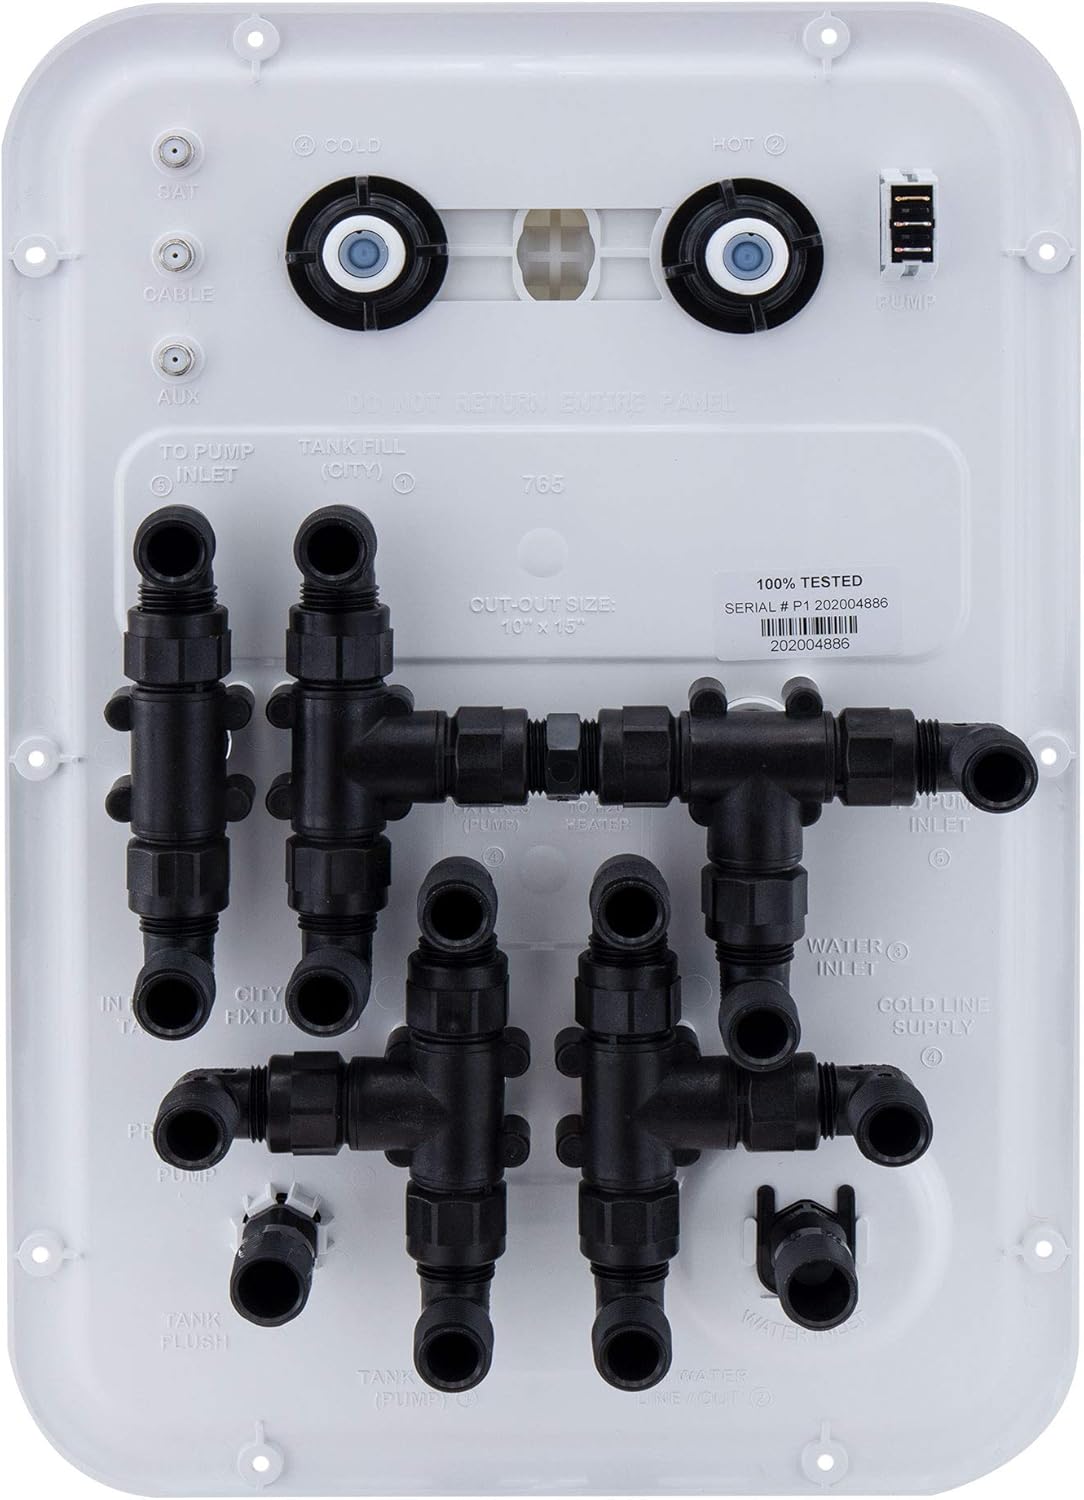
Figure 3: Rear view of the Nautilus P1 panel, illustrating the various plumbing connections and their labels for proper installation.
Electrical Connections
The panel includes connections for SAT, Cable, and AUX cables. Ensure these are connected according to your RV's wiring diagram.
Operating Instructions
The Nautilus P1 panel features a clear diagram on its face to guide you through various water management functions. Each function is activated by adjusting the red and green valves according to the diagram.
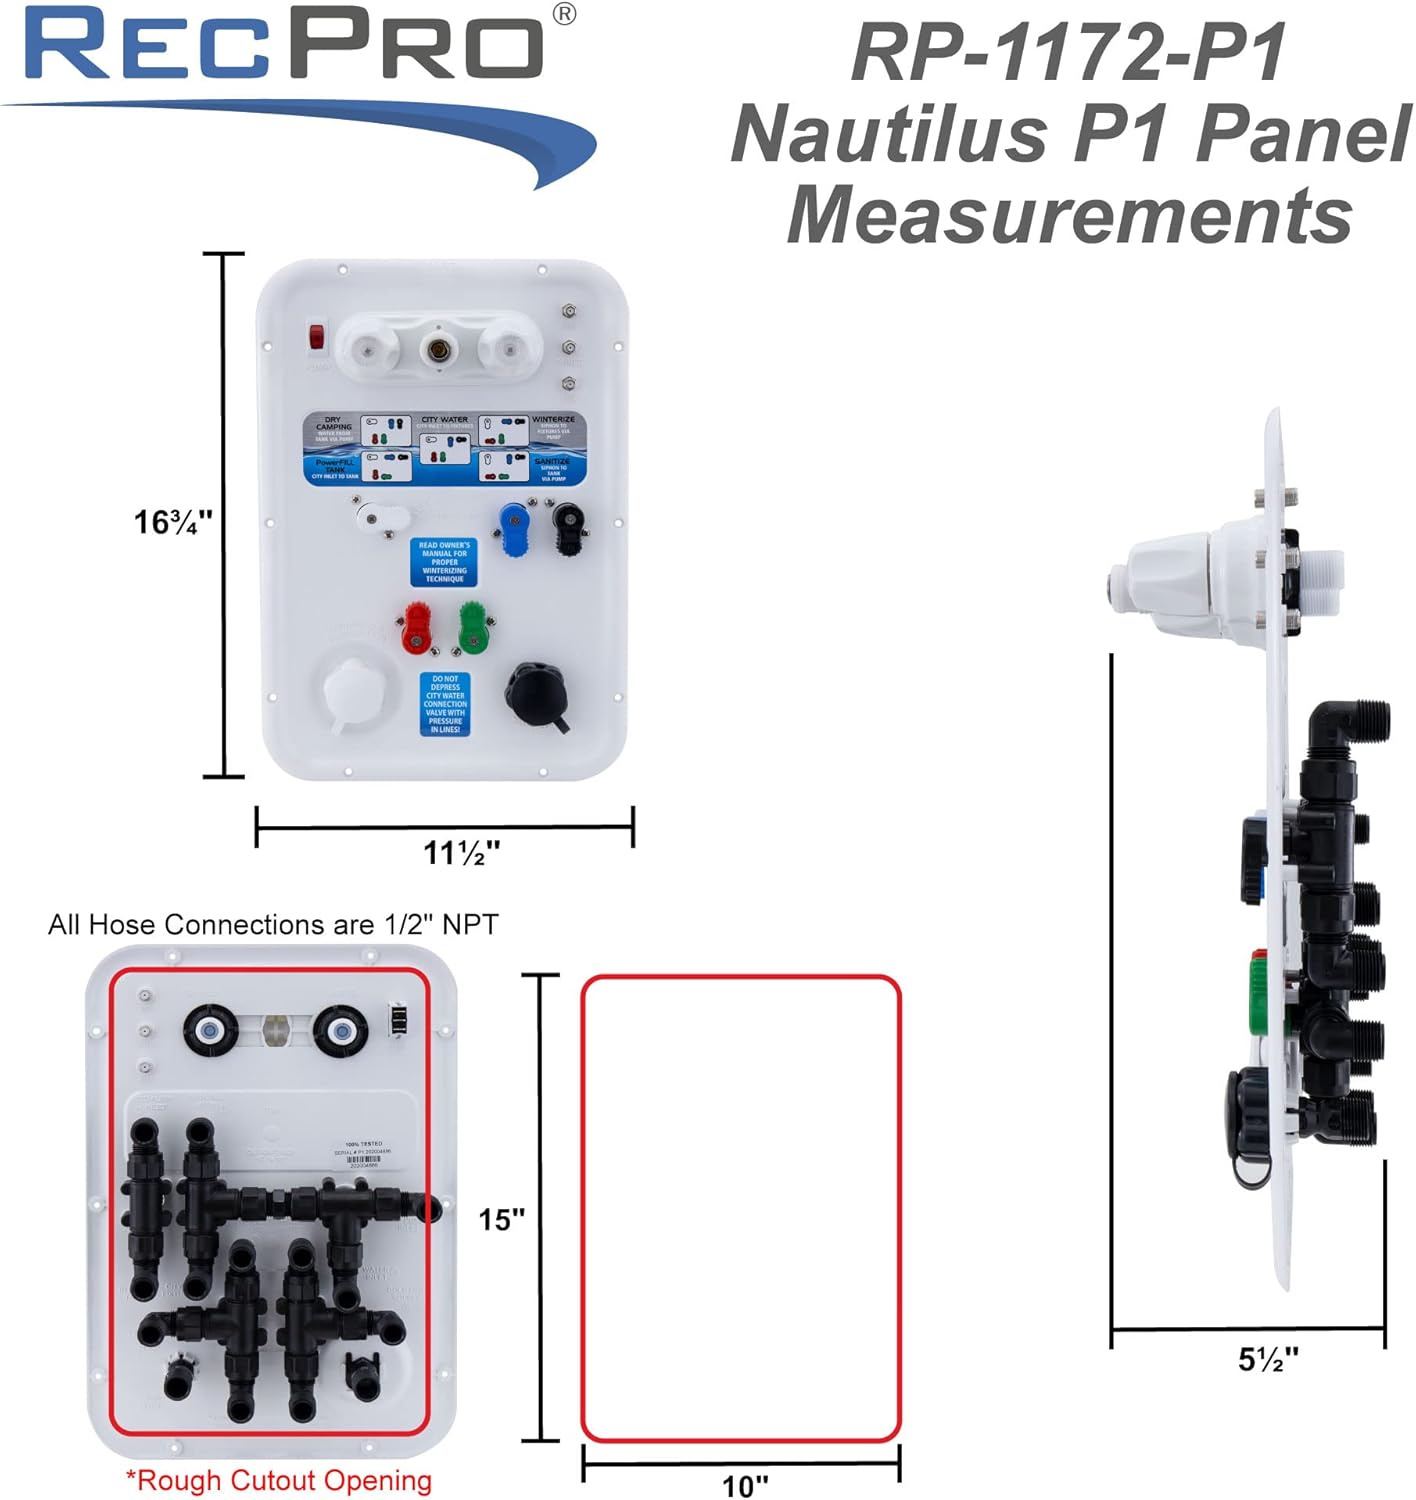
Figure 4: Close-up view of the Nautilus P1 panel's operational diagram, showing valve positions for different functions.
Available Functions:
- Dry Camping (Water from Tank via Pump): This mode allows you to draw water from your fresh water tank using your RV's pump to supply fixtures. Follow the diagram on the panel to set the valves for this operation.
- PowerFill Tank (City Inlet to Tank): Use this function to fill your fresh water tank from a city water connection. Adjust the valves as indicated on the panel for this mode.
- City Water (City Inlet to Fixtures): Connect to a city water supply at your campsite to directly provide water to your RV's fixtures without using the pump or the fresh water tank. Set the valves according to the panel diagram.
- Winterize (Fixtures via Pump): This mode facilitates the winterization process by allowing you to pump RV antifreeze through your plumbing lines and fixtures. Refer to the panel diagram for the correct valve configuration.
- Sanitize (Siphon to Tank via Pump): Utilize your RV's pump to siphon sanitizing solution from a bucket into your fresh water tank. This is also used for siphoning to fill the tank from an external source. Follow the panel's instructions for valve settings.
- Black Tank Flush: Connect a water hose to the black tank flush inlet to rinse your black tank. This helps prevent sewage buildup and control odors. Ensure the black tank valve is open during this process.
- Bypass Hot Water Heater (during Winterization): When winterizing, ensure the hot water heater is bypassed to prevent antifreeze from entering and potentially damaging it. The panel's design integrates this bypass functionality.
- Exterior Hot/Cold Faucet: The panel supports an exterior hot/cold faucet (if installed) for rinsing items outside the RV.
Important: Do not depress the city water connection valve with pressure in lines. Always relieve pressure before manipulating connections.
Maintenance
Regular maintenance of your RV's water system, including the Nautilus P1 panel, is essential for optimal performance and hygiene.
- Winterization: Proper winterization is critical to prevent freezing damage. The panel includes a 'Winterize' function. Always refer to your RV's owner's manual for specific winterizing techniques and ensure the hot water heater is bypassed.
- Sanitization: Periodically sanitize your fresh water tank and plumbing system using the 'Sanitize' function to maintain water quality.
- Black Tank Rinsing: Regularly use the 'Black Tank Flush' function to clean the black tank, which helps prevent sensor malfunctions and odor issues.
- Inspection: Periodically inspect all hose connections for leaks and ensure valves operate smoothly.
Troubleshooting
This section provides general guidance for common issues. For complex problems, consult a qualified RV technician.
| Problem | Possible Cause | Solution |
|---|---|---|
| No water flow in City Water mode | City water supply off; valves incorrectly set; clogged inlet screen. | Check city water connection and supply; verify valve positions match diagram; inspect and clean inlet screen. |
| Pump not drawing water in Dry Camping mode | Pump switch off; fresh water tank empty; valves incorrectly set; air in lines. | Ensure pump switch is on; check fresh water tank level; verify valve positions; prime pump if necessary. |
| Leaks at connections | Loose fittings; damaged O-rings or seals. | Tighten all connections; inspect and replace any damaged O-rings or seals. |
Warranty and Support
Specific warranty information for the RecPro RV Water Management Panel Nautilus P1 is not provided within the product details. For warranty claims, technical support, or further assistance, please contact RecPro directly through their official website or customer service channels.
You can visit the RecPro store on Amazon for additional products and information: RecPro Amazon Store

