1. Introduction and Overview
This manual provides comprehensive instructions for the installation, operation, and maintenance of your Sharkoon RGB Slider Mid-Tower PC Case. Please read this manual carefully before proceeding with assembly to ensure proper functionality and longevity of your components.
The Sharkoon RGB Slider is a compact Midi-ATX case designed for PC enthusiasts seeking a balance of aesthetics and functionality. It features a tempered glass side panel, an integrated RGB LED strip on the front panel, and support for various cooling and storage configurations.

Figure 1: Angled front view of the Sharkoon RGB Slider PC case, showcasing the RGB LED strip and tempered glass side panel.
2. Package Contents
Verify that all components are present in the package:
- Sharkoon RGB Slider Mid-Tower PC Case
- 1x 120mm Fan (pre-installed in rear)
- Accessory box (screws, cable ties, standoffs)
- User Manual (this document)
3. Case Components and Features
Familiarize yourself with the various parts of the PC case.

Figure 2: Top-down view highlighting the I/O panel with USB ports and audio jacks, along with the magnetic dust filter on the top panel.
- Front Panel: Features an integrated RGB LED strip and front ventilation.
- I/O Panel: Located on the top, includes power button, reset button, 2x USB 3.0 ports, 1x USB 2.0 port, and audio jacks.
- Tempered Glass Side Panel: Provides a clear view of internal components. Secured with screws at the rear.
- Rear Panel: Includes motherboard I/O cutout, expansion slots, and pre-installed 120mm fan mount.
- Interior Layout: Supports ATX, Micro-ATX, and Mini-ITX motherboards. Features a PSU shroud for clean cable management and dedicated drive bays.

Figure 3: Internal view of the PC case, showing the motherboard tray, PSU shroud, and fan mounting points.
4. Setup and Installation
Follow these steps for installing your PC components into the Sharkoon RGB Slider case.
4.1 Preparing the Case
- Place the case on a stable, flat surface.
- Remove the tempered glass side panel by unscrewing the two thumb screws at the rear and carefully sliding the panel off.
- Remove the right-side metal panel by unscrewing the two thumb screws at the rear.
4.2 Motherboard Installation
- Install the I/O shield into the cutout on the rear of the case.
- Align your motherboard with the pre-installed standoffs. Ensure the standoffs match your motherboard's form factor (ATX, Micro-ATX, Mini-ITX). Additional standoffs may be required and can be installed using the provided tool.
- Secure the motherboard with the appropriate screws from the accessory box.
4.3 Power Supply Unit (PSU) Installation
- Position the PSU into the dedicated compartment at the bottom rear of the case, under the shroud.
- Ensure the PSU fan faces downwards (if the case has a bottom vent) or upwards (if no bottom vent).
- Secure the PSU to the rear of the case with screws.
4.4 Storage Drive Installation
The case supports multiple storage configurations:
- 2.5-inch SSDs: Three compact SSDs can be mounted on the motherboard tray or on top of the power supply tunnel.
- 3.5-inch HDDs: Two 3.5-inch HDDs can be installed in the hard drive cage located under the PSU shroud. This cage can also accommodate 2.5-inch SSDs.
- For 3.5-inch HDDs, slide the drive into the drive cage and secure with screws.
- For 2.5-inch SSDs, mount them to the designated spots using screws.
4.5 Expansion Card (GPU, etc.) Installation
- Remove the necessary expansion slot covers from the rear of the case.
- Insert your expansion card into the appropriate PCIe slot on the motherboard.
- Secure the card with a screw to the case chassis.
4.6 Fan and Cooling Installation
The case comes with one 120mm fan pre-installed at the rear. Additional fans can be installed:
- Front: Up to three 120mm fans.
- Top: Two 120mm or two 140mm fans.
- Mount fans to the designated positions using fan screws.
- Connect fan power cables to your motherboard or a fan controller.

Figure 4: Internal view of the case with the tempered glass panel removed, showing the spacious interior for component installation.
4.7 Cable Management
Utilize the cutouts and tie-down points behind the motherboard tray to route cables cleanly. This improves airflow and aesthetics.

Figure 5: View behind the motherboard tray, illustrating the space available for cable routing and mounting points for SSDs.
4.8 Final Assembly
- Once all components are installed and cables are managed, reattach the right-side metal panel.
- Carefully reattach the tempered glass side panel and secure it with the thumb screws.
5. Operating the RGB LED Strip
The integrated RGB LED strip on the front panel offers customizable lighting effects.
5.1 Manual Control
The case features an integrated control button (usually part of the I/O panel or a dedicated button) to cycle through 14 preset lighting modes. Press the button repeatedly to change modes.
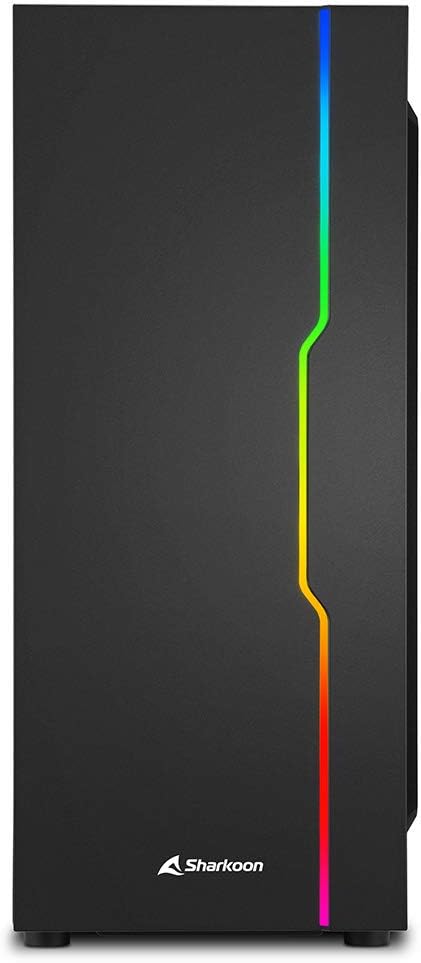
Figure 6: Front view of the PC case, showcasing the illuminated RGB LED strip.
5.2 Motherboard Synchronization
The RGB LED strip can be synchronized with compatible motherboards using software such as:
- Asus Aura Sync
- MSI Mystic Light Sync
- Gigabyte Fusion
- ASRock Polychrome SYNC
Connect the RGB cable from the case to the appropriate 5V-D-Coded-G or 5V-D-G pin header on your motherboard. Refer to your motherboard manual for specific header locations and software instructions.
6. Maintenance
Regular maintenance helps ensure optimal performance and longevity of your PC components.
6.1 Dust Filter Cleaning
The case features removable dust filters (e.g., on the top and bottom). Periodically remove and clean these filters with compressed air or by washing them with water and allowing them to dry completely before reinstallation.
6.2 Exterior Cleaning
Wipe the exterior surfaces of the case with a soft, damp cloth. Avoid abrasive cleaners or solvents that could damage the finish or tempered glass.
6.3 Interior Cleaning
Occasionally, open the case and use compressed air to remove dust buildup from internal components and fan blades. Ensure the system is powered off and unplugged before performing interior cleaning.
7. Troubleshooting
This section addresses common issues you might encounter.
7.1 PC Does Not Power On
- Ensure the power supply is switched on and properly connected to the wall outlet.
- Verify all power cables (24-pin ATX, 8-pin CPU, PCIe, SATA) are securely connected to the motherboard and components.
- Check that the front panel power switch cable is correctly connected to the motherboard's front panel header.
7.2 RGB LED Strip Not Lighting Up
- Ensure the RGB power cable is connected to a SATA power connector from your PSU.
- If using motherboard synchronization, verify the RGB data cable is correctly connected to a compatible 5V addressable RGB header on your motherboard.
- If using manual control, press the dedicated RGB button to cycle through modes.
7.3 USB Ports Not Functioning
- Check that the USB 3.0 and USB 2.0 cables from the front panel are securely connected to the corresponding headers on your motherboard.
- Ensure motherboard drivers are up to date.
8. Specifications
Detailed technical specifications for the Sharkoon RGB Slider PC Case.
| Feature | Specification |
|---|---|
| Brand | Sharkoon |
| Model Name | Sharkoon RGB Slider |
| Item Model Number | 4044951029846 |
| Case Type | Mid Tower |
| Motherboard Compatibility | ATX, Micro-ATX, Mini-ITX |
| Material | Tempered Glass, Steel |
| Color | Black |
| Product Dimensions (LxWxH) | 15.75 x 7.48 x 17.95 inches (40 x 19 x 45.6 cm) |
| Item Weight | 10.56 pounds (4.79 kg) |
| Number of USB 3.0 Ports | 2 |
| Number of USB 2.0 Ports | 1 |
| Pre-installed Fans | 1x 120mm (rear) |
| Fan Support (Front) | 3x 120mm |
| Fan Support (Top) | 2x 120mm or 2x 140mm |
| CPU Cooler Height Clearance | Up to 15.7 cm |
| Graphics Card Length Clearance | Up to 33.5 cm |
| Drive Bays (3.5" HDD) | 2 |
| Drive Bays (2.5" SSD) | 3 (or 2x 3.5" + 1x 2.5") |
| Cooling Method | Air |
| Power Supply Mounting Type | Rear Mount (bottom) |
9. Warranty and Support
For warranty information and technical support, please refer to the official Sharkoon website or contact your local retailer. Keep your proof of purchase for warranty claims.
Official Sharkoon Website: www.sharkoon.com


