
Duramax 0638801202257
Duramax Woodbridge II 10.5 x 8 Plus Plastic Garden Shed Instruction Manual
Model: 0638801202257
1. Introduction
This manual provides detailed instructions for the assembly, operation, maintenance, and troubleshooting of your Duramax Woodbridge II 10.5 x 8 Plus Plastic Garden Shed. Please read this manual thoroughly before beginning assembly or use to ensure safe and correct installation and to maximize the lifespan of your product.
The Duramax Woodbridge II shed offers a durable and low-maintenance outdoor storage solution. Its robust construction, featuring vinyl wall panels and a strong metal frame, is designed to withstand various weather conditions.
2. Safety Information
WARNING: Failure to follow these safety instructions may result in injury or damage to the product.
- Always follow the assembly instructions carefully.
- Ensure the structure is correctly assembled and securely anchored to the ground.
- Do not exceed the indicated load limits for the roof (9.1 kg/m² or 20 lb/ft² snow load) or any shelving installed.
- Exercise caution when handling heavy components during assembly. It is recommended to have at least two people for assembly.
- Keep children and pets away from the assembly area.
- Wear appropriate safety gear, including gloves and eye protection, during assembly.
- Choose a level and stable surface for installation.
- This shed is made of fire-retardant PVC. However, avoid storing flammable materials inside.
3. Package Contents
Before beginning assembly, verify that all parts are present and undamaged. Refer to the separate parts list provided with your shed for a complete inventory.
Key components include:
- Vinyl wall panels
- Metal frame components (for walls and roof)
- Roof panels
- Double doors with lockable handle
- 2 fixed windows
- Metal foundation kit
- Ventilation kits
- Fasteners and hardware
4. Setup and Assembly
Assembly typically requires two people and can take approximately 5-9 hours, depending on experience and conditions. A still day is recommended for assembly, as sides can be flimsy until the roof structure is in place.
4.1 Site Preparation
- Select a level and stable area for the shed. The foundation must be absolutely even.
- Clear the area of any debris, rocks, or vegetation.
- Ensure you have sufficient space around the shed for assembly, allowing access to all sides.
4.2 Foundation Kit Assembly
The shed includes a metal foundation kit. Assemble this kit first, ensuring it is perfectly square and level. Minor discrepancies in the foundation can cause issues during roof assembly.

Image: The metal foundation frame laid out on the ground, ready for the shed walls to be built upon it.

Image: A detailed view of the metal foundation kit components, showing how they interlock to form the base.
4.3 Wall and Roof Assembly
Follow the step-by-step instructions provided in the separate assembly booklet. All parts are clearly labeled. Pay close attention to the orientation and designation of each part.
- Assemble wall panels according to the instructions. The panels are made of durable, easy-to-maintain vinyl.
- Reinforce wall columns with the solid metal structure components. This provides strength and allows for hanging shelves or tools.
- Once a wall side is complete, it is recommended to attach the roof rails for stability as soon as possible.
- The roof is reinforced with a strong metallic structure.

Image: Inside the shed, the robust metal framework supporting the roof is visible, ensuring structural integrity.
4.4 Door and Window Installation
- Install the double doors, ensuring they open and close smoothly. The doors feature a lockable handle for security.
- Install the two fixed windows. For enhanced weatherproofing, consider sealing the windows with clear silicone sealant after installation.

Image: A close-up of one of the fixed windows, showing its design and integration into the shed wall.

Image: A detailed view of the door handle, highlighting its design and functionality for securing the shed.
4.5 Anchoring the Shed
Once assembled, securely anchor the shed to your prepared foundation. This is crucial for stability, especially in windy conditions.
5. Operating Your Shed
5.1 Storage Capacity
The Woodbridge II 10.5 x 8 Plus shed provides a generous 8.02 m² (approximately 86 sq ft) of storage space. It is ideal for garden tools, bicycles, barbecues, exercise equipment, and other outdoor items.

Image: The interior of the shed, showcasing its spacious design and potential for organizing garden equipment and other items.

Image: An illustrative view of the shed's interior, demonstrating its capacity for diverse storage needs, including shelving units and larger equipment.
5.2 Ventilation
The shed includes ventilation kits to ensure proper air circulation, helping to prevent condensation and maintain a suitable environment for stored items.
5.3 Security
The double doors are equipped with a lockable handle. For added security, a padlock (not included) can be used.
6. Maintenance
The Duramax Woodbridge II shed is designed for low maintenance due to its durable vinyl construction.
- Cleaning: Clean the exterior surfaces periodically with mild soap and water. Avoid abrasive cleaners or harsh chemicals.
- Inspection: Regularly inspect the shed for any signs of wear, damage, or loose fasteners. Tighten any loose screws or bolts.
- Snow Load: While the roof is designed to support up to 9.1 kg/m² (20 lb/ft²) of snow, it is advisable to remove heavy snow accumulation to prevent excessive stress on the structure.
- Drainage: Ensure that water drains away from the shed's base to prevent moisture buildup.
7. Troubleshooting
| Problem | Possible Cause | Solution |
|---|---|---|
| Doors do not close properly or are misaligned. | Uneven foundation; loose hinges; warped panels. | Check if the foundation is level. Adjust hinges. Ensure all wall panels are correctly seated and fastened. |
| Water leakage inside the shed. | Improperly sealed windows/seams; damaged roof panel; inadequate foundation drainage. | Apply silicone sealant around windows and seams. Inspect roof panels for damage. Improve drainage around the shed. |
| Shed feels unstable or wobbly. | Not properly anchored; loose frame connections. | Ensure the shed is securely anchored to the ground. Check and tighten all frame connections. |
| Difficulty assembling parts. | Incorrect orientation; parts not fully aligned; missing hardware. | Refer to the assembly manual for correct part orientation. Ensure parts are fully engaged before fastening. Verify all hardware is present. |
8. Specifications
| Feature | Detail |
|---|---|
| Model Number | 0638801202257 |
| Exterior Dimensions (L x W x H) | 324.8 cm x 247 cm x 233.3 cm (127.8" x 97.2" x 91.8") |
| Interior Height | 181.5 cm (71.4") |
| Door Style | Hinged Double Door |
| Material | Vinyl (Plastic) panels, Metal frame |
| Color | Adobe/Dark Grey |
| Weight | 130 Kilograms |
| Snow Load Capacity | Up to 9.1 kg/m² (20 lb/ft²) |
| Water Resistance | Waterproof |
| Features | Metal foundation kit, 2 fixed windows, Ventilation kits, Lockable handle |
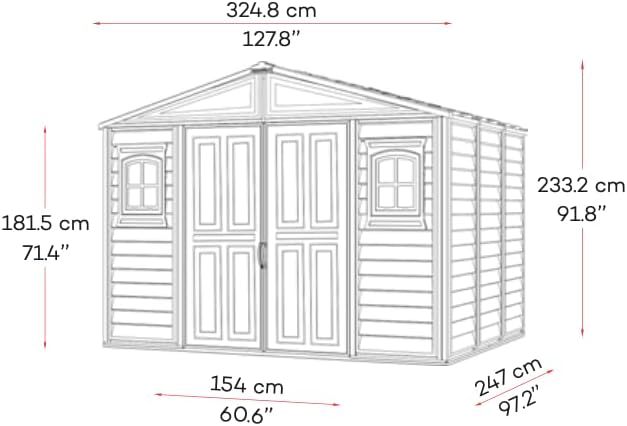
Image: Dimensional diagram of the shed, illustrating its length, width, and height in both centimeters and inches for precise planning.
9. Warranty and Support
Specific warranty details are typically provided with your purchase documentation. Please refer to the warranty card or contact your retailer for information regarding warranty coverage and claims.
For technical support, missing parts, or further assistance, please contact Duramax customer service or your point of purchase. Keep your proof of purchase and model number (0638801202257) readily available when contacting support.
Related documents0638801202257


Ask a question about this manual
Ask about setup, troubleshooting, compatibility, parts, safety, or missing instructions. Manuals+ will review the question and use this page’s manual context to help answer it.