1. Introduction
Thank you for choosing the COSTWAY Crank Awning. This manual provides essential information for the safe assembly, operation, and maintenance of your awning. Please read these instructions carefully before installation and use, and retain them for future reference.
The COSTWAY Crank Awning is designed to provide shade and protection from the sun and light rain for your outdoor spaces. It features a robust aluminum frame, a durable polyester fabric with PA coating, and a convenient hand crank for manual extension and retraction. The awning's angle can be adjusted to suit your specific shading needs.

Image 1.1: The COSTWAY Crank Awning providing shade for different outdoor settings, including a storefront, a cafe patio, and a residential balcony.
2. Safety Instructions
- Read all instructions before assembly and use.
- Ensure the awning is securely mounted to a stable wall structure (cement, wood, or masonry) by qualified personnel.
- Do not operate the awning in strong winds, heavy rain, or snow. Retract the awning completely during extreme weather conditions to prevent damage and extend its lifespan.
- Keep children and pets away from the awning during operation.
- Do not hang objects from the awning frame or fabric.
- Regularly inspect all mounting hardware and moving parts for wear or damage. Tighten any loose fasteners.
- Do not attempt to modify the awning structure or components. Use only original replacement parts if needed.
- After assembly, ensure the rope used to secure the arm during shipping is removed only when all installation steps are complete and the awning is securely mounted.

Image 2.1: Illustration showing the awning providing sun protection and a reminder to retract it during extreme weather conditions like heavy rain to ensure longevity.
3. Package Contents
Please check the package to ensure all components are present and undamaged:
- 1 x COSTWAY Crank Awning
- 1 x Hand Crank
- 1 x Instruction Manual
- All necessary mounting hardware (screws, bolts, brackets, etc.)
4. Specifications
| Feature | Detail |
|---|---|
| Brand | COSTWAY |
| Model Number | NP11201GRDE |
| Material | Aluminum frame, Polyester fabric with PA coating |
| Operation Mode | Manual (Crank) |
| Adjustable Angle | 5° - 35° |
| Dimensions (L x W) | 300 x 250 cm (3m x 2.5m) |
| Product Weight | 18.9 kg |
| Mounting Surfaces | Cement walls, Wooden walls, Masonry walls |

Image 4.1: Visual representation of the awning's dimensions (3m width, 2.5m projection) and highlighted features such as sun protection, durability, and ease of assembly.
5. Setup and Installation
The COSTWAY Crank Awning requires assembly and secure mounting. Please follow the detailed assembly instructions provided in the package. Below are general guidelines and important considerations:
- Site Selection: Choose a suitable location on a sturdy wall (cement, wood, or masonry) that can support the weight of the awning and withstand operational forces. Ensure there is sufficient clearance for full extension and retraction.
- Tools Required: Gather all necessary tools, which typically include a drill, level, measuring tape, wrench, and screwdriver.
- Assembly: Assemble the awning frame according to the step-by-step diagrams in the included manual. Pay close attention to the orientation of parts.
- Mounting: Mark and drill holes for the mounting brackets. Securely attach the brackets to the wall using appropriate fasteners for your wall type. Ensure the brackets are level and properly spaced.
- Awning Attachment: Carefully lift and attach the assembled awning to the mounted brackets. Secure it firmly.
- Final Check: After installation, ensure all connections are tight and the awning is stable. Important: Do not remove the rope used to secure the arm until all assembly and mounting steps are fully completed and verified.

Image 5.1: Detail showing the stylish side cover design, which helps to keep water out and contributes to the awning's durability.
6. Operating Instructions
Your COSTWAY Crank Awning is designed for simple manual operation.
6.1 Extending and Retracting the Awning
- Insert the hand crank into the designated loop on the awning mechanism.
- To extend the awning, turn the hand crank clockwise. Continue turning until the awning reaches the desired extension or is fully extended.
- To retract the awning, turn the hand crank counter-clockwise. Continue turning until the awning is fully retracted against the wall.

Image 6.1: Illustration of the hand crank mechanism used to easily extend and retract the awning.
6.2 Adjusting the Awning Angle
The awning's pitch can be adjusted between 5 and 35 degrees to optimize shade coverage.
- Locate the angle adjustment points on the awning arms (refer to your assembly manual for exact locations).
- Using the appropriate tool (usually a wrench), loosen the locking bolts at the adjustment points.
- Carefully adjust the angle of the awning arms to the desired pitch. Ensure both arms are adjusted equally to maintain an even canopy.
- Once the desired angle is set, securely tighten the locking bolts to fix the position.
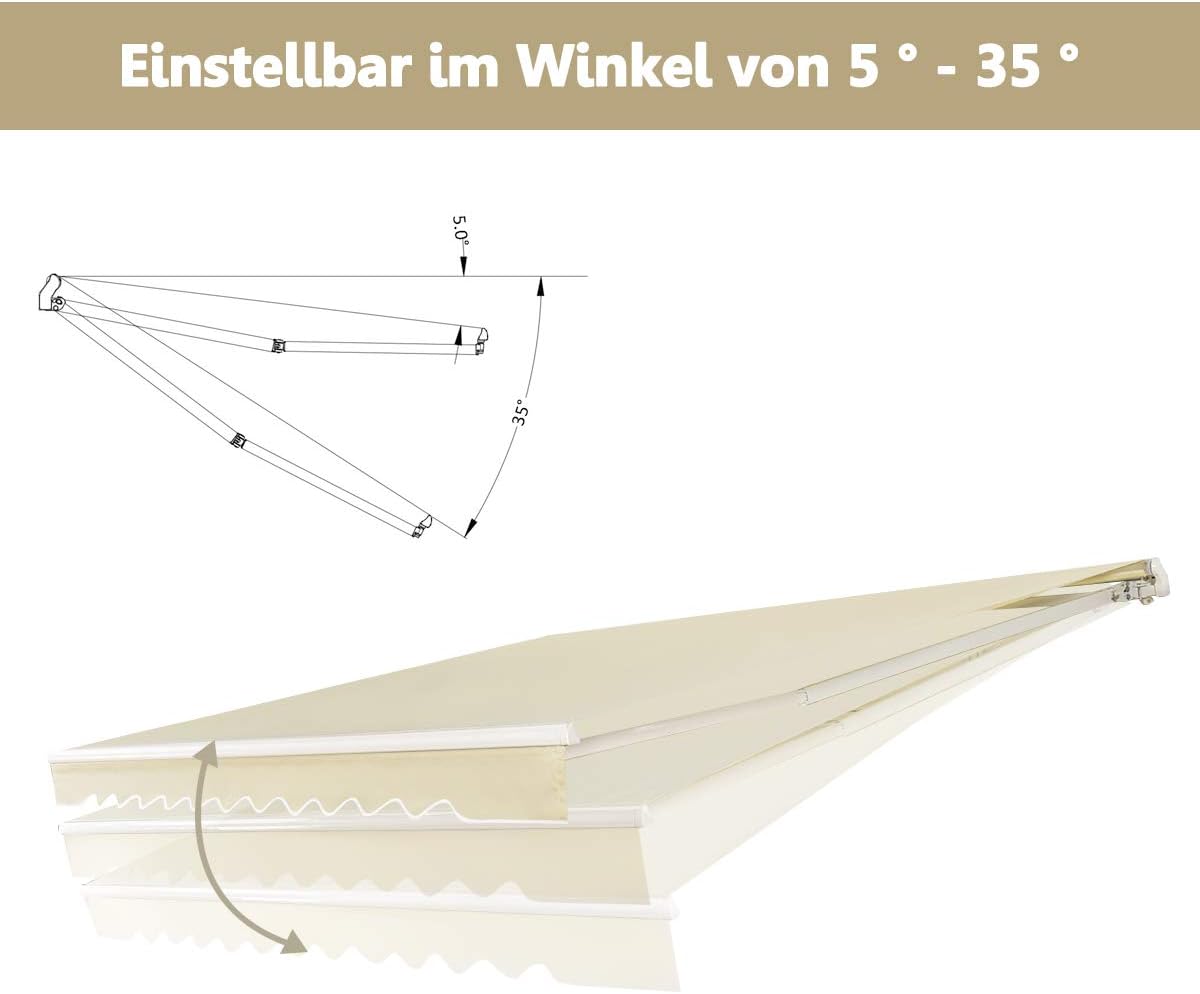
Image 6.2: Diagram illustrating the adjustable angle feature of the awning, allowing for a pitch between 5 and 35 degrees.
7. Maintenance
Proper maintenance will ensure the longevity and optimal performance of your COSTWAY Crank Awning.
- Cleaning the Fabric: Clean the awning fabric regularly with mild soap and water. Use a soft brush or sponge. Rinse thoroughly with clean water and allow it to air dry completely before retracting. Do not use harsh chemicals or abrasive cleaners.
- Frame Maintenance: Periodically wipe down the aluminum frame with a damp cloth to remove dirt and debris. Check for any signs of rust or corrosion, especially on metal components.
- Hardware Inspection: Annually, inspect all bolts, screws, and mounting hardware. Tighten any loose fasteners to ensure the awning remains securely attached.
- Lubrication: Lightly lubricate moving parts of the arm joints and crank mechanism with a silicone-based spray lubricant to ensure smooth operation.
- Weather Protection: Always retract the awning during strong winds, heavy rain, snow, or hail to prevent damage to the fabric and frame.

Image 7.1: Close-up view highlighting reinforced seals for durable use, the PA-coated waterproof surface of the fabric, and premium connectors for smooth retraction, all contributing to the awning's low maintenance and longevity.
8. Troubleshooting
If you encounter issues with your awning, refer to the following common troubleshooting tips:
- Awning does not extend/retract smoothly:
- Check if the hand crank is properly engaged.
- Inspect the arm joints and crank mechanism for obstructions.
- Apply a silicone-based lubricant to moving parts.
- Awning sags or is uneven:
- Verify that the mounting brackets are securely fastened and level.
- Ensure the angle adjustment bolts on both arms are tightened equally.
- Water pooling on fabric:
- Adjust the awning's pitch to a steeper angle (within the 5-35° range) to allow for better water runoff.
- Ensure the fabric is taut and not stretched or damaged.
- Awning makes unusual noises during operation:
- Inspect all moving parts for wear or damage.
- Lubricate the arm joints and crank mechanism.
If problems persist, please contact COSTWAY customer support for assistance.
9. Warranty and Support
COSTWAY products are manufactured to high-quality standards. For warranty information, please refer to the terms and conditions provided at the time of purchase or visit the official COSTWAY website. If you require technical support, replacement parts, or have any questions regarding your awning, please contact COSTWAY customer service through their official channels.


