
1. Introduction
This manual provides detailed instructions for the assembly, operation, and maintenance of your MUSETEX G05MN6-HW Mesh ATX Mid-Tower Computer Gaming Case. Please read this manual thoroughly before installation and use to ensure proper functionality and longevity of your product.

Figure 1: MUSETEX G05MN6-HW Gaming PC Case with RGB fans and tempered glass side panel.
2. Setup and Installation
2.1 Component Compatibility
The MUSETEX G05MN6-HW case supports various motherboard form factors and storage devices:
- Motherboard Compatibility: ATX, Micro-ATX, Mini-ITX
- Internal Drive Bays:
- Two (2) 3.5-inch Hard Disk Drives (HDDs)
- Three (3) 2.5-inch Solid State Drives (SSDs)
- GPU Length: Up to 380mm (MAX)
- PSU Length: Up to 245mm (MAX)

Figure 2: Internal layout indicating compatible component sizes and locations for motherboard, GPU, PSU, SSDs, and HDDs.
2.2 Pre-installed Cooling System
This PC case comes with six (6) 120mm ARGB LED fans pre-installed to ensure optimal airflow and cooling:
- Three (3) fans at the front
- Two (2) fans at the top
- One (1) fan at the rear

Figure 3: Illustration of the 6 pre-installed 120mm ARGB fans.
2.3 Front I/O Panel Connections
The top I/O panel provides convenient access to essential ports and controls:
- One (1) USB 3.0 Port
- Two (2) USB 2.0 Ports
- Two (2) HD Audio Jacks (Headphone and Microphone)
- RGB Button for fan lighting control
- Power Button
- Reset Button
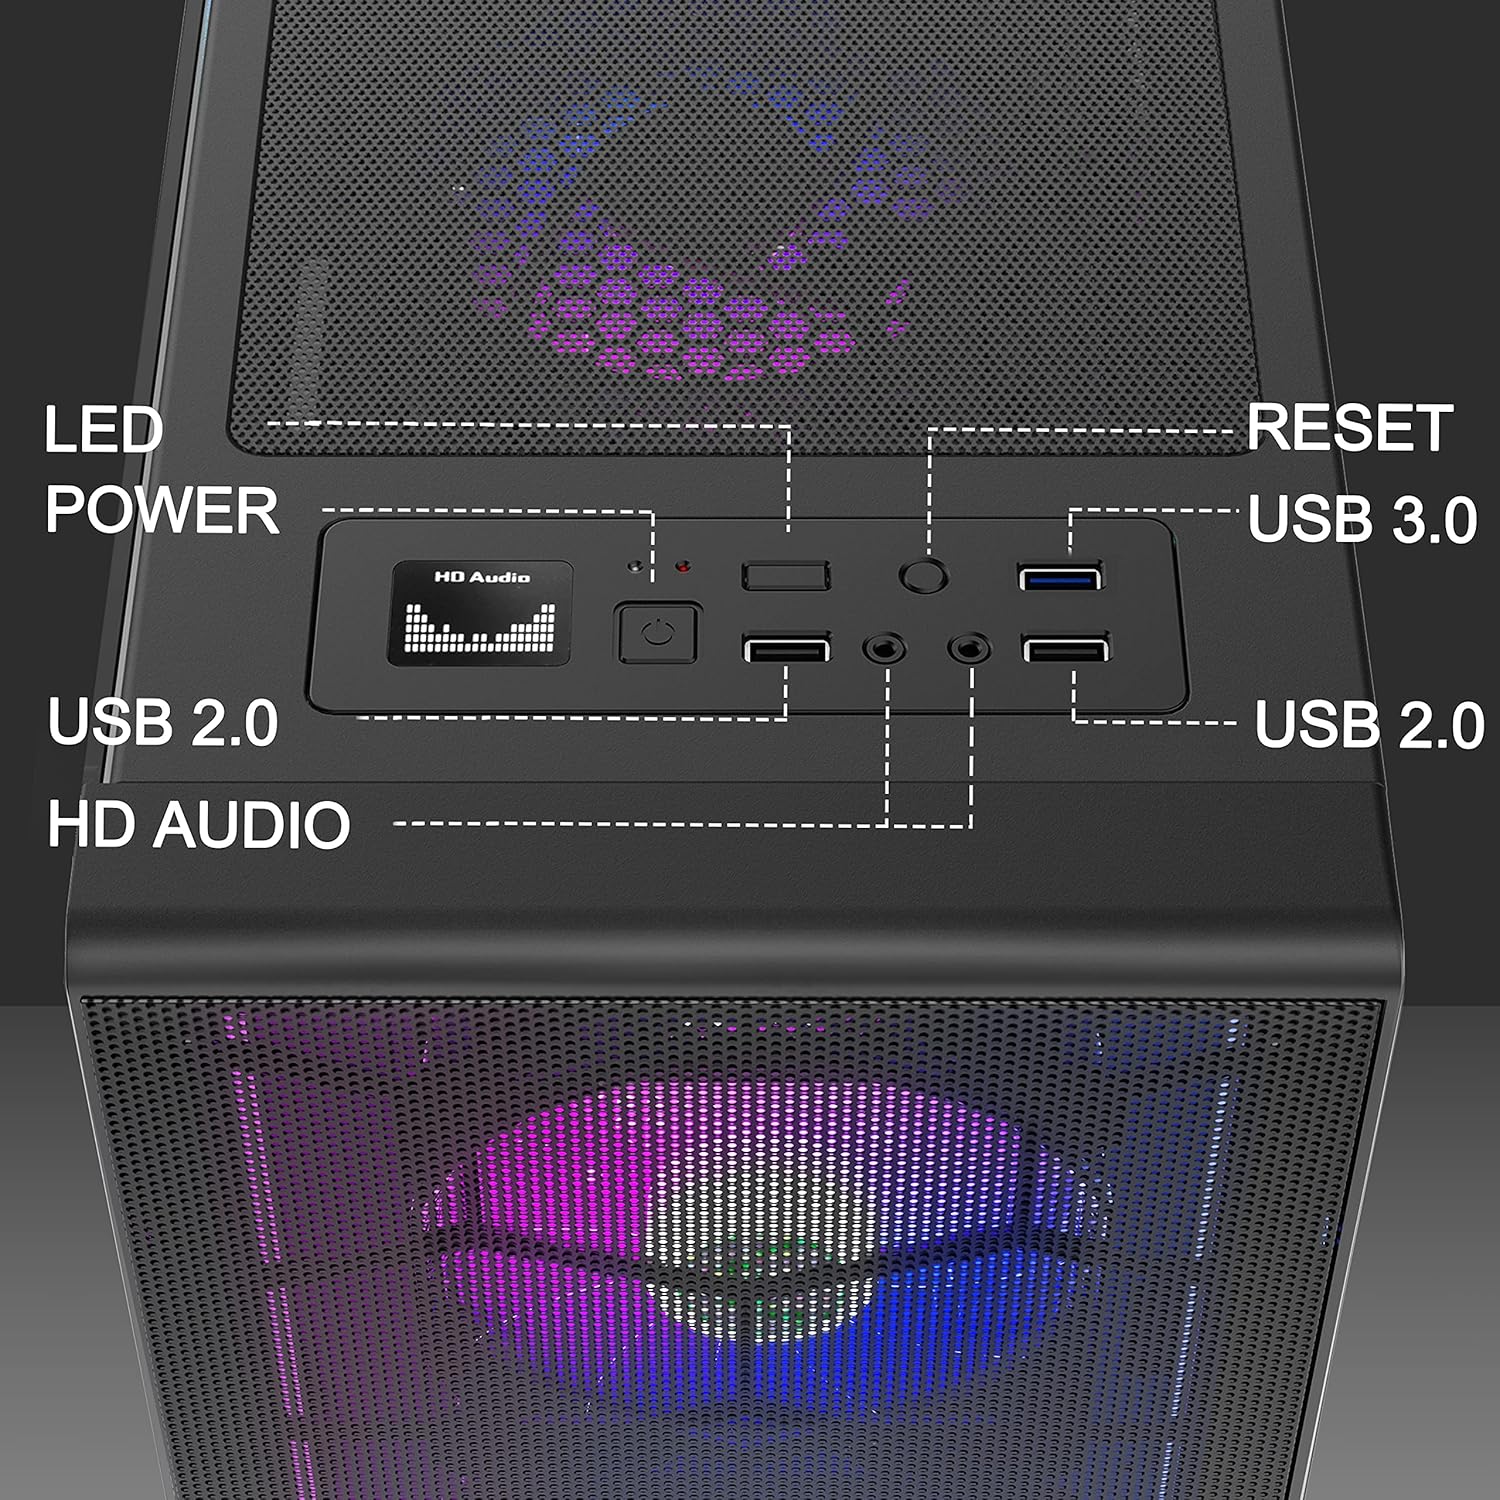
Figure 4: Detailed view of the top I/O panel connections.
2.4 Motherboard Cable Connection for ARGB Fans
To synchronize the ARGB fans with your motherboard's lighting system, connect the fan controller cable to a compatible 5V 3-pin ARGB header on your motherboard. Ensure correct orientation to prevent damage.
Video 1: Demonstrates connecting the motherboard cable for ARGB fan synchronization. This cable is compatible only with 5V 3-pin headers.
3. Operation
3.1 Controlling ARGB Fan Lighting
The pre-installed ARGB fans offer customizable lighting effects. You can change the color and mode of the lights using the dedicated RGB button on the top I/O panel. Alternatively, if connected to a compatible motherboard, you can control the lighting via motherboard software (e.g., ARGB Fusion, Aura Sync, Mystic Light Sync).
Video 2: Demonstrates changing ARGB fan colors and modes using the RGB button on the case.
Video 3: Illustrates controlling ARGB fan lighting via motherboard software (e.g., ARGB Fusion, Aura Sync, Mystic Light Sync).
4. Maintenance
4.1 Dust Filter Cleaning
The case is equipped with magnetic dust filters on the top and bottom to prevent dust accumulation. Regularly clean these filters to maintain optimal airflow and cooling performance.
- Gently remove the magnetic dust filters from the top and bottom panels.
- Clean the filters using a soft brush or by rinsing with water. Ensure they are completely dry before reattaching.
- Reattach the magnetic dust filters to their respective positions.
Video 4: Shows the removal and cleaning of the magnetic dust filters located on the top and bottom of the case.
4.2 Tempered Glass Panel Care
The tempered glass side panel provides a clear view of your components. Clean it with a soft, lint-free cloth and a non-abrasive glass cleaner. Avoid harsh chemicals or abrasive materials that could scratch the glass.
5. Troubleshooting
This section addresses common issues you might encounter during the setup or operation of your PC case.
5.1 Fans Not Lighting Up or Functioning Incorrectly
- Check Connections: Ensure all fan power cables and ARGB cables are securely connected to the fan controller and, if applicable, to the motherboard's 5V 3-pin ARGB header.
- RGB Button: Press the RGB button on the top I/O panel to cycle through lighting modes and confirm functionality.
- Motherboard Software: If connected to the motherboard, verify that the correct lighting software is installed and configured.
- Power Supply: Ensure the fan controller is receiving adequate power from the power supply unit (PSU).
5.2 Motherboard Fit Issues
If your ATX motherboard is a tight fit or interferes with top-mounted fans:
- Verify Compatibility: Double-check that your motherboard is ATX, Micro-ATX, or Mini-ITX.
- Standoffs: Ensure all motherboard standoffs are correctly installed and aligned with your motherboard's mounting holes.
- Fan Clearance: In some configurations, larger ATX motherboards or tall RAM modules might require adjusting the position of top-mounted fans or using slimmer fan models for optimal clearance.
5.3 Missing HDD Trays or Remote Control
- Check Packaging: Thoroughly inspect all packaging materials for any small components that might be overlooked.
- Contact Support: If components are genuinely missing, contact MUSETEX customer support for assistance.
6. Specifications
| Feature | Detail |
|---|---|
| Brand | MUSETEX |
| Model Name | G05MN6-HW |
| Case Type | Mid Tower |
| Motherboard Compatibility | ATX, Micro-ATX, Mini-ITX |
| Material | Tempered Glass |
| Cooling Method | Air |
| Number of Fans | 6 (120mm ARGB LED pre-installed) |
| Internal Bays | 2 x 3.5" HDD, 3 x 2.5" SSD |
| GPU Length (Max) | 380 mm |
| PSU Length (Max) | 245 mm |
| Top I/O Panel | 1 x USB 3.0, 2 x USB 2.0, 2 x HD Audio, RGB Button, Power, Reset |
| Special Features | RGB Lighting, Mesh Front Panel, Tempered Glass Side Panel, Dust Filters |
| UPC | 684758695352 |
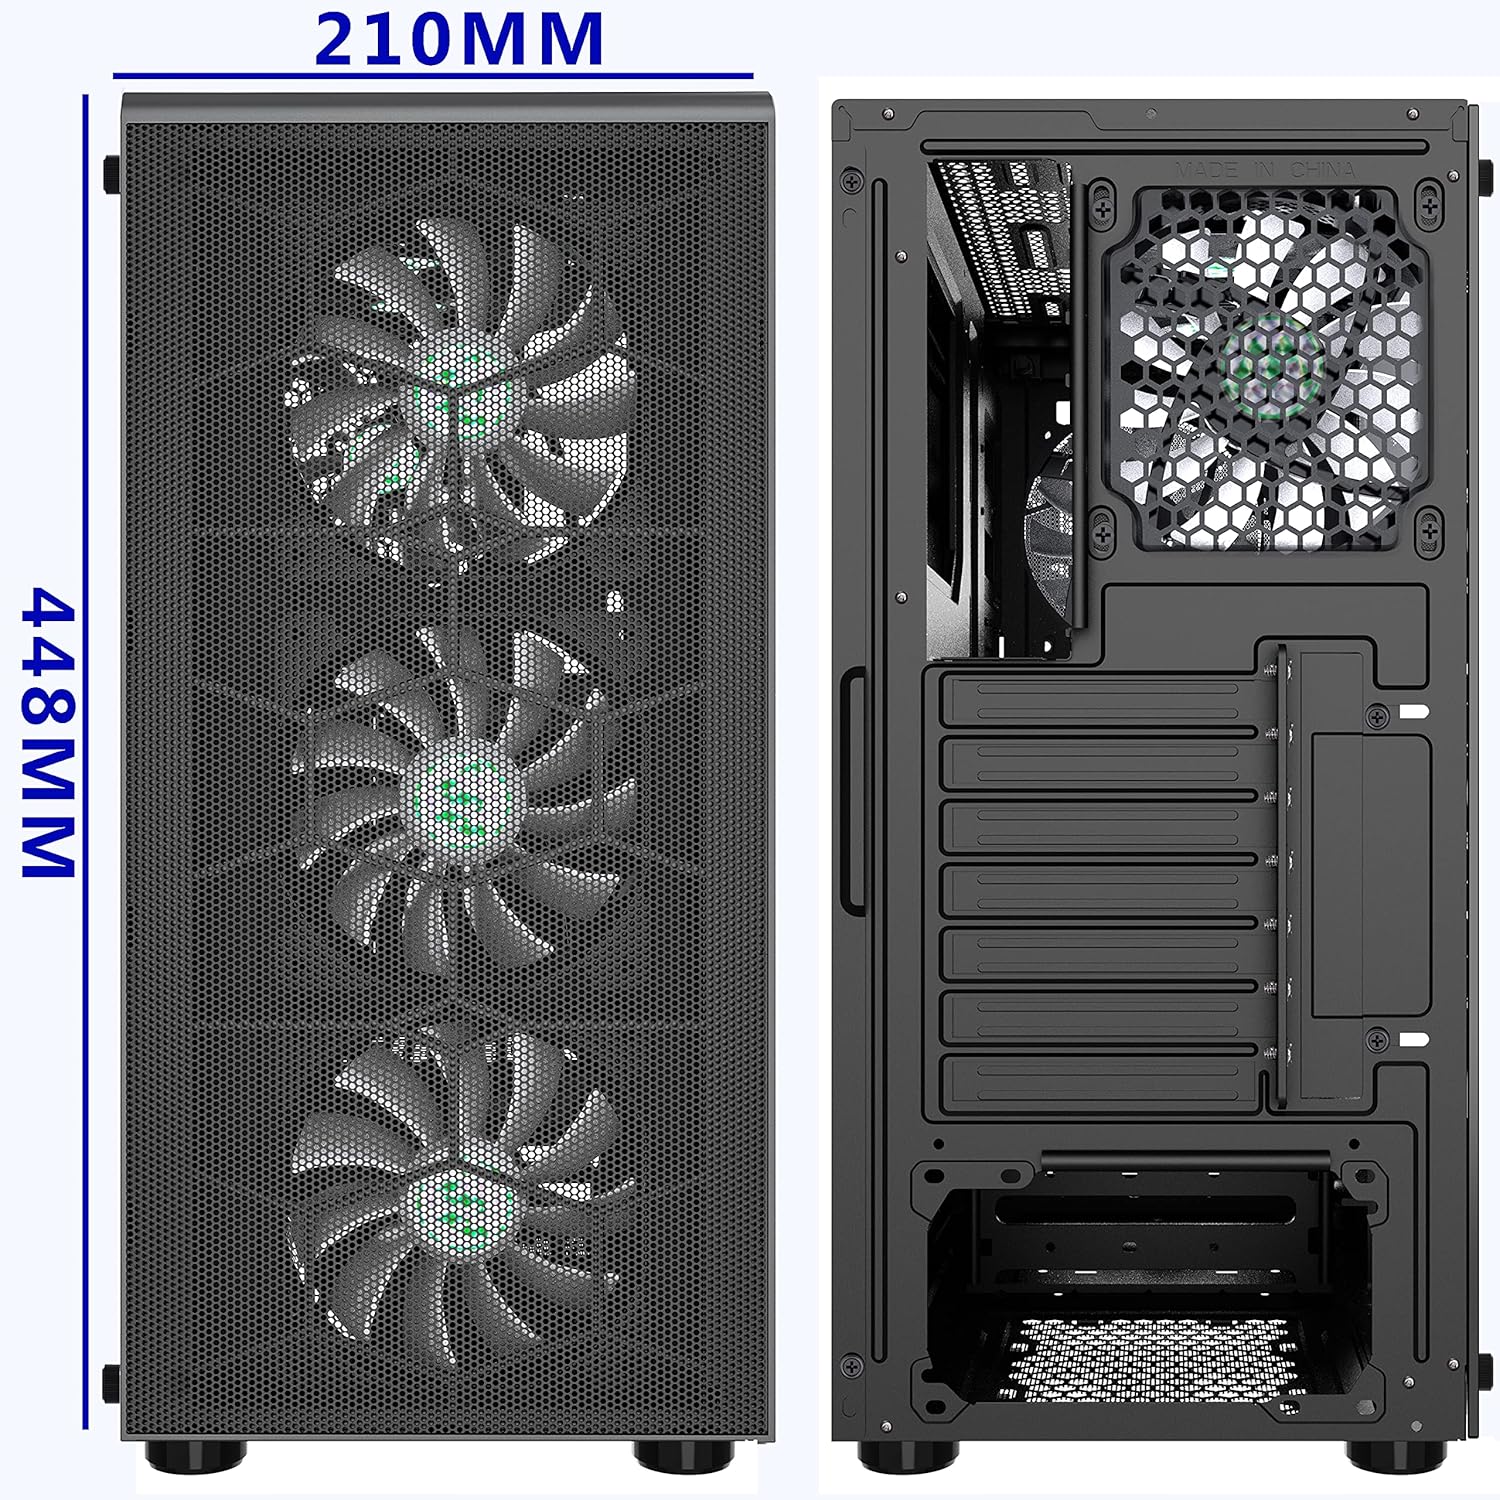
Figure 5: Front and rear views of the case, illustrating dimensions (210mm width, 448mm height).
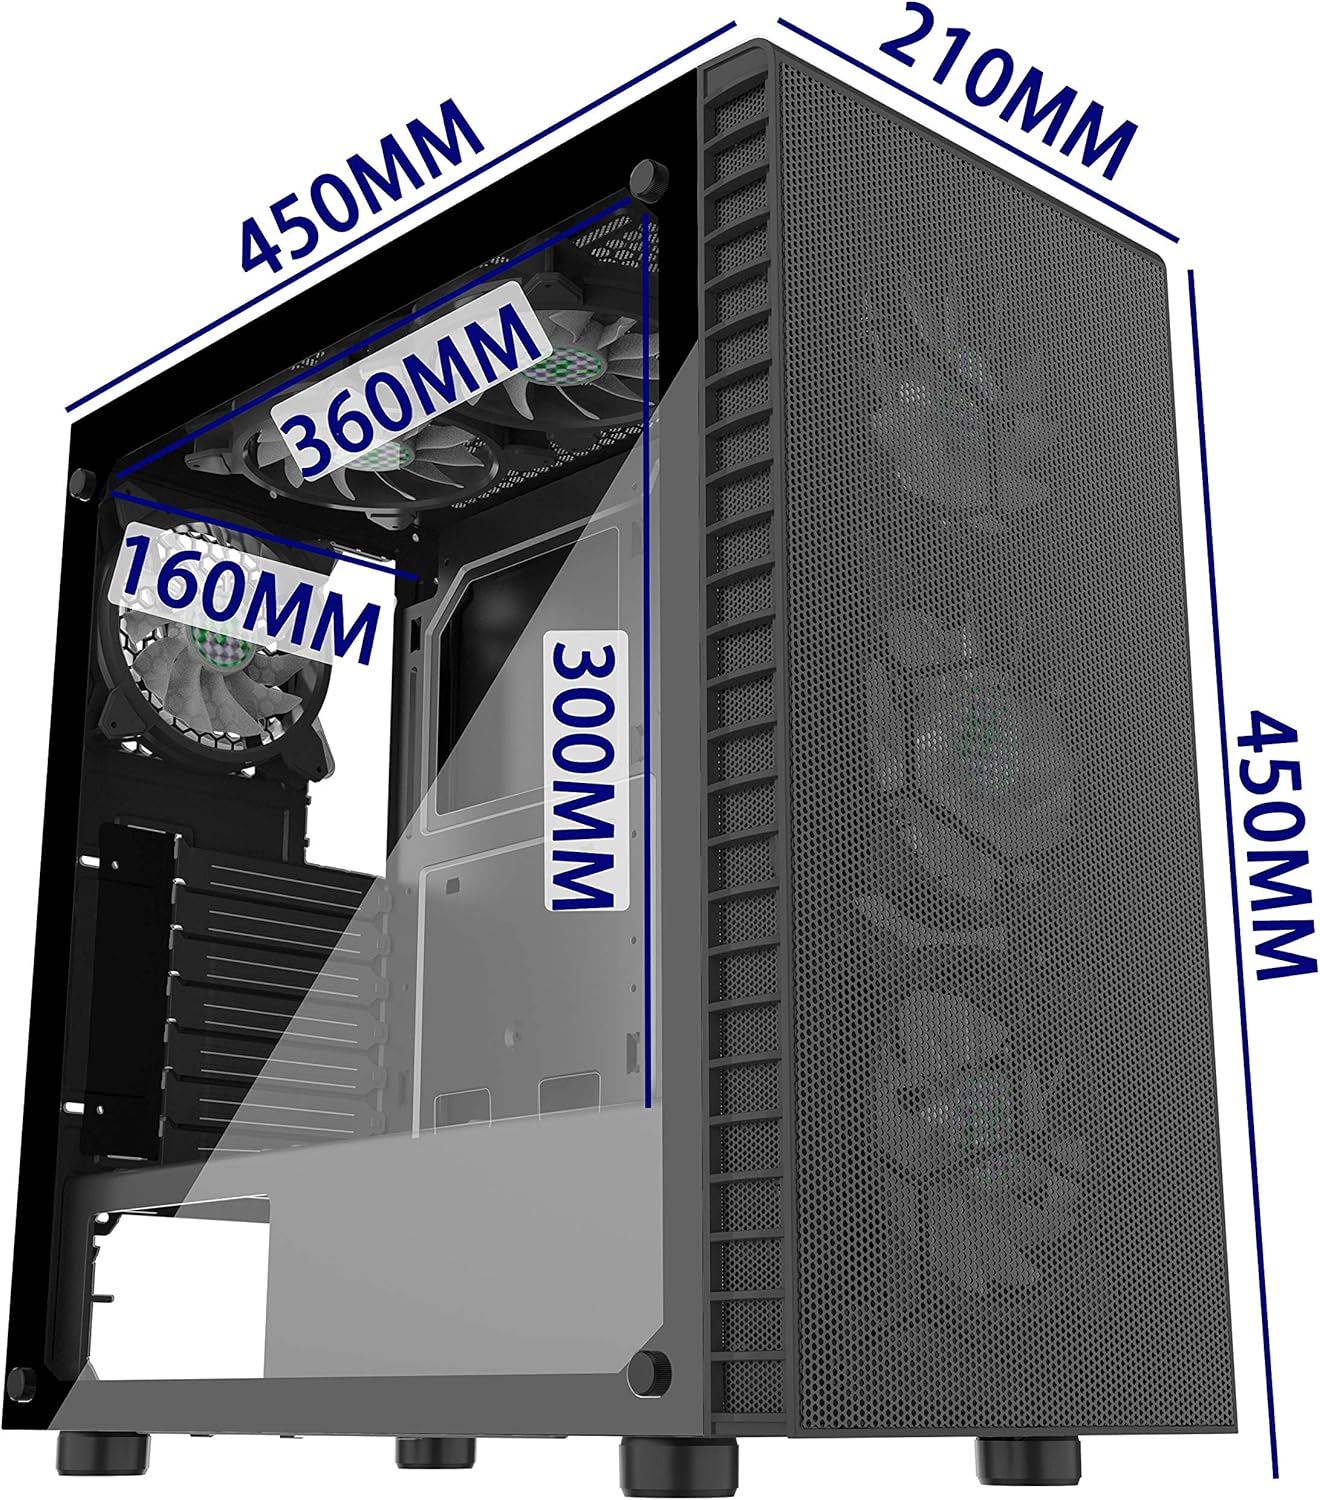
Figure 6: Isometric view showing internal dimensions for components like GPU (300mm), top radiator (360mm), and front radiator (160mm).


