
1. Introduction
This manual provides detailed instructions for the safe and efficient installation, operation, and maintenance of your Ensenior 6 Pack 4 Inch LED Recessed Lights. Please read this manual thoroughly before installation and retain it for future reference.

Image 1.1: Ensenior 4 Inch LED Recessed Light showcasing its ultra-thin design, high brightness (750LM), 9W power consumption, 5%-100% dimmability, and suitability for damp locations.
2. Safety Information
- Always turn off the power at the circuit breaker before beginning installation.
- Consult a qualified electrician if you are unsure about the installation process.
- Ensure all electrical connections comply with local and national electrical codes.
- Do not modify the fixture or its components.
- This product is suitable for damp locations but avoid direct water contact.
- The junction box is IC rated, allowing direct contact with insulation.
3. Package Contents
Verify that all components are present before installation:
- Recessed Light (6 units)
- Junction Box (6 units)
- Instruction Manual (1 unit)
- Cutting Template (1 unit)
4. Specifications
| Brand | Ensenior |
| Model Number | ERL-9X-ETL (4I-5CCT-6PACK) |
| Size | 4 Inch |
| Color Temperature (CCT) | 2700K, 3000K, 3500K, 4000K, 5000K (5CCT Selectable) |
| Brightness | 750 Lumens |
| Wattage | 9 Watts |
| Voltage | 120 Volts |
| Dimmable | 5%-100% Smooth Dimming |
| Material | Aluminum |
| Life Span | 50,000 Hours |
| Certifications | ETL, FCC, IC Rated, UL Listed Terminals |
| Damp Rated | Yes |
| Product Dimensions | 4.72"L x 4.72"W x 0.94"H |

Image 4.1: Detailed product dimensions for the 4-inch recessed light and its junction box. Recommended hole sizes are 4.25" to 4.6".
5. Setup and Installation
Follow these steps for a safe and easy installation:
5.1. Prepare the Installation Area
- Turn off power at the circuit breaker.
- Use the provided cutting template to mark the desired hole size (4.25" to 4.6") on the ceiling.
- Cut the hole carefully using an appropriate tool.
5.2. Wiring the Junction Box
- Open the junction box cover.
- Connect the household electrical wires (live, neutral, ground) to the corresponding terminals inside the junction box using the provided UL listed connectors.
- Close the junction box cover securely.
5.3. Selecting Color Temperature (CCT)
Before mounting the light, select your desired color temperature (2700K, 3000K, 3500K, 4000K, or 5000K) using the switch located on the side of the junction box. This allows you to customize the ambiance of your room.

Image 5.1: The CCT selection switch on the junction box allows you to choose from 5 color temperatures (2700K to 5000K) to match your preference.
5.4. Connecting and Mounting the Light
- Connect the male/female cable from the junction box to the recessed light fixture.
- Push the spring clips on the recessed light upwards and insert the light into the prepared ceiling hole.
- Release the clips; they will secure the light firmly against the ceiling.

Image 5.2: Visual guide for hassle-free installation, detailing steps from cutting the hole to mounting the light.
5.5. Dimmer Compatibility
These lights are 5%-100% dimmable. Refer to the table below for compatible dimmer models. Other models may also be suitable.
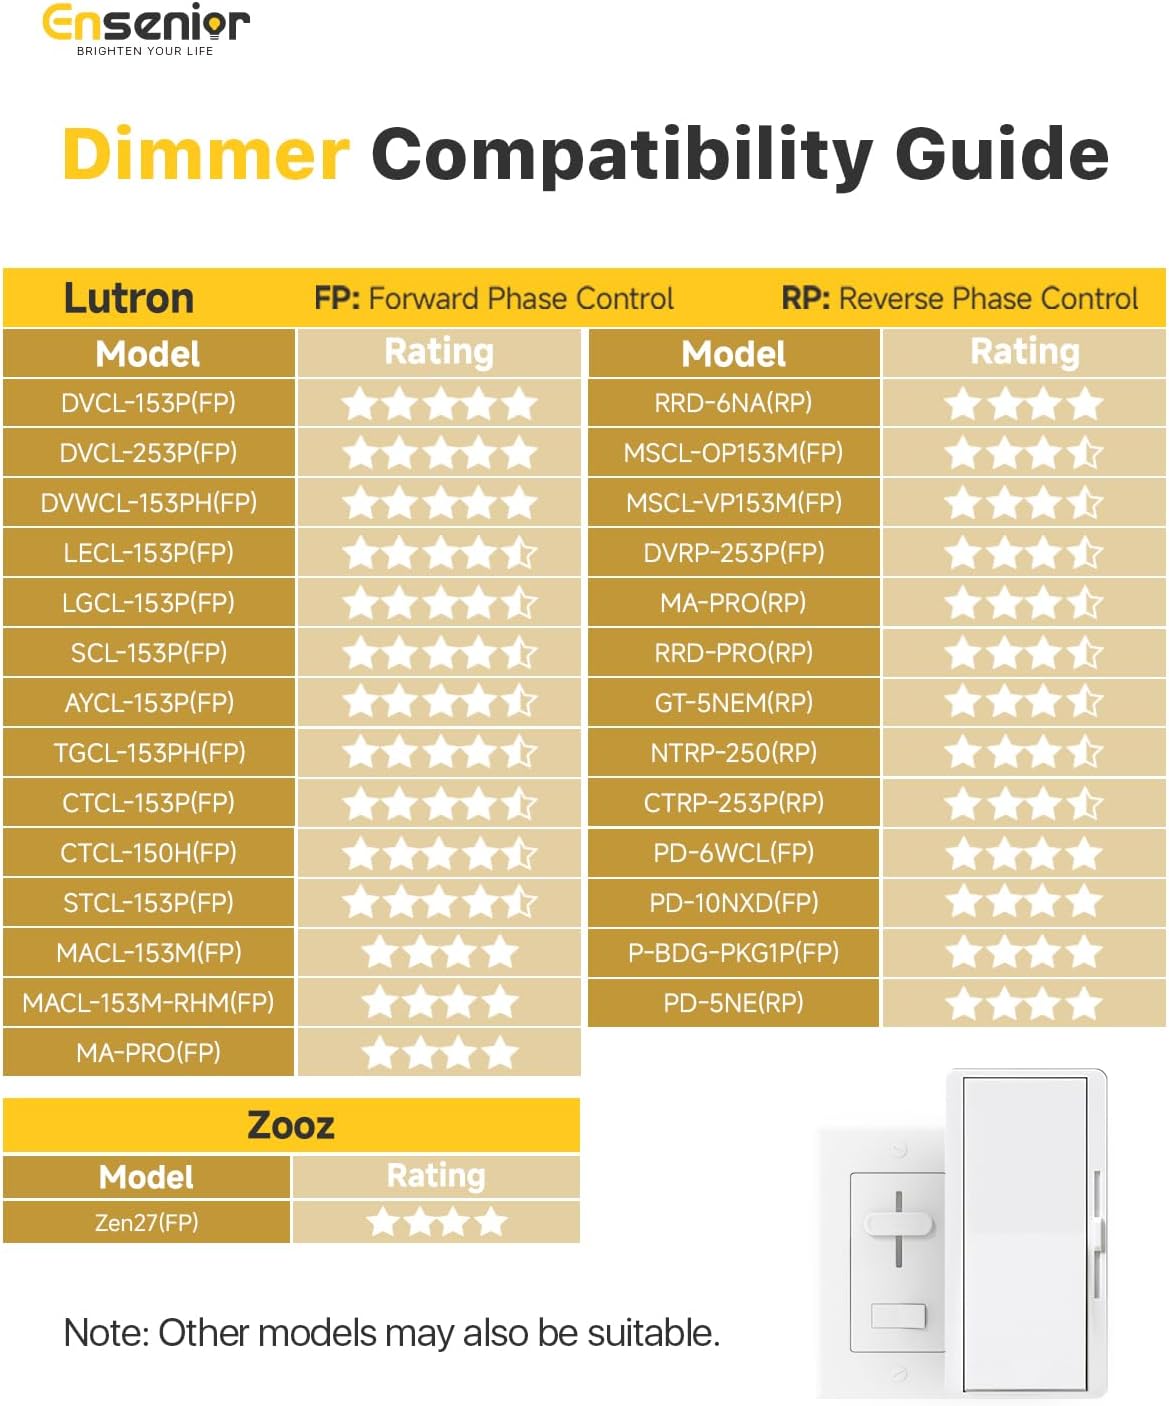
Image 5.3: Dimmer Compatibility Guide showing various Lutron and Zooz models that work with Ensenior recessed lights.
5.6. Recommended Spacing
For optimal illumination, consider the following spacing guidelines:

Image 5.4: Recommended spacing for recessed lights, typically 2-4 feet apart and 7 feet from walls for balanced lighting.
5.7. Installation Video Guide
Watch this video for a visual guide on the installation process and key features of the Ensenior Ultra-Thin LED Recessed Ceiling Light.
Video 5.1: An official Ensenior video demonstrating the ultra-thin design, cooling fins, safe wiring, CCT options, dimmability, and the spring clip mounting method for the recessed lights.
6. Operating Instructions
6.1. Adjusting Brightness (Dimming)
The Ensenior LED recessed lights are designed for smooth dimming from 5% to 100%. Use a compatible dimmer switch (refer to Section 5.5) to adjust the light output to your preferred level. This allows for versatile lighting suitable for various activities, from bright task lighting to soft ambient light.
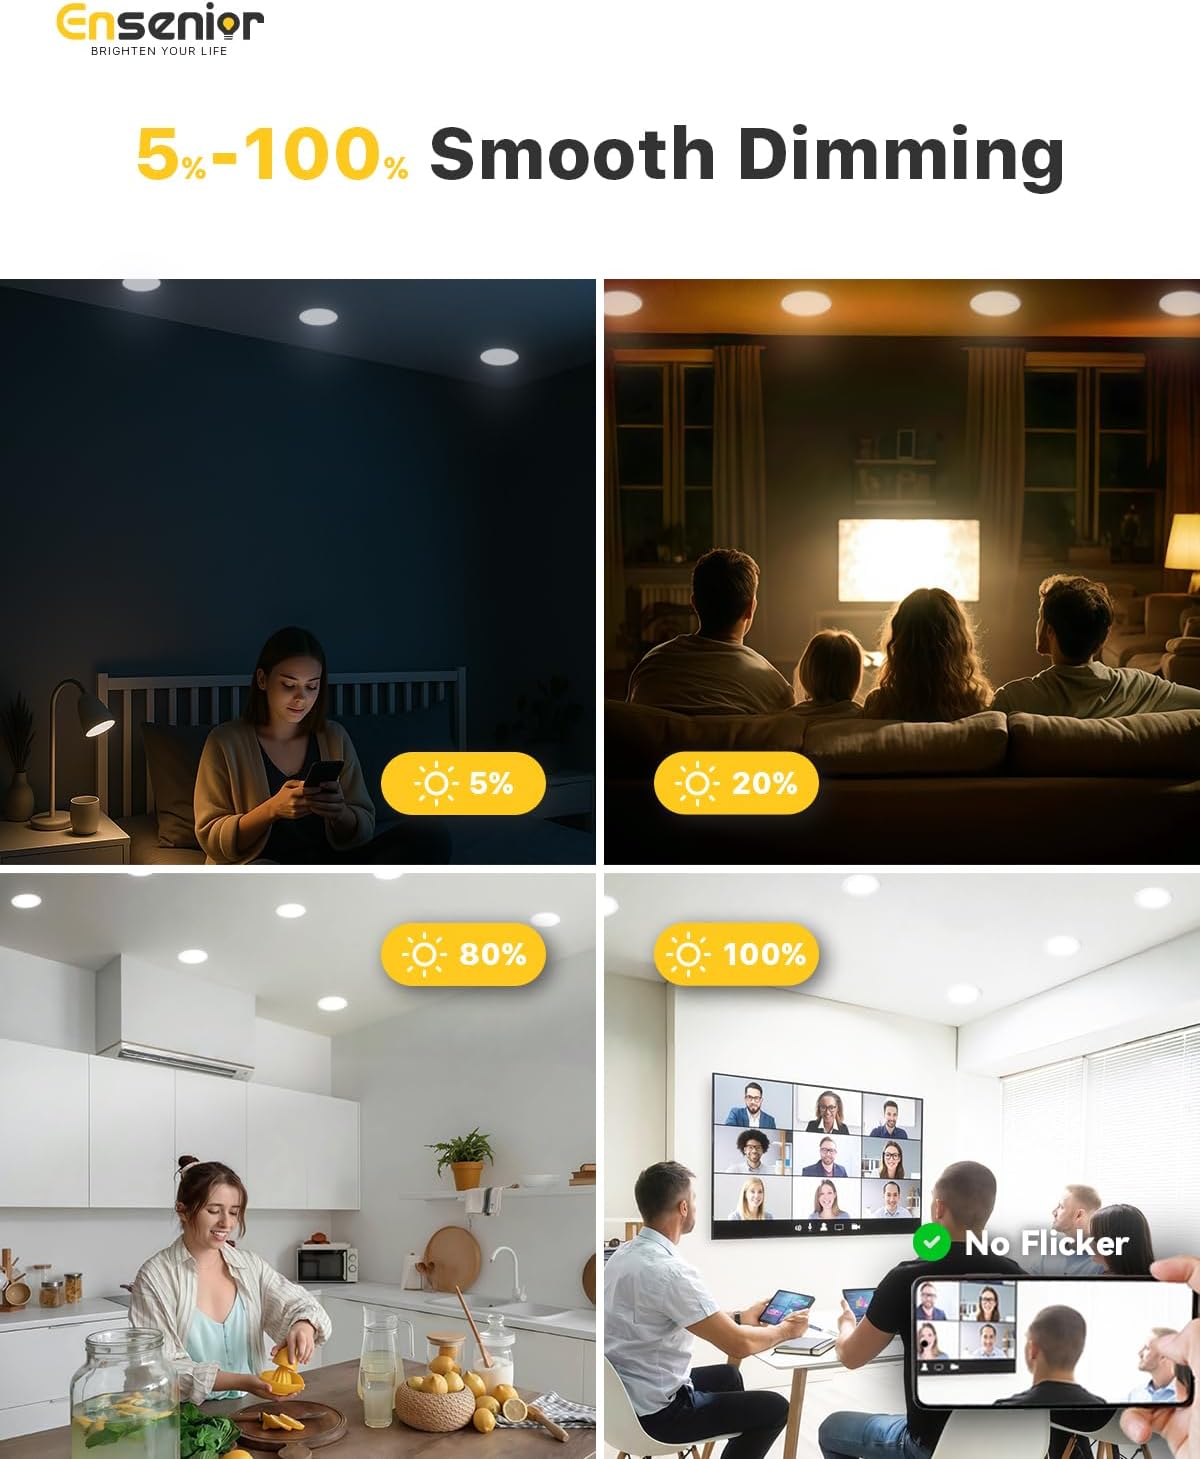
Image 6.1: Demonstration of 5%-100% smooth dimming capability, illustrating how the light can be adjusted for different moods and tasks without flickering.
6.2. Changing Color Temperature (CCT)
The color temperature is selected via a switch on the junction box prior to installation. Once installed, the CCT setting is fixed until the fixture is accessed again. Choose from 2700K (warm white), 3000K (soft white), 3500K (neutral white), 4000K (cool white), or 5000K (daylight) to match your room's aesthetic and function.

Image 6.2: The 5CCT feature allows selection of color temperature for different rooms, such as 2700K for bedrooms and 5000K for living rooms.
6.3. Color Temperature Selection Video Guide
This video specifically demonstrates how to select the desired color temperature for your Ensenior recessed lights.
Video 6.1: An official Ensenior video showcasing the 2700K, 3000K, 3500K, 4000K, and 5000K color temperature options for the recessed light.
7. Maintenance
- Ensure power is off before cleaning.
- Clean the light fixture with a soft, dry cloth. Do not use abrasive cleaners or solvents.
- Regularly check for any loose connections or damage.
- LED lights have a long lifespan and typically do not require bulb replacement.
8. Troubleshooting
If you encounter issues with your recessed lights, refer to the following common troubleshooting steps:
- Light does not turn on: Check the circuit breaker to ensure power is on. Verify all wire connections in the junction box are secure. Ensure the light fixture is properly connected to the junction box.
- Light flickers: Ensure you are using a compatible dimmer switch. Check for loose wiring connections.
- Inconsistent brightness: Verify that all lights are set to the same color temperature if applicable. Ensure the dimmer switch is functioning correctly.
- Light makes noise: Ensure all connections are secure. If using a dimmer, verify it is compatible and properly installed.
9. Warranty and Support
Ensenior LED recessed ceiling lights come with a 5-year warranty and a 50,000-hour lifespan. For any questions or support, please contact Ensenior customer service. They offer 7/24 customer service and a commitment to new replacements without fear of quality problems.


