
MAXTO M3 Headset
Maxto M3 Bluetooth Motorcycle Helmet Intercom User Manual
Model: M3 Headset
Introduction
This user manual provides detailed instructions for the installation, operation, and maintenance of your Maxto M3 Bluetooth Motorcycle Helmet Intercom. Please read this manual thoroughly before using the device to ensure proper functionality and safety. The Maxto M3 is designed to provide seamless communication and entertainment while riding, suitable for various helmet types.
Product Overview
The Maxto M3 is a dedicated Bluetooth intercom system for motorcycle helmets, offering enhanced communication and multimedia features. Key features include:
- Dedicated Bluetooth intercom for motorcycle helmets.
- 2-in-1 microphone suitable for various helmet types (full-face, open-face, half-face, flip-up, 3/4 helmets).
- Designed for quick installation and transfer between multiple helmets.

Image: Front view of the Maxto M3 Bluetooth intercom unit, showcasing its sleek black design with a blue illuminated ring on the right side and a camera lens on the left.
Package Contents
Please check the package contents upon unboxing to ensure all components are present:
- Maxto M3 Bluetooth Intercom Unit
- 2-in-1 Microphone (boom mic and soft wire mic)
- Helmet Speakers (pair)
- USB Charging Cable
- Mounting Clip (for helmet edge)
- Adhesive Mount (for flat helmet surfaces)
- Velcro Pads for Speakers and Microphone
- Hex Key (for clip installation)
- User Manual

Image: All components included in the Maxto M3 package, laid out on a white surface. This includes the main unit, speakers, microphones, various mounting options, and cables.
Component Identification
Familiarize yourself with the various parts of the Maxto M3 unit and its accessories:

Image: A detailed diagram of the Maxto M3 unit with labels pointing to its various buttons, ports, and features. Key components include the lens, switch (drive recorder), WiFi button, indicator, switch button, multi-function button, knob, USB charging port, earphone jack, card slot, and clip.
- Lens: For video recording.
- Switch (Drive Recorder): Power on/off and control recording functions.
- WiFi Button: Activates Wi-Fi for app connectivity.
- Indicator: LED light showing device status (power, pairing, charging).
- Switch Button: Controls various functions depending on context.
- Multi-function Button: Primary control for calls, music, and intercom.
- Knob: Rotary control for volume adjustment and menu navigation.
- USB Charging Port: For charging the device.
- Earphone Jack: Connects to helmet speakers and microphone.
- Card Slot: For inserting a microSD card for video storage.
- Clip: Attachment point for helmet mounting.
Setup and Installation
Proper installation ensures optimal performance and comfort. The Maxto M3 offers two main mounting options:
1. Helmet Edge Clip Installation
- Loosen the screws on the helmet clip using the provided hex key.
- Slide the clip between the outer shell and the inner padding of your helmet, ensuring it is securely positioned.
- Tighten the screws to firmly secure the clip.
- Slide the Maxto M3 unit onto the clip until it clicks into place.
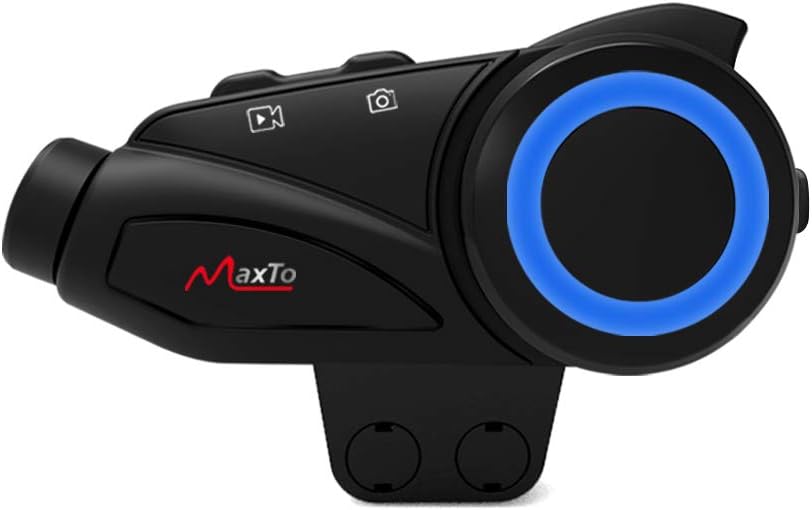
Image: The Maxto M3 unit attached to its helmet clip, demonstrating how it would sit on the side of a helmet.

Image: Two types of mounting clips for the Maxto M3: a screw-on clamp clip and an adhesive base with 3M VHB tape, providing flexible installation options.
2. Adhesive Mount Installation
- Clean the desired flat surface on your helmet where the unit will be mounted. Ensure it is dry and free of dust.
- Peel off the protective film from the 3M VHB adhesive on the mount.
- Firmly press the adhesive mount onto the helmet surface for at least 30 seconds. Allow 24 hours for the adhesive to fully cure before attaching the unit.
- Slide the Maxto M3 unit onto the adhesive mount until it clicks into place.
3. Speaker and Microphone Installation
- Attach the Velcro pads to the back of the speakers.
- Position the speakers inside the helmet's ear pockets, ensuring they are aligned with your ears for optimal sound.
- Choose the appropriate microphone for your helmet type:
- Boom Microphone: Ideal for open-face or flip-up helmets. Attach the Velcro to the boom mic and position it near your mouth.
- Soft Wire Microphone: Suitable for full-face helmets. Attach the Velcro to the mic and place it inside the helmet near your mouth, often along the cheek pad.
- Route the speaker and microphone wires neatly under the helmet padding to the mounting location of the Maxto M3 unit.
- Plug the speaker/microphone cable into the earphone jack on the Maxto M3 unit.
Operating Instructions
Power On/Off
- Power On: Press and hold the Power/Drive Recorder Switch button for approximately 3 seconds until the indicator light turns on.
- Power Off: Press and hold the Power/Drive Recorder Switch button for approximately 3 seconds until the indicator light turns off.
Bluetooth Pairing (Mobile Phone)
- With the Maxto M3 powered off, press and hold the Multi-function Button for approximately 5-7 seconds until the indicator light flashes red and blue alternately, indicating pairing mode.
- On your mobile phone, enable Bluetooth and search for new devices.
- Select "Maxto M3" from the list of available devices.
- Once paired, the indicator light will turn solid blue.
Intercom Pairing (Device to Device)
The Maxto M3 supports intercom communication with other Maxto M3 units and can also pair with other brands of Bluetooth intercoms.

Image: Diagram illustrating the Maxto M3's compatibility with various other Bluetooth intercom brands and helmet types, showing its versatility in group communication.
- Ensure both Maxto M3 units are powered on and not connected to any other devices.
- On both units, press and hold the Intercom Button (often integrated with the Multi-function Button or a dedicated button) for approximately 3-5 seconds until the indicator lights flash rapidly.
- One unit will automatically search for the other. Once connected, the indicator lights will change to a steady color (e.g., blue).
- To initiate intercom conversation, briefly press the Intercom Button on either unit.
Music Playback
- Play/Pause: Briefly press the Multi-function Button.
- Next Track: Rotate the Knob clockwise.
- Previous Track: Rotate the Knob counter-clockwise.
- Volume Up: Briefly press the Volume Up button (if separate) or rotate the Knob clockwise and hold.
- Volume Down: Briefly press the Volume Down button (if separate) or rotate the Knob counter-clockwise and hold.
Phone Calls
- Answer Call: Briefly press the Multi-function Button.
- End Call: Briefly press the Multi-function Button.
- Reject Call: Press and hold the Multi-function Button for 2 seconds.
- Redial Last Number: Double-press the Multi-function Button.
Video Recording (Drive Recorder)
The Maxto M3 features an integrated drive recorder. Ensure a microSD card (not included) is inserted into the card slot before recording.
- Start Recording: Briefly press the Drive Recorder Switch button. The indicator light will change to indicate recording is active.
- Stop Recording: Briefly press the Drive Recorder Switch button again.
- Access Recordings: Connect the device to a computer via USB or remove the microSD card to view recorded files.
Wi-Fi Connectivity
The Maxto M3 can connect to a smartphone app via Wi-Fi for live view, settings adjustment, and file management.
- Activate Wi-Fi: Press the Wi-Fi Button. The Wi-Fi indicator will light up.
- Connect to App: On your smartphone, connect to the Maxto M3's Wi-Fi network (SSID and password usually found in the quick start guide or on the device). Open the dedicated Maxto app to control and view the device.
Maintenance
- Cleaning: Use a soft, damp cloth to clean the exterior of the unit. Do not use harsh chemicals or abrasive cleaners.
- Storage: When not in use for extended periods, store the device in a cool, dry place.
- Battery Care: To prolong battery life, charge the device fully before long-term storage and recharge it every few months.
- Water Resistance: The Maxto M3 is designed to be weather-resistant, but avoid submerging it in water. Ensure the USB port cover is securely closed.
Troubleshooting
| Problem | Possible Cause | Solution |
|---|---|---|
| Device does not power on. | Low battery. | Charge the device fully. |
| Cannot pair with phone/intercom. | Not in pairing mode; too far apart; interference. | Ensure device is in pairing mode (flashing red/blue). Move closer. Restart both devices. |
| No sound from speakers. | Speakers not connected; volume too low; faulty speakers. | Check speaker connection to the unit. Increase volume. Test with another audio source if possible. |
| Video recording not working. | No microSD card; card full; card error. | Insert a microSD card. Format the card. Use a compatible card (Class 10 or higher). |
| Poor intercom range/quality. | Obstructions; too far apart; interference. | Reduce distance between units. Avoid large obstructions. |
Specifications
| Feature | Detail |
|---|---|
| Brand | MAXTO |
| Model Name | M3 |
| Manufacturer Reference | M3 Headset |
| Connectivity Technology | Wireless |
| Wireless Communication Technology | Bluetooth |
| Material | Plastic |
| Style | Clip M3 |
| Age Range (Description) | Adult |
| ASIN | B08KCQCYSY |
Warranty and Support
For warranty information and technical support, please refer to the official Maxto website or contact your local distributor. Keep your purchase receipt as proof of purchase for any warranty claims.
For further assistance, you may also refer to the manufacturer's contact information provided with your product packaging.
Ask a question about this manual
Ask about setup, troubleshooting, compatibility, parts, safety, or missing instructions. Manuals+ will review the question and use this page’s manual context to help answer it.