Introduction
This manual provides essential instructions for the safe and efficient operation, maintenance, and troubleshooting of your ONEZILI 15L Ultrasonic Cleaner, Model OZL-15A. Please read this manual thoroughly before using the appliance and retain it for future reference.

Image: The ONEZILI 15L Ultrasonic Cleaner unit, showcasing its stainless steel construction, control panel, drain valve, and included accessories: a cleaning basket, drain hose, and power cord.
Important Safety Instructions
To reduce the risk of fire, electric shock, or injury, always follow these basic safety precautions:
- Grounding: The unit must be properly connected to a grounded electrical outlet to prevent electric shock.
- Disassembly: Do not attempt to disassemble or modify the unit. Servicing should only be performed by qualified personnel.
- Wet Hands: Never touch the electrical socket or plug with wet hands.
- Empty Tank Operation: Do not operate the unit when the cleaning tank is empty. This can damage the ultrasonic transducers.
- Water Level: Ensure the cleaning solution level is always between the MIN and MAX fill lines.
- Ventilation: Operate the unit in a well-ventilated area.
- Chemicals: Use only cleaning solutions recommended for ultrasonic cleaners. Avoid flammable, corrosive, or abrasive solutions.
- Children and Pets: Keep the appliance out of reach of children and pets.
- Power Cord: Regularly inspect the power cord for damage. Do not use if the cord is damaged.
- Heat: The unit's surface may become hot during operation, especially when using the heating function. Exercise caution.
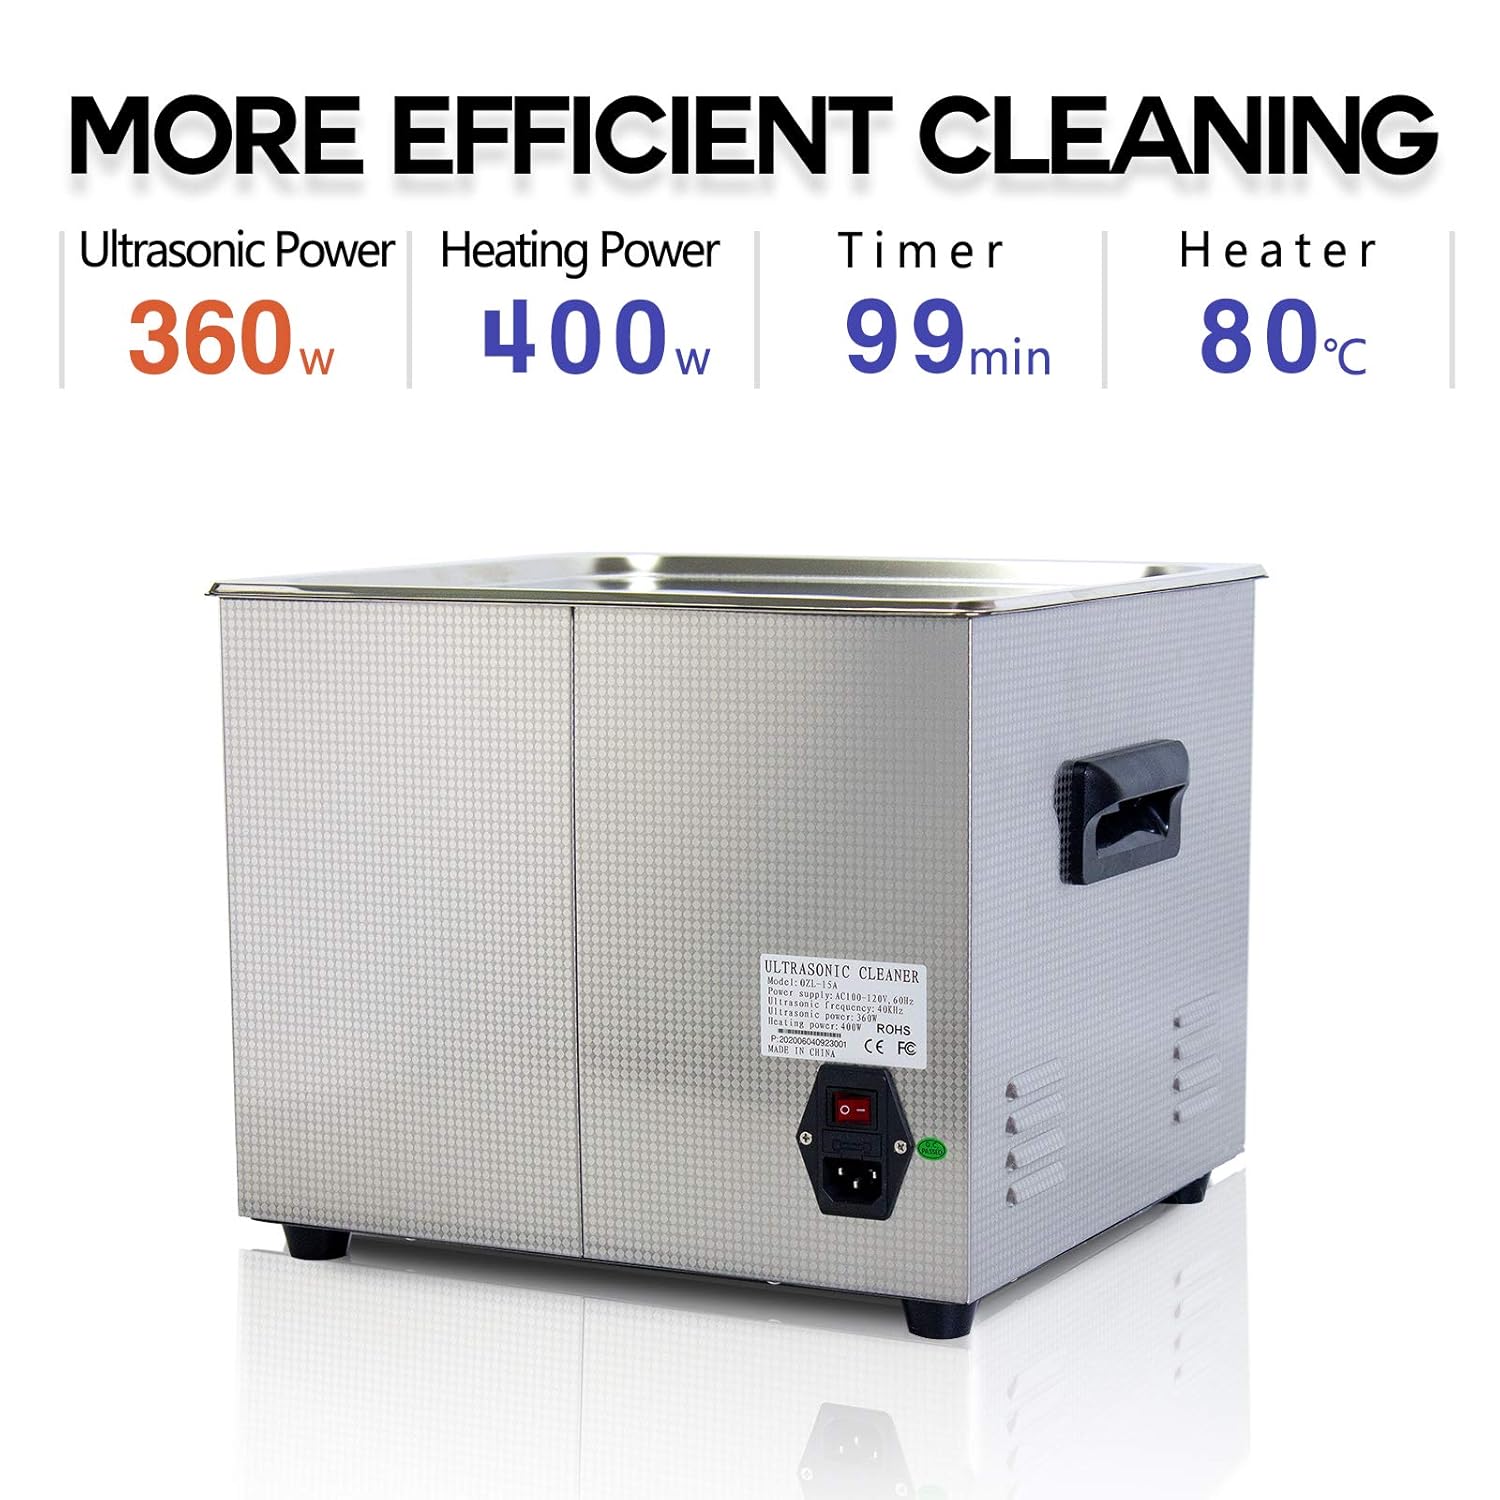
Image: Rear view of the ultrasonic cleaner, highlighting the main power switch and a warning label with important safety information regarding grounding and operation.
Product Overview and Components
The ONEZILI 15L Ultrasonic Cleaner is designed for professional cleaning of various items. Key components include:
- Stainless Steel Tank: Durable 304 stainless steel tank for holding cleaning solution.
- Control Panel: Digital display and buttons for setting temperature and time.
- Drain Valve: For easy draining of used cleaning solution.
- Lid: Helps contain heat and reduce noise during operation.
- Cleaning Basket: A fine mesh basket designed to hold items during cleaning, preventing them from resting directly on the tank bottom.
- Power Cord: For connecting the unit to an electrical outlet.
- Drain Hose: For controlled draining of the tank.

Image: A comparison highlighting the superior features of the ONEZILI cleaner, including its 304 stainless steel tank, hanging basket design to protect transducers, and high-strength rubber handles for comfortable and safe transport.
Technical Specifications
| Feature | Value |
|---|---|
| Model Number | OZL-15A |
| Tank Capacity | 15 Liters |
| Proper Operating Capacity | Approximately 12 Liters |
| Ultrasonic Power | 360 Watts |
| Heating Power | 400 Watts |
| Maximum Heating Temperature | 80°C |
| Timer Settings | Up to 99 minutes |
| Product Dimensions (L x W x H) | 36.02 x 33.02 x 28.02 cm (14.18" x 13.00" x 11.03") |
| Tank Internal Dimensions (L x W x D) | Approximately 33.02 x 28.02 x 15.00 cm (13.00" x 11.03" x 5.91") |
| Basket Dimensions (L x W x D) | Approximately 30.81 x 27.31 x 11.00 cm (12.13" x 10.75" x 4.33") |
| Weight | 9.66 kg |
| Manufacturer | ONEZILI |
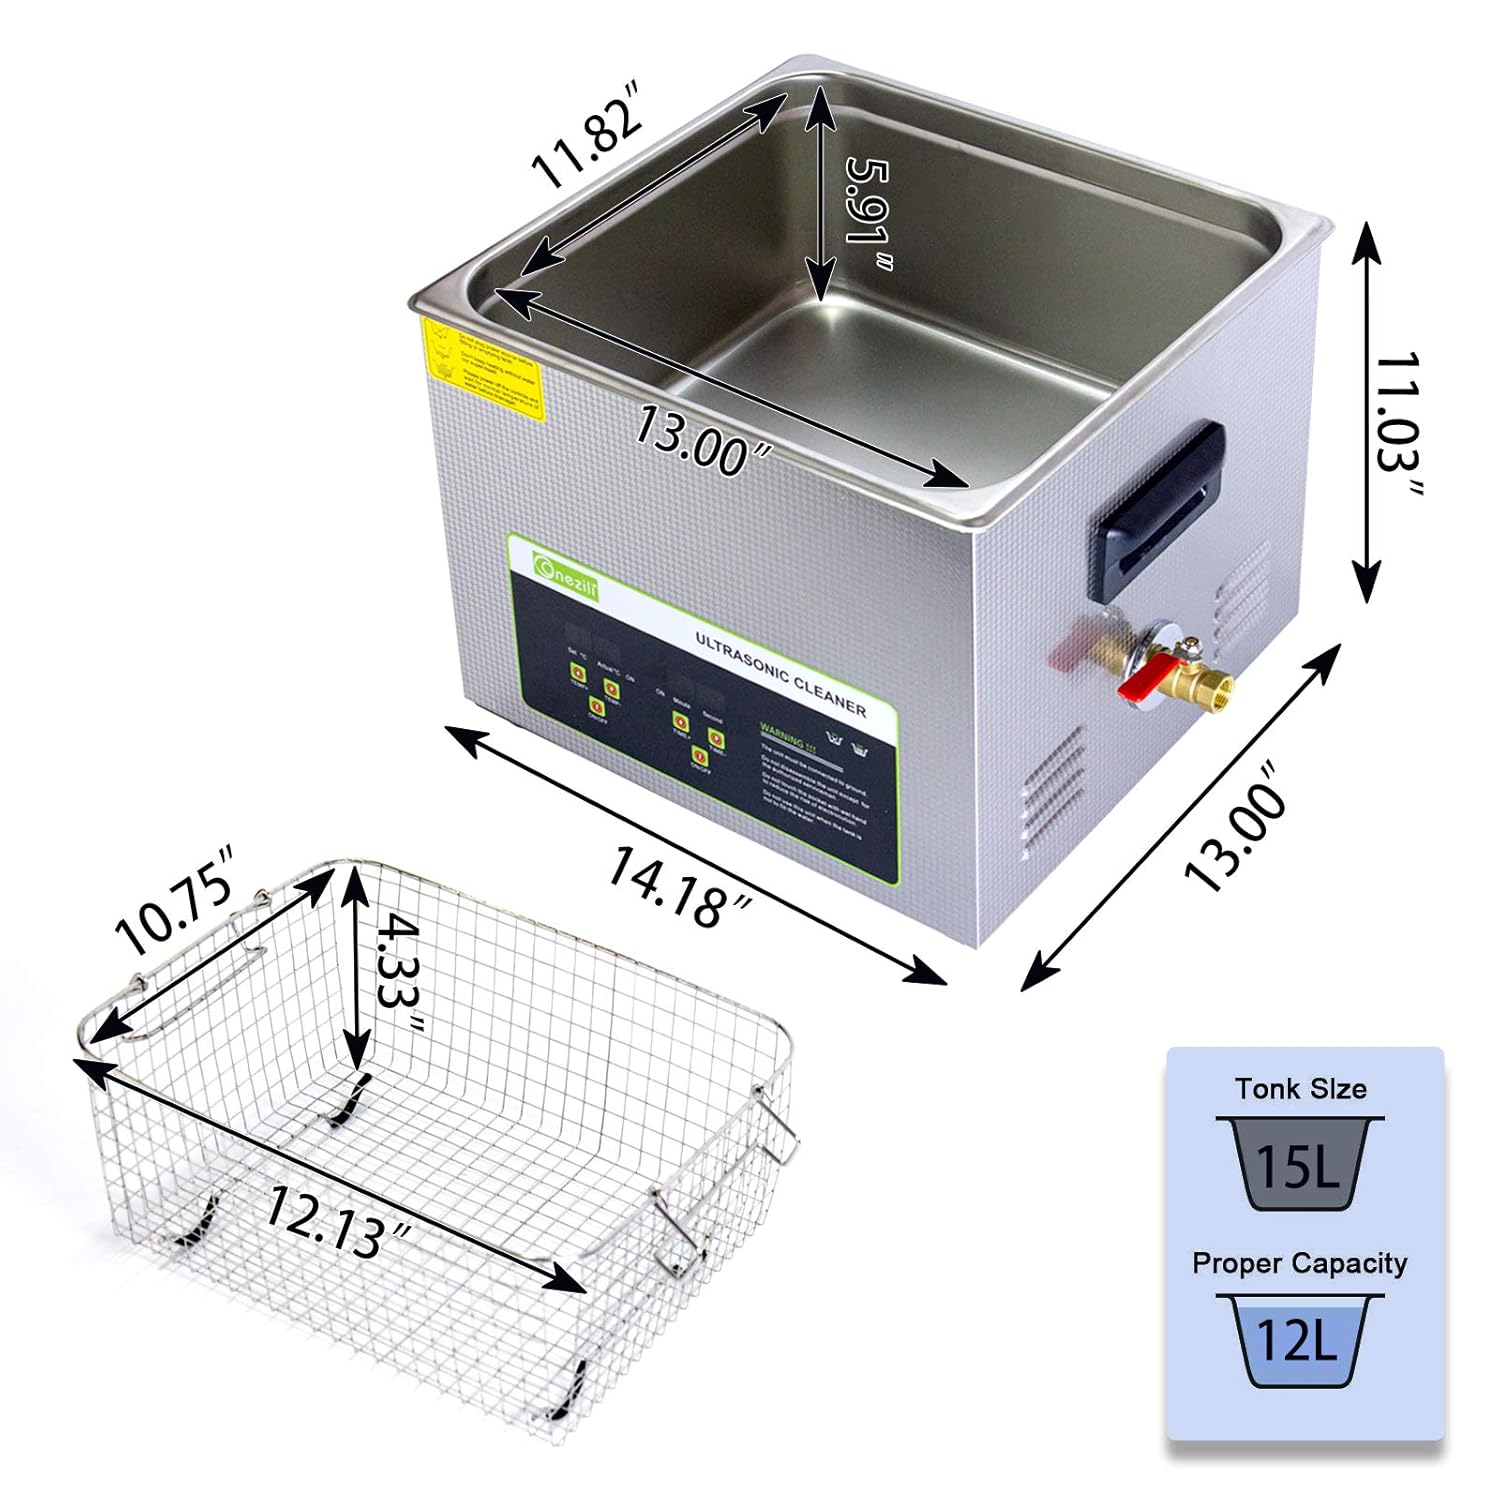
Image: Detailed diagram illustrating the external dimensions of the ultrasonic cleaner unit, the internal dimensions of the tank, and the dimensions of the included cleaning basket. It also indicates the 15L tank size and 12L proper capacity.
Setup Instructions
- Unpacking: Carefully remove the ultrasonic cleaner and all accessories from the packaging. Inspect for any damage.
- Placement: Place the unit on a stable, level, and heat-resistant surface. Ensure adequate ventilation around the unit.
- Power Connection: Ensure the power switch on the back of the unit is in the OFF position. Connect the power cord to the unit and then to a properly grounded electrical outlet.
- Fill Tank: Open the lid and fill the stainless steel tank with the appropriate cleaning solution. Ensure the liquid level is between the MIN and MAX marks. Do not overfill.
- Insert Basket: If using, place the cleaning basket into the tank.
- Drain Hose: Attach the drain hose to the drain valve if you plan to drain the solution immediately after use, or ensure the valve is closed.
Operating Instructions
- Power On: Flip the main power switch on the back of the unit to the ON position. The digital display will illuminate.
- Load Items: Place the items to be cleaned into the cleaning basket. Ensure items are fully submerged in the cleaning solution but do not touch the bottom of the tank directly.
- Set Temperature (Optional):
- Press the "TEMP+" or "TEMP-" buttons to adjust the desired heating temperature. The maximum temperature is 80°C.
- Press the "ON/OFF" button under "TEMP" to start or stop the heating function. The "ACTUAL" display will show the current liquid temperature.
- Set Cleaning Time:
- Press the "TIME+" or "TIME-" buttons to set the desired cleaning duration. The timer can be set up to 99 minutes.
- Press the "ON/OFF" button under "TIME" to start or stop the ultrasonic cleaning cycle. The display will count down the remaining time.
- Cleaning Process: The unit will begin ultrasonic cleaning. You may hear a high-frequency buzzing sound. Keep the lid closed during operation to maintain heat and reduce noise.
- Completion: Once the set time expires, the ultrasonic cleaning will automatically stop. The heating function will continue until manually turned off or the unit is powered down.
- Remove Items: Carefully open the lid. Use the basket to lift cleaned items out of the tank. Rinse items with clean water if necessary and dry them thoroughly.
- Drain Solution: Turn off the heating and ultrasonic functions. Place a suitable container under the drain valve. Open the drain valve to empty the used cleaning solution. Close the valve once empty.
- Power Off: Turn off the main power switch on the back of the unit and unplug the power cord from the outlet.
This ultrasonic cleaner is suitable for a wide range of applications, including:
- Jewelry (necklaces, rings, earrings, bracelets)
- Eyeglasses and optical lenses
- Watches (waterproof only, without strap)
- Dental instruments and dentures
- Small metal parts (carburetors, gun parts, brass casings, tools)
- Circuit boards and electronic components
- Laboratory equipment (test tubes, beakers)
- Small household items (razor heads, combs, toothbrushes)

Image: An illustration showing a variety of items that can be effectively cleaned using the ultrasonic cleaner, such as jewelry, firearms components, dental prosthetics, laboratory glassware, fruits, gears, and circuit boards.
Maintenance and Care
- Cleaning the Tank: After each use, especially with dirty solutions, drain the tank and wipe the interior with a soft cloth. Do not use abrasive cleaners or steel wool.
- Exterior Cleaning: Wipe the exterior of the unit with a damp cloth. Do not immerse the unit in water.
- Solution Replacement: Replace the cleaning solution regularly, or when it becomes visibly dirty or loses effectiveness.
- Storage: When not in use, ensure the tank is empty and dry. Store the unit in a cool, dry place away from direct sunlight and moisture.
- Basket Care: Clean the cleaning basket regularly to prevent residue buildup.
Troubleshooting
| Problem | Possible Cause | Solution |
|---|---|---|
| Unit does not power on. | No power supply; Power switch off; Faulty power cord. | Check power outlet; Ensure power switch is ON; Inspect power cord for damage. |
| Ultrasonic function not working. | Timer not set or started; Insufficient water level; Unit malfunction. | Set and start the timer; Ensure water level is adequate; Contact support if problem persists. |
| Heating function not working. | Temperature not set or started; Unit malfunction. | Set and start the heating function; Contact support if problem persists. |
| Poor cleaning results. | Incorrect cleaning solution; Insufficient cleaning time; Overloaded tank; Solution too cold. | Use appropriate solution; Increase cleaning time; Clean fewer items at once; Increase solution temperature. |
| Excessive noise during operation. | Items touching tank bottom; Unit not on a stable surface. | Ensure items are in the basket and not touching the tank; Place unit on a stable, level surface. |
Warranty and Support
For warranty information, technical support, or service inquiries, please contact ONEZILI customer service. Please have your model number (OZL-15A) and purchase date available when contacting support.
Refer to your purchase documentation or the ONEZILI official website for specific warranty terms and contact details.


