
1. Introduction
This manual provides detailed instructions for the Fafeicy DC 12V Adjustable Timer Delay Turn Off Module, model boug6t80c7. This module is designed to provide a precise time delay function for various electronic applications. It features an adjustable delay range of 1 to 10 seconds and includes a button switch for activation. The module is suitable for use in timer operating equipment, robotics, automation systems, and smart home projects.

Figure 1: Fafeicy DC 12V Adjustable Timer Delay Turn Off Module
2. Safety Information
Please read and understand all safety instructions before operating this module. Failure to follow these instructions may result in electric shock, fire, or damage to the product or connected equipment.
- Ensure the power supply voltage matches the module's specified voltage (DC 12V).
- Disconnect power before making any wiring connections or adjustments.
- Avoid touching exposed circuit components when the module is powered.
- Do not expose the module to moisture, extreme temperatures, or corrosive environments.
- This module is intended for use by individuals familiar with basic electronics and electrical wiring.
3. Product Overview
The Fafeicy DC 12V Adjustable Timer Delay Turn Off Module consists of a circuit board with a relay, a potentiometer for time adjustment, and terminal blocks for power and load connections. It also includes an external push-button switch for triggering the delay function.
3.1 Key Features
- Adjustable Time Delay: 1 to 10 seconds, adjustable via potentiometer.
- Reverse Input Protection: Designed to protect against incorrect power polarity.
- Integrated Button Switch: For convenient manual triggering.
- High Precision: Provides stable and reliable timing performance.
3.2 Component Identification
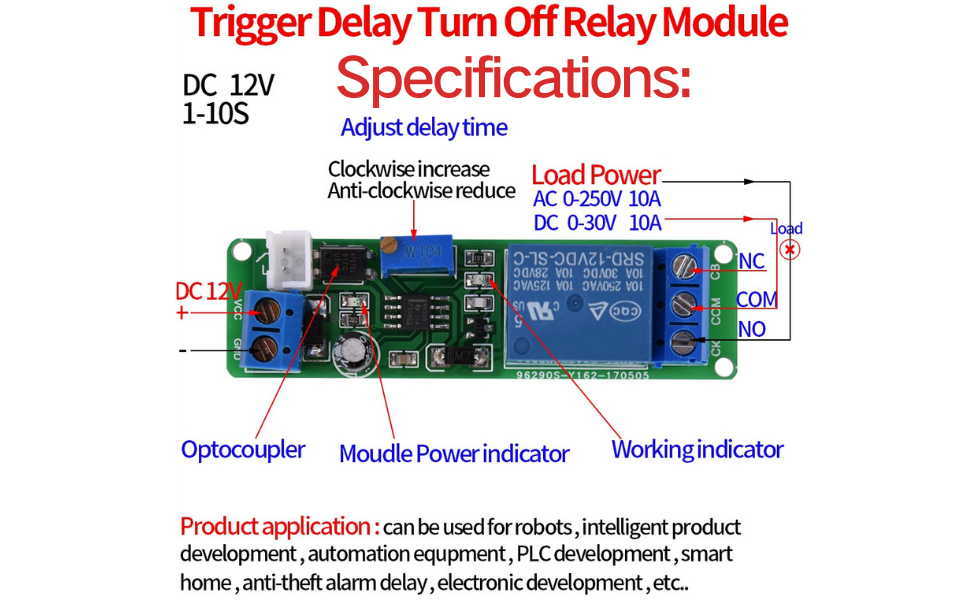
Figure 2: Module Component Diagram and Wiring
Refer to Figure 2 for the location of key components:
- VCC: Positive power input (DC 12V).
- GND: Ground connection.
- Potentiometer (W104): Used to adjust the delay time.
- Relay: Switches the load on/off.
- CK, COM, CB: Load connection terminals (Normally Closed, Common, Normally Open).
- Optocoupler: Provides isolation.
- Module Power Indicator: LED indicating power status.
- Working Indicator: LED indicating relay status.
4. Specifications
| Parameter | Value |
|---|---|
| Working Voltage | DC 12V |
| Time Range | 1 to 10 seconds (adjustable) |
| Load Capacity (AC) | 10A 250VAC |
| Load Capacity (DC) | 10A 30VDC |
| Dimensions (L x W) | 67.6mm x 19.2mm (2.66" x 0.75") |
| Number of Items | 1 |
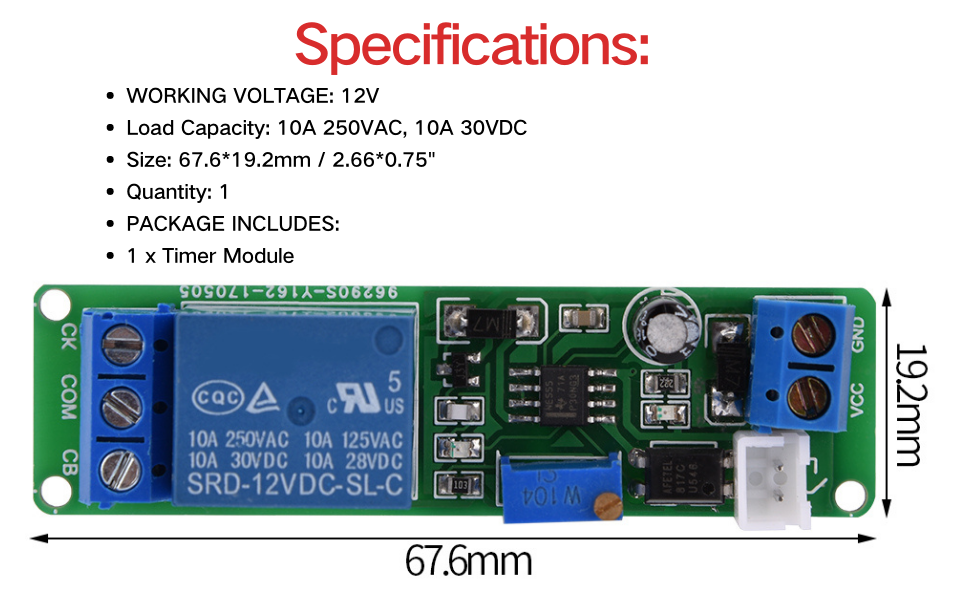
Figure 3: Module Specifications and Dimensions
5. Setup
Follow these steps to set up your timer module:
5.1 Wiring Connections
- Power Supply: Connect the positive (+) lead of your DC 12V power supply to the VCC terminal and the negative (-) lead to the GND terminal. Ensure correct polarity.
- Load Connection: The module's relay has three terminals: CK (Normally Closed), COM (Common), and CB (Normally Open).
- For a load that should turn ON after the delay, connect one side of the load to the power source and the other side to the CB terminal. Connect the COM terminal to the other side of the power source (or ground, depending on your load's wiring).
- For a load that should turn OFF after the delay, connect one side of the load to the power source and the other side to the CK terminal. Connect the COM terminal to the other side of the power source.
- Button Switch: The included push-button switch connects to the dedicated 2-pin header on the module. This switch triggers the timing sequence.
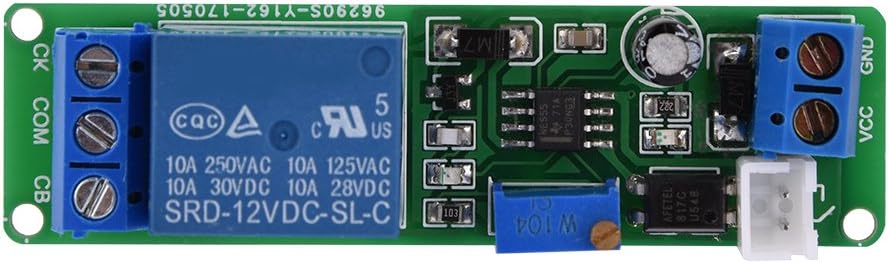
Figure 4: Top View of Module with Components
5.2 Initial Power-Up
After wiring, apply DC 12V power. The module's power indicator LED should illuminate, indicating that the module is receiving power.
6. Operating Instructions
The module operates as a delay turn-off timer. When triggered, it activates the load for a set duration and then deactivates it.
6.1 Adjusting Delay Time
The delay time (1 to 10 seconds) is adjusted using the blue potentiometer (labeled W104) on the circuit board. Use a small screwdriver to turn the potentiometer:
- Turn clockwise to increase the delay time.
- Turn counter-clockwise to decrease the delay time.
If a longer delay time is required, you may need to replace the capacitor or potentiometer with components of larger values (advanced modification).
6.2 Triggering the Timer
Once the module is powered and the delay time is set:
- Press the external push-button switch.
- The relay will activate, and the connected load will turn ON (if wired to CB) or OFF (if wired to CK). The working indicator LED will change state.
- After the set delay time expires, the relay will deactivate, and the load will return to its original state. The working indicator LED will also return to its original state.
7. Maintenance
The Fafeicy DC 12V Adjustable Timer Delay Turn Off Module is designed for reliable operation with minimal maintenance.
- Keep the module clean and free from dust and debris.
- Ensure all wiring connections are secure and free from corrosion.
- Periodically inspect for any signs of physical damage or overheating.
- Store the module in a dry, cool environment when not in use.
8. Troubleshooting
| Problem | Possible Cause | Solution |
|---|---|---|
| Module does not power on (Power LED off) | No power supply, incorrect voltage, reverse polarity, faulty wiring. | Check power supply connection, ensure it's DC 12V, verify polarity, inspect wiring for breaks. |
| Load does not activate/deactivate | Incorrect load wiring, faulty load, relay issue, button switch not working. | Verify load wiring (CK/COM/CB), test the load independently, check button switch connection. |
| Delay time is incorrect or not adjustable | Potentiometer setting, faulty potentiometer or capacitor. | Adjust the potentiometer. If issue persists, component replacement may be necessary (advanced). |
| Module overheats | Overloaded relay, short circuit, incorrect voltage. | Ensure load current does not exceed 10A, check for short circuits, verify input voltage. |
9. Warranty and Support
Fafeicy products are manufactured to high-quality standards. For specific warranty information, please refer to the product packaging or contact your retailer. For technical support or inquiries, please visit the official Fafeicy website or contact their customer service department.
Fafeicy Official Store: Visit Fafeicy Store on Amazon