1. Product Overview
This DEEG Front Wheel Bearing Kit is designed as a replacement and upgrade for the front wheel bushings on various John Deere lawn mower models. It provides a smoother operation and enhanced durability compared to standard bushings.

Image 1.1: Complete DEEG Front Wheel Bearing Kit, including bearings, washers, E-clips, and hub caps.
Key Features:
- Bearing Grade: P6 (ABEC3) for precision and performance.
- High Speed Rating: Up to 9000 R/min.
- Low Noise Value: Z1.
- Designed for wheels with 1 3/8 inch rim size and 3/4 inch axle size.
2. Compatibility
This bearing kit is compatible with a wide range of John Deere lawn mower models, as well as certain Craftsman and Husqvarna models. Always verify your wheel hub liner or bearing hole outer diameter for proper fitment.

Image 2.1: Visual guide for determining compatibility by measuring the outer diameter of the lawn mower wheel hub liner or bearing hole. The kit is suitable for wheels with a 1-1/2 inch (38.1mm) outer diameter bearing hole.
Compatible John Deere Models:
- L Series: L100, L105, L107, L108, L110, L111, L118, L120, L130
- LA Series: LA100, LA105, LA110, LA115, LA120, LA125, LA130, LA135, LA140, LA145, LA150, LA155, LA165, LA175
- D Series: D100, D105, D110, D120, D125, D130, D140, D150, D155, D160, D170
- X Series: X300, X304, X310, X320, X324, X340, X300R, X360, X500, X520, X530, X534, X540
- Other Models: G100, G110, GX70, GX75, GX85, GX95, GX255, GT242, GT235, GT235E, GT245, R70, R72, R92, RX63, RX73, RX75, RX95, 190C, 1948GV, 1948HV, LX172, LX173, LX176, LX178, LX186, LX188, LX255, LX277, LX277AWS, LX279, LX288, LX280, LX280AWS, LX289, S100, S110, S120, S130, S140, S160, S170, STX30, STX38, STX46, S80, S82, S92, SX75, SX85, SX95, SRX75, SRX95, L17, L17.542, L1742, L17542, L2048, L2548, 107-17HS, 107H, 107S, 108-14.5, 108-17HS, 14.542GS, 1438, 1438GS, 1438HS, 145, 14HS, 17, 17.542HS, 1742GS, 1742HS, 17542, 17HS, 100, 102, 105, 108, 111, 111H, 112L, 115, 116, 125, 130, 135, 145, 155c, 160, 165, 170, 175, 1851338GS, S1642, S1742, S2046, S2048, S2348, S2546, S2554, 1842GV, 1842HV, 1846HMS, 1846HV, 1848GV, 1848HV, 1538, 1538HS, 1542GS, 1542, 1542HS, 1546GS, 155C, 1638HS, 1642H, 1642HS, 1646H, 1646HS, 1646V-TWINH, 2046HV, 2048, 2048HV, 2148HV, 2254HV, 92H, 97-14HS, E76, E100, E110, E120, E130, E140, E150, E160, E170, LT133, LT155, LT166, LTR155, LTR166, LT150, LT160, LT180, LT190, LTR180, 1338GS, 1438GS, 1438HS, 14538GS, 14538HS, 14542GS, 1538GS, 1538HS, 1542GS, 1542HS, 1546GS, 15538GS, 15538HS, 15542GS, 15542HS, 1638GS, 1638HS, 1642GS, 1642H, 1642HS, 1642HV, 1646GS, 1646HS, 1646HV, 1742GS, 1742HS, 17542HS, 2046HV, L1742, L17542, L2048.
Replacement Part Numbers:
This kit replaces OEM part numbers: AM127304, M123811, AM118315, AM35443, M143338.
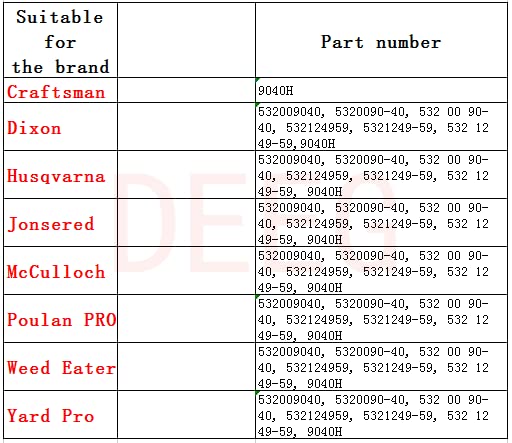
Image 2.2: Table showing compatible brands and their corresponding part numbers, including Craftsman, Dixon, Husqvarna, Jonsered, McCulloch, Poulan Pro, Weed Eater, and Yard Pro.
3. Components Included
The DEEG Front Wheel Bearing Kit includes all necessary components for a complete front wheel bearing conversion or replacement.

Image 3.1: Diagram illustrating the components included in the kit: 2 new hub caps, 2 hub cap washers, 4 heat-treated thrust washers, 4 high-quality sealed flange wheel bearings, and 2 new E-clips.
- 4 x Sealed Flange Wheel Bearings
- 6 x Gaskets/Washers (various types for proper spacing)
- 2 x Rubber Sleeves (often referred to as hub caps)
- 2 x Black Cushion Clips (E-clips)

Image 3.2: Sealed Flange Wheel Bearings.

Image 3.3: Yellow Hub Caps.

Image 3.4: Assorted Washers and E-clips.
4. Setup & Installation
Proper installation of the wheel bearing kit is crucial for optimal performance and safety. Follow these steps carefully.
Tools Required:
- Jack and Jack Stands
- Wrench or Socket Set
- Hammer
- Punch or Drift
- Large Socket (matching bearing outer diameter for installation)
- Emery Cloth or Fine Sandpaper (optional, for spindle cleaning)
- Grease (for lubrication)
Installation Steps:
- Prepare the Mower: Park the lawn mower on a flat, stable surface. Engage the parking brake. Use a jack to lift the front of the mower and secure it with jack stands. Remove the front wheels.
- Remove Old Bushings/Bearings: If your mower has bushings, use a punch and hammer to carefully drive them out of the wheel hub. If it has old bearings, remove any retaining clips (E-clips) and slide them off the spindle.
- Clean the Spindle: Inspect the wheel spindle for any rust, debris, or wear. Lightly sand the spindle with emery cloth or fine sandpaper if necessary to ensure a smooth surface for the new bearings.
- Install New Bearings: Place the new sealed flange wheel bearings into the wheel hub. Use a large socket that matches the outer diameter of the bearing and a hammer to gently tap the bearings into place until they are fully seated. Ensure they are installed straight.
- Lubricate (Optional but Recommended): Some users recommend removing the inner seal of the bearing before installation to allow grease to reach the ball bearings when using a grease fitting. Apply a small amount of grease to the spindle and inside the bearings.
- Assemble the Wheel: Slide the wheel onto the spindle. Add the appropriate washers from the kit to take up any play. The kit includes various washers to achieve a snug fit.
- Secure with E-Clip: Install the new E-clip onto the spindle to secure the wheel assembly. Ensure the E-clip is fully seated in its groove.
- Install Hub Cap: Place the yellow hub cap over the end of the spindle.
- Reinstall Wheel: Reattach the front wheels to the mower. Lower the mower from the jack stands.

Image 4.1: Exploded view diagram of a typical lawn mower wheel assembly, showing the placement of the hub cap, E-ring, washers, spacer, and axle.
5. Operating Instructions
After installation, perform a quick check before operating your lawn mower.
- Wheel Spin Test: Lift the front of the mower slightly and manually spin each wheel to ensure it rotates freely without binding.
- Check for Play: Gently try to wiggle the wheels. There should be minimal to no lateral play. If excessive play is detected, re-check washer placement and E-clip seating.
- Initial Operation: Operate the mower at a slow speed in a safe area for a few minutes to ensure everything functions correctly. Listen for any unusual noises.
6. Maintenance
Regular maintenance helps extend the life of your wheel bearings and ensures smooth operation.
- Periodic Inspection: Regularly inspect the front wheels for any signs of wear, damage, or excessive play. Check the hub caps and E-clips to ensure they are securely in place.
- Lubrication: While these are sealed bearings, if you opted to remove the inner seal during installation, periodic greasing through the mower's grease fittings (if present) will help maintain bearing life. Use a high-quality, water-resistant grease.
- Cleaning: Keep the wheel area clean from grass clippings, dirt, and debris, which can potentially interfere with bearing performance or cause premature wear.

Image 6.1: Example of grease suitable for bearing lubrication.
7. Troubleshooting
If you encounter issues after installing the bearing kit, refer to the following common problems and solutions.
| Problem | Possible Cause | Solution |
|---|---|---|
| Wheel does not spin freely or binds. | Bearings not fully seated; incorrect washer spacing; spindle obstruction. | Re-check bearing installation; adjust washer quantity/placement; inspect spindle for debris. |
| Excessive wheel play (wobbling). | Insufficient washers; E-clip not properly seated; incorrect bearing size. | Add more washers to reduce play; ensure E-clip is fully engaged; verify bearing dimensions. |
| Unusual noise from wheel. | Bearing damage; lack of lubrication; foreign object. | Inspect bearings for damage (replace if necessary); ensure proper lubrication; remove any foreign objects. |
| Hub cap falls off. | Loose fit; damaged cap. | Ensure cap is pressed on firmly; replace if damaged or excessively loose. |
8. Specifications
- Product Dimensions: 5.12 x 5.12 x 1.18 inches
- Item Weight: 8 ounces
- Brand: DEEG
- Material: Rubber (for sleeves/caps), Metal (for bearings/washers)
- Bearing Grade: P6 (ABEC3)
- Speed Rating: 9000 R/min
- Noise Value: Z1
- Axle Size Compatibility: 3/4 inch (19.05mm)
- Wheel Hub Liner/Bearing Hole Outer Diameter Compatibility: 1 1/2 inch (38.1mm)
- Bearing Outer Diameter: 1 3/8 inch (34.925mm)

Image 8.1: Diagram illustrating the key dimensions of the bearing: 1-1/2 inch (38.1mm) outer diameter, 3/4 inch (19.05mm) inner diameter, and 1-3/8 inch (34.925mm) width.
9. Safety Information
Always prioritize safety when working with machinery and replacement parts.
- Wear appropriate personal protective equipment (PPE), such as safety glasses and gloves.
- Ensure the lawn mower is turned off, the engine is cool, and the spark plug wire is disconnected before performing any maintenance or installation.
- Use proper lifting equipment (jack and jack stands) to secure the mower. Never work under a mower supported only by a jack.
- Keep children and pets away from the work area.
- This product is intended for adult use in machinery maintenance and is not a toy.
10. Warranty and Support
For any questions, concerns, or support regarding your DEEG Front Wheel Bearing Kit, please contact the manufacturer directly through your purchase platform or the DEEG brand store. Information regarding specific warranty terms may be available at the point of purchase.
Visit the DEEG Store for more products and information.


