
Introduction
This manual provides essential instructions for the safe and effective use of your ColouredPeas 10-Bearings Shoe Repair Hand Sewing Machine. This robust manual sewing machine is designed for mending various materials, including shoes, bags, clothes, quilts, coats, and trousers. Featuring an optimized 10-bearing system, it offers smoother operation and enhanced durability for demanding sewing tasks.
Initial Setup
Unpacking and Component Identification
Carefully unpack all components from the box. Inspect the machine for any visible damage that may have occurred during transit. The machine is typically coated in a protective oil; this is normal and should be cleaned off before use. Refer to the image below for identification of key parts.

Figure 1: Overview of the ColouredPeas Shoe Repair Machine with its main components labeled for easy identification. This includes the linker, crimper, rewinder, presser foot, needle pitch adjusting nut, hand crank, working disc, and bracket.

Figure 2: The machine as it appears in its internal packaging, including the instruction manual and various accessories.
Mounting the Machine
The machine comes with a basic stand (bracket). For optimal stability and ease of use, it is highly recommended to mount the machine onto a sturdy, flat workbench or a custom-built base. Ensure the mounting is secure to prevent movement during operation.
Initial Lubrication and Adjustments
Before first use, apply a small amount of sewing machine oil to all moving parts and pivot points. Manually turn the hand crank several times to distribute the oil. Check for any binding or stiffness. Minor adjustments may be needed to ensure smooth operation, such as ensuring the rocker arms move freely.
Video 1: An official product video from ColouredPeas demonstrating the features and operation of the sewing machine. This video provides a visual guide to understanding the machine's capabilities and how it functions.
Operating Instructions
Threading the Machine
- Place your spool of nylon thread on the thread holder.
- Guide the thread through the tension discs (crimper). The tightness of the line can be adjusted using the crimping board.
- Thread the needle from front to back. Ensure the needle has a flat side, which should face away from the machine.
- Wind the bobbin and insert it into the shuttle.
Adjusting Stitch Length and Direction
The stitch length can be adjusted by turning the screw up or down, allowing for a stitch length of up to 0.7 inches. The sewing direction can be adjusted by rotating the machine head 360 degrees using the universal wrench.

Figure 3: Detailed views of various adjustment points: the crimping board for thread tension, the bobbin winder, the hand crank, the foot wrench, the universal wrench for rotating the machine head, the needle chuck, and the stitch adjustment screw.
Sewing Procedure
- Place the material under the presser foot. Pull the presser foot upward to raise it, then push it downward to start working.
- Turn the hand crank clockwise to begin sewing. Maintain a steady pace.
- Guide the material smoothly as the machine stitches.
- When finished, pull the string to release the thread easily.

Figure 4: Exploded view and detailed diagrams illustrating the tension adjustment mechanism, the 360-degree rotation for sewing direction, and the grooved main pole for secure installation.
Maintenance
Cleaning
Regularly clean the machine to remove dust, lint, and thread scraps. Use a soft brush or cloth. Pay special attention to the needle area, bobbin case, and feed dogs.
Lubrication
Apply sewing machine oil to all moving parts and friction points periodically, especially after extended use. This ensures smooth operation and prolongs the machine's lifespan. Refer to the manual's diagrams for specific oiling points.
Needle Replacement
Replace needles regularly, especially if they become bent, dull, or if you notice skipped stitches. Always use needles with a flat shank, ensuring the flat side faces away from the machine when inserted into the needle chuck.
Troubleshooting
This section addresses common issues you might encounter with your sewing machine.
- Thread Breaking: Check thread tension (ensure it's not too tight), inspect the needle for burrs or bends, and ensure the thread path is clear.
- Skipped Stitches: This often indicates a bent or dull needle, incorrect needle insertion, or improper threading. Replace the needle and re-thread the machine.
- Machine Binding/Stiffness: Apply lubrication to all moving parts. If the issue persists, check for any foreign objects obstructing movement or components that may be misaligned.
- Uneven Stitches: Adjust the stitch length screw. Ensure consistent material feeding.
For more complex issues or detailed visual guides, online resources such as YouTube videos and dedicated sewing machine forums can provide valuable assistance.
Product Specifications
- Brand: ColouredPeas
- Model: 10-Bearings Shoe Repair Hand Sewing Machine
- Power Source: Manual
- Material: Metal (Green, Silver finish)
- Product Dimensions: 19.15"D x 13"W x 6"H
- Maximum Sewing Thickness: 0.48 inches
- UPC: 744306800406, 744306800512
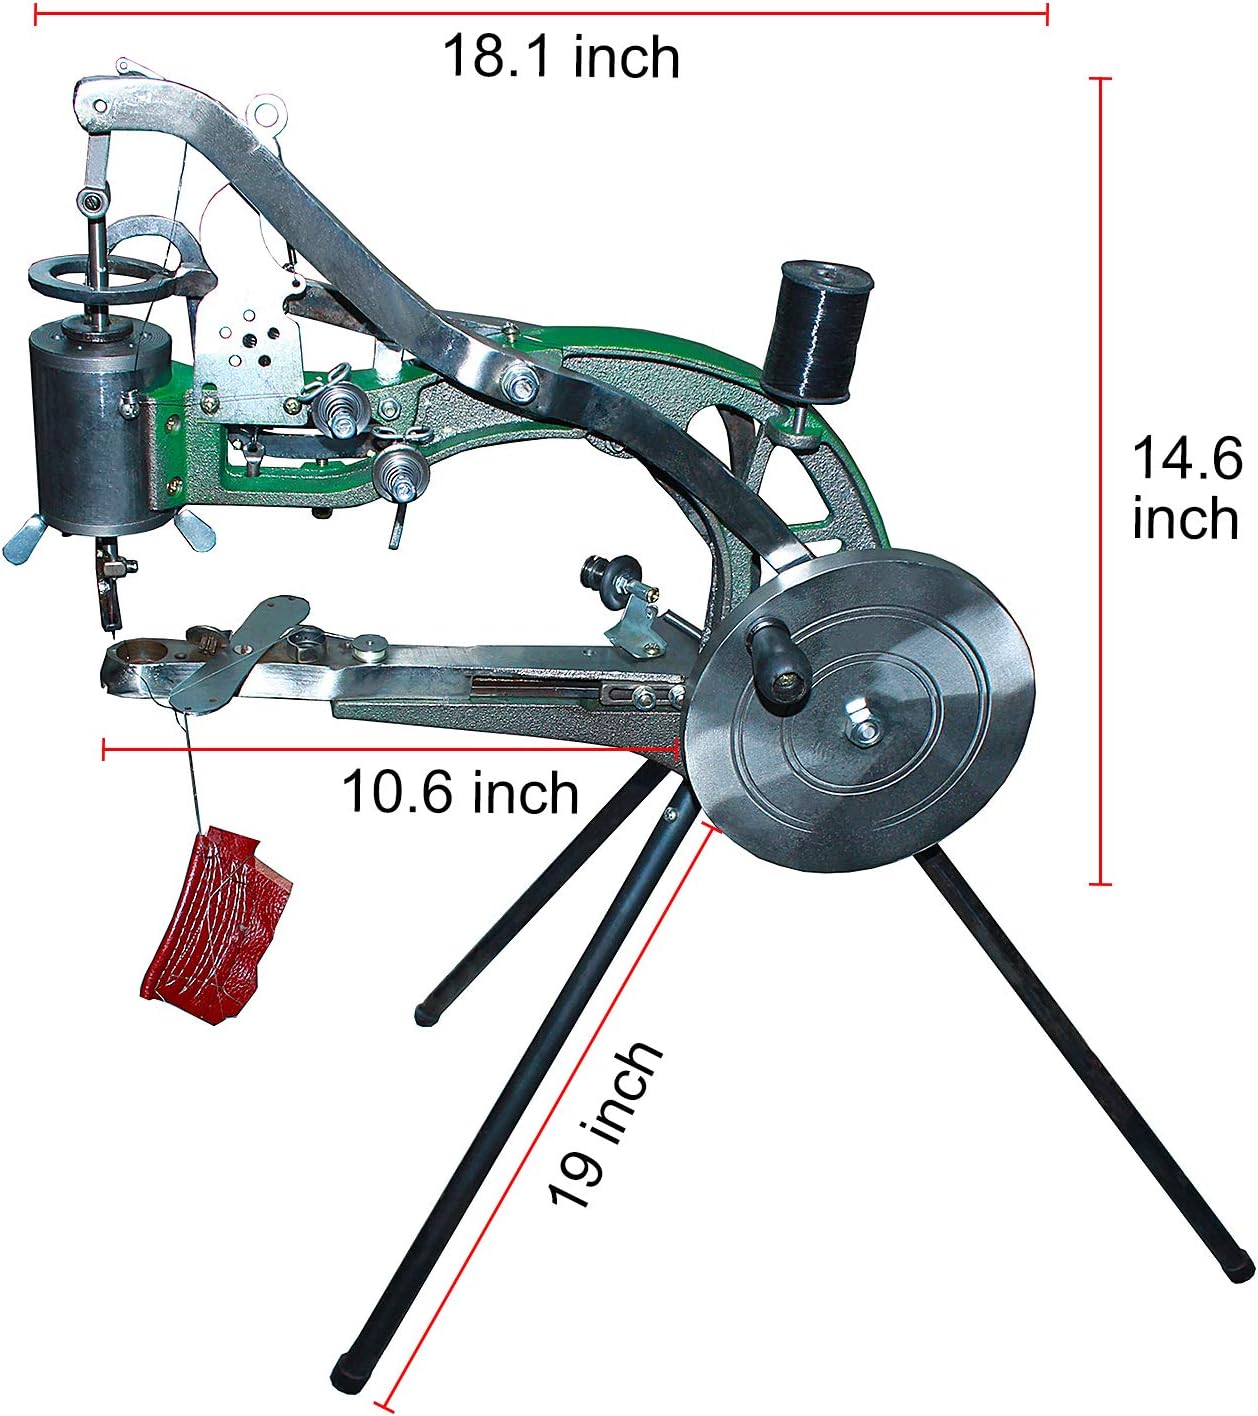
Figure 5: Dimensional overview of the ColouredPeas Shoe Repair Machine, indicating its length, height, arm length, and stand leg length.

Figure 6: Illustration of the 10-axis bearing system, featuring double bearings for enhanced smoothness and a stable bending process structure, compared to an 8-axis system.
Warranty and Support
For any questions, technical assistance, or warranty inquiries regarding your ColouredPeas Shoe Repair Hand Sewing Machine, please contact the manufacturer directly through their official channels. Retain your purchase receipt for proof of purchase.