1. Introduction
The ALAMSCN MB102 Solderless Breadboard Power Supply Module is designed to provide regulated 3.3V and 5V power to your breadboard projects. This module simplifies power management for electronic prototyping, offering flexibility with multiple input options and selectable output voltages. It is ideal for use with microcontrollers like Arduino and other low-power electronic circuits.
2. Safety Information
- Ensure correct polarity when connecting power sources to avoid damage to the module or connected components.
- Do not exceed the maximum input voltage of 12V.
- The maximum output current is 700mA. Avoid drawing excessive current, which can lead to overheating or damage.
- Always double-check jumper settings for desired output voltage (3.3V or 5V) before powering your circuit.
- Keep the module away from moisture and extreme temperatures.
3. Product Overview
The MB102 power supply module features a compact design that plugs directly into a standard breadboard. It includes a DC barrel jack for external power, a USB port for powering external devices, and jumper pins for selecting output voltages.

Figure 3.1: Labeled diagram of the MB102 module. Key components include the DC input jack, ON/OFF switch, LED power indicator, USB output, voltage selection jumpers, and output header pins.
Key Components:
- DC-IN Barrel Jack: Accepts input voltage between 6.5V and 12V (5.5mm x 2.1mm plug).
- ON/OFF Switch: Controls power to the breadboard rails.
- LED Power Indicator: Illuminates when the module is powered on.
- USB Interface: Provides 5V output for powering external USB devices.
- Voltage Selection Jumpers: Two sets of jumpers (one for each side of the breadboard) allow selection of 3.3V, 5V, or OFF for the respective power rail.
- Output Header Pins: Provide convenient access to 3.3V, 5V, and GND for external connections.
4. Setup Instructions
4.1 Connecting to a Breadboard
- Align the module's header pins with the power rails of your solderless breadboard. The pins are designed to fit securely into the breadboard's power lines.
- Gently press the module into the breadboard until it is firmly seated. Ensure all pins are properly inserted.

Figure 4.1: The MB102 module plugged into a breadboard, ready for use.
4.2 Input Power Connection
The module can be powered via its DC barrel jack or a 9V battery clip.
- DC Barrel Jack: Connect a DC power adapter (not included) with an output voltage between 6.5V and 12V and a 5.5mm x 2.1mm male DC plug.
- 9V Battery Clip: Use the provided 9V battery clip power cable. Connect the 9V battery clip to a standard 9V battery, then plug the male DC jack into the module's DC-IN port.

Figure 4.2: MB102 module powered by a 9V battery using the provided clip cable.
4.3 Voltage Selection
The module features two independent sets of jumpers, allowing you to select the output voltage for each side of the breadboard's power rails.
- Identify the two sets of yellow jumper pins on the module. Each set controls one side of the breadboard's power rails.
- To select 5V output, place the jumper cap over the pins labeled '5V' and 'OFF'.
- To select 3.3V output, place the jumper cap over the pins labeled '3.3' and 'OFF'.
- To disable power to a rail, remove the jumper cap or place it over the 'OFF' position only (if available, otherwise remove).
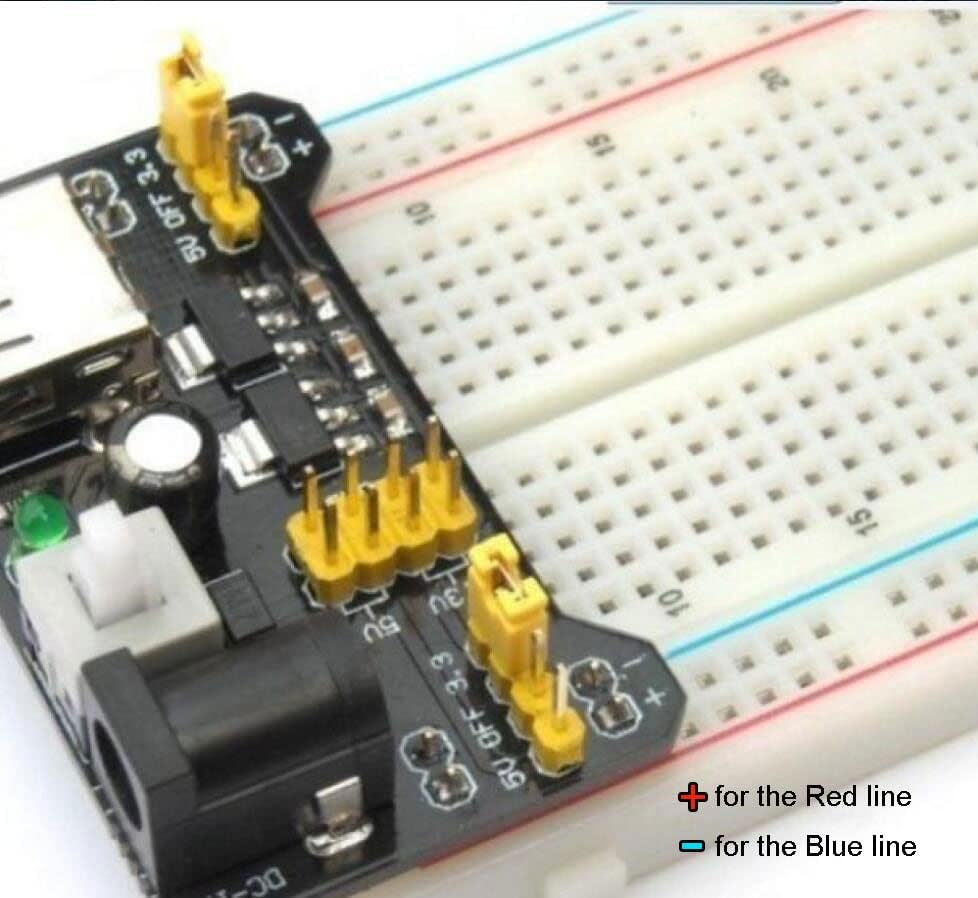
Figure 4.3: Voltage selection jumpers on the MB102 module. The red line indicates the positive power rail, and the blue line indicates the ground rail on the breadboard.
5. Operating Instructions
5.1 Powering On/Off
After connecting the input power and setting the desired output voltages with the jumpers:
- Flip the white ON/OFF latching switch to the 'ON' position.
- The green LED power indicator will illuminate, confirming that power is being supplied to the breadboard rails.
- To turn off the module, flip the switch to the 'OFF' position. The green LED will turn off.

Figure 5.1: The green LED indicating power is active, next to the ON/OFF switch.
5.2 Using the USB Output
The integrated USB port can supply 5V power to external devices, such as charging a phone or powering a small USB-powered circuit.
- Ensure the module is powered on.
- Connect your USB device to the USB-A port on the module.
- The USB output provides a regulated 5V supply.
6. Maintenance
The ALAMSCN MB102 module requires minimal maintenance. Follow these guidelines to ensure longevity:
- Keep the module clean and free from dust and debris. Use a soft, dry cloth for cleaning.
- Avoid physical shock or dropping the module.
- Store in a dry environment when not in use.
- Regularly inspect the connections for any signs of wear or damage.
7. Troubleshooting
- No Power/LED Off:
- Check if the input power source (DC adapter or 9V battery) is connected correctly and providing sufficient voltage (6.5V-12V).
- Ensure the ON/OFF switch is in the 'ON' position.
- Verify the 9V battery is not depleted if using battery power.
- Incorrect Output Voltage:
- Confirm that the voltage selection jumpers are correctly placed for the desired 3.3V or 5V output on each rail.
- Use a multimeter to verify the actual output voltage on the breadboard rails.
- Module Overheating:
- Reduce the current draw from the module. The maximum output current is 700mA.
- Ensure the input voltage is within the recommended range (6.5V-12V). Higher input voltages can lead to more heat dissipation.
- USB Output Not Working:
- Ensure the module is powered on and the green LED is lit.
- Check the USB cable and the connected device for proper functionality.
8. Specifications
| Brand | ALAMSCN |
| Model Name | AL12413 |
| Input Voltage | DC 6.5V - 12V (via barrel jack) |
| Output Voltage | 3.3V, 5V (selectable per rail) |
| Maximum Output Current | 700mA |
| DC Jack Size | 5.5mm x 2.1mm |
| Connectivity Technology | USB (for external device power) |
| Compatible Devices | MB102 breadboard |
| Dimensions (LxWxH) | 3.94 x 7.87 x 14.57 inches (Product Dimensions) |
| Item Weight | 0.705 ounces |
9. Warranty and Support
This product is covered by a standard manufacturer's warranty against defects in materials and workmanship. For specific warranty details, returns, or technical support, please refer to the retailer's policy or contact ALAMSCN customer service directly through their official channels. Keep your purchase receipt for warranty claims.