This manual provides essential information for the safe and effective operation of your XTUGA MX8 8-Channel Audio Mixer. Please read these instructions thoroughly before using the device to ensure proper setup, functionality, and longevity of your equipment. Keep this manual for future reference.
Safety Information
Observe the following safety precautions to prevent damage to the device or injury to yourself:
Power Supply: Use only the specified power adapter. Ensure the voltage matches your local power supply.
Moisture: Do not expose the mixer to water, rain, or excessive humidity. Avoid placing liquid containers near the unit.
Ventilation: Ensure adequate ventilation around the mixer. Do not block ventilation openings.
Heat: Keep the mixer away from heat sources such as radiators, heat registers, stoves, or other heat-producing appliances.
Cleaning: Disconnect power before cleaning. Use a dry, soft cloth. Do not use liquid cleaners or aerosols.
Servicing: Do not attempt to service this product yourself. Refer all servicing to qualified service personnel.
Cables: Protect power cords from being walked on or pinched, particularly at plugs, convenience receptacles, and the point where they exit from the apparatus.
Features
The XTUGA MX8 Audio Mixer offers a range of features designed for versatile audio control:
3-Band EQ: High, Mid, and Low frequency equalization for each channel.
USB Connectivity: Allows direct connection to a computer for recording and playback.
48V Phantom Power: Provides power for condenser microphones on designated channels.
Microphone Priority Function: Automatically reduces other input sources when a microphone is active, enhancing vocal clarity.
Multiple Input Interfaces: Supports both 6.35mm (1/4 inch) and XLR connections.
Setup
1. Connecting Audio Inputs
The MX8 mixer supports various audio input types. Channels 1 and 2 feature combination jacks that accept both 6.35mm (1/4 inch) TRS/TS connectors and XLR connectors.
Image: Input interfaces on the XTUGA MX8 mixer, illustrating 6.35mm and XLR connection points for microphones and line-level devices.
Microphones: Connect dynamic or condenser microphones using XLR cables to the MIC1 or MIC2 inputs.
Line-Level Devices: Connect instruments or other audio devices with 6.35mm (1/4 inch) cables to the MIC1/MIC2 inputs or LINE IN 3/4, LINE IN 5/6, LINE IN 7/8 inputs.
2. Phantom Power Activation
For condenser microphones that require external power, the MX8 provides 48V phantom power. This feature is typically activated via a switch on the mixer.
Image: The XTUGA MX8 mixer, highlighting its 48V phantom power capability for condenser microphones.
Locate the '+48V PHANTOM' switch, usually near the main section or input channels.
Press the switch to activate phantom power. An indicator light will typically illuminate.
Caution: Ensure condenser microphones are connected before activating phantom power to prevent potential damage to non-phantom powered devices.
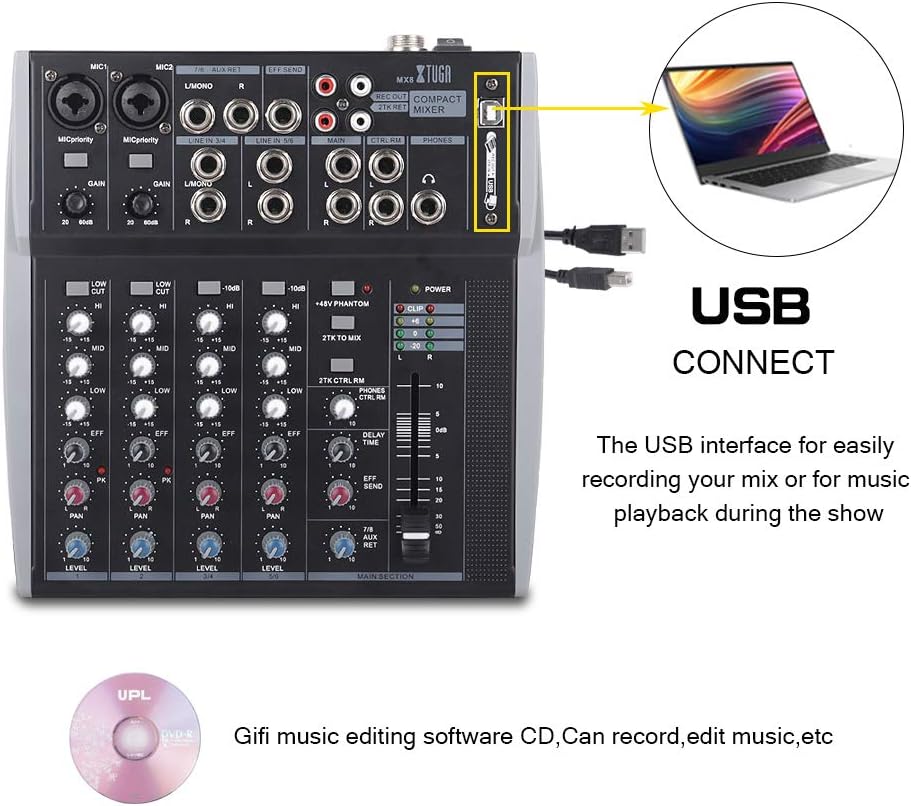
3. USB Connection to Computer
The MX8 can connect to a computer via USB for recording audio or playing back music.
Image: The XTUGA MX8 mixer connected to a laptop via its USB interface, illustrating its use for recording or music playback.
Connect one end of the USB cable to the 'USB' port on the mixer and the other end to an available USB port on your computer.
The mixer should be recognized as an audio device by your operating system. You may need to select it as the input/output device in your computer's sound settings or recording software.
A software CD for music editing may be included to assist with recording and editing.
Image: An optical disc labeled 'UPL Gifi music editing software CD', which can be used for recording and editing music with the mixer.
4. Power Connection
Connect the provided power adapter to the DC 15V x2 / DC 48V input on the rear panel of the mixer, then plug it into a suitable power outlet.
Image: Rear panel of the XTUGA MX8 mixer, showing the power input (DC 15V x2 / DC 48V) and the USB 2.0 interface.
Operating Instructions
1. Basic Channel Control
GAIN: Adjusts the input sensitivity for each channel. Set this to an appropriate level to avoid clipping (distortion).
EQ (LOW, MID, HIGH): Use these knobs to adjust the bass, midrange, and treble frequencies for each channel.
EFF: Controls the amount of effect send from the channel to the built-in effects processor.
PAN: Adjusts the stereo position of the channel's signal (left to right).
LEVEL: Controls the overall output volume of the individual channel.
2. Microphone Priority Function
The Microphone Priority function automatically lowers the volume of other input sources when a signal is detected on the designated microphone channel, ensuring the microphone signal is prominent.
Image: A detailed view of the XTUGA MX8 mixer, highlighting the 'MICPriority' input selection button, which activates the microphone priority feature.
Locate the 'MICPriority' button on the mixer.
Press this button to activate the function. When a signal is present on the priority microphone input, the volume of other inputs will automatically attenuate.
3. Main Output and Monitoring
MAIN SECTION: Use the main fader or knob to control the overall output volume of the mixer.
LED Level Meters: Monitor the output level using the LED indicators to prevent clipping.
PHONES: Connect headphones to the PHONES jack for monitoring the mix. Adjust the PHONES level knob for headphone volume.
Maintenance
Cleaning: Regularly wipe the mixer's surface with a soft, dry cloth. Avoid abrasive cleaners or solvents.
Storage: When not in use, store the mixer in a clean, dry environment, away from extreme temperatures and direct sunlight.
Cable Management: Avoid bending or crimping cables excessively to prevent internal damage.
Troubleshooting
No Sound Output:
Check all cable connections (inputs, outputs, power).
Ensure the main level fader/knob is up.
Verify individual channel level knobs are up and not muted.
Check if the correct input source is selected on connected devices.
Distorted Sound:
Reduce the GAIN knob for the affected channel.
Lower the main output level.
Check if the input source itself is distorted.
Condenser Microphone Not Working:
Ensure 48V phantom power is activated.
Verify the microphone cable is securely connected.
USB Audio Issues:
Ensure the USB cable is properly connected.
Check your computer's sound settings to confirm the mixer is selected as the input/output device.
Try a different USB port on your computer.
Specifications
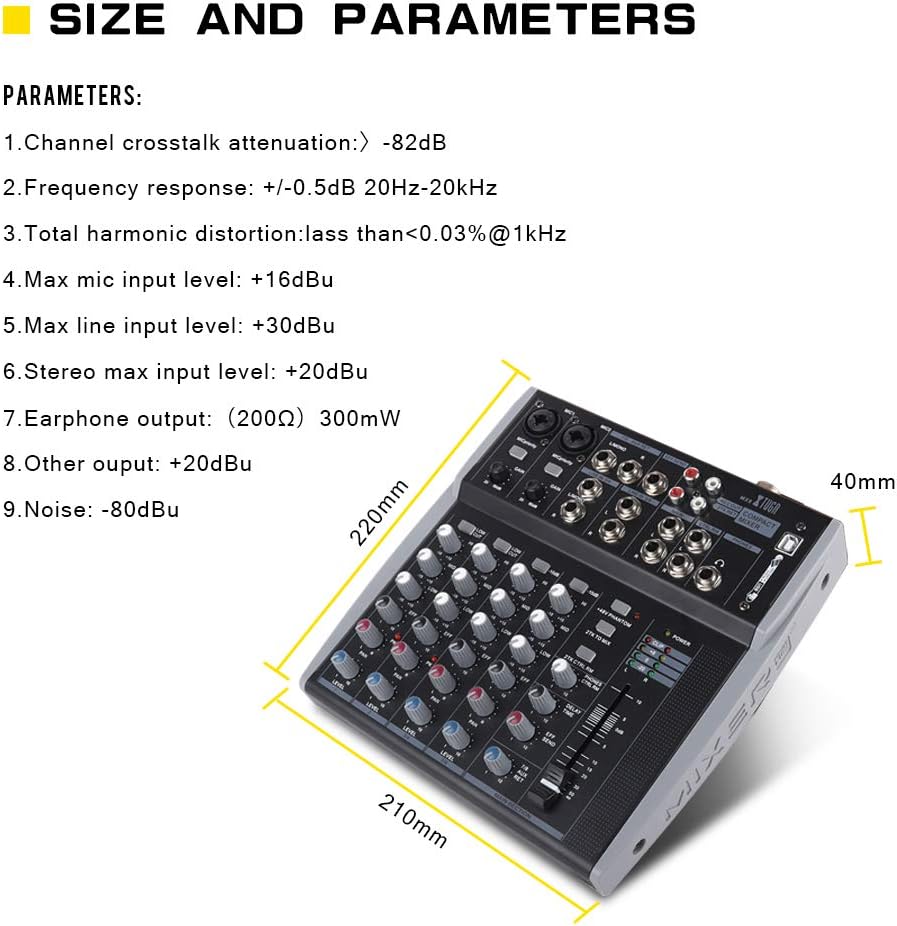
Image: The XTUGA MX8 mixer with its physical dimensions (210mm x 220mm x 40mm) and key technical parameters displayed.
Item Model Number
MX8
Number of Channels
8
Connectivity Technology
USB
Power Source
Corded Electric
Product Dimensions
14.96 x 11.02 x 3.94 inches (380 x 280 x 100 mm)
Item Weight
10.56 pounds (4.8 Kilograms)
Channel Crosstalk Attenuation
> -82dB
Frequency Response
+/-0.5dB 20Hz-20KHz
Total Harmonic Distortion
<0.03% @1kHz
Max Mic Input Level
+16dBu
Max Line Input Level
+30dBu
Stereo Max Input Level
+20dBu
Earphone Output
(200Ω) 300mW
Other Output
+20dBu
Noise
-80dBu
Warranty and Support
For warranty information and technical support, please refer to the documentation included with your purchase or contact XTUGA customer service directly. Details can typically be found on the manufacturer's official website or through your retailer.
Ask about setup, troubleshooting, compatibility, parts, safety, or missing instructions. Manuals+ will review the question and use this page’s manual context to help answer it.