1. Introduction
This manual provides essential instructions for the safe and effective use of your AQQA 200W Submersible Aquarium Heater. Designed for both freshwater and saltwater aquariums ranging from 45 to 80 gallons, this heater features an external temperature controller and a digital LED display for precise temperature management. Please read these instructions thoroughly before installation and operation.
2. Product Features
- Safe & Durable Construction: Made from heat-resistant quartz glass and a PC plastic cover, offering explosion-proof, shatterproof, and IP68 waterproof protection.
- Intelligent Automatic Heating: Features an automatic constant temperature function with an external controller. The heater will automatically restart heating when the water temperature drops 1°F (1°C) below the set temperature.
- Digital LED Display: Clearly shows current water temperature and set temperature. An indicator light changes from red (heating) to blue (temperature reached).
- External Temperature Controller: Allows temperature adjustment from 59°F to 93°F (15°C to 34°C). Hold the control button for 5 seconds to switch between Celsius and Fahrenheit.
- Easy Installation: Can be placed vertically or horizontally using the adjustable hanging rack and two suction cups.

Image: Components of the AQQA Aquarium Heater, highlighting its quartz glass construction, PC plastic guard, two suction cups for mounting, and UL-certified plug.
3. Safety Instructions
- Always ensure the heater is completely submerged in water before turning on the power. Operating the heater out of water can cause damage and pose a safety risk.
- Before performing any aquarium maintenance, such as cleaning or water changes, always unplug the heater from the power outlet.
- Allow the heater to cool for at least 10 minutes after unplugging before removing it from the water.
- Do not bury the heater in sand or gravel. It must be fully immersed in open water.
- Ensure the power cord is not damaged or pinched.
- Keep out of reach of children.
4. Setup Instructions
- Unpack: Carefully remove the heater and all accessories from the packaging. Inspect for any damage.
- Mounting: Attach the two suction cups to the heater unit. Position the heater inside your aquarium, ensuring it is fully submerged in water. It can be installed vertically or horizontally.
- Placement: For optimal heat distribution, place the heater near an area with good water flow, such as near a filter outlet.
- Controller Placement: The external temperature controller should be placed outside the aquarium, in a dry location, where it is easily accessible for adjustments and viewing.
- Power Connection: Once the heater is fully submerged and properly positioned, plug the power cord into a suitable electrical outlet.

Image: Proper installation methods for the aquarium heater, emphasizing full submersion and avoiding burial in substrate.
5. Operating Instructions
- Power On: After proper installation, plug the heater into a power outlet. The LED display on the external controller will illuminate.
- Set Temperature: Use the control button on the external controller to adjust the desired water temperature. The temperature range is 59°F to 93°F (15°C to 34°C).
- Switch Temperature Units: To switch between Fahrenheit (°F) and Celsius (°C), press and hold the control button on the top of the controller for 5 seconds.
- Monitoring: The LED display will show the current water temperature and the set temperature. When the heater is actively heating, a red indicator light will be constant. Once the set temperature is reached, the heater will stop heating, and a blue indicator light will be constant.
- Automatic Operation: The heater will automatically resume heating if the water temperature drops 1°F (1°C) below your set temperature.

Image: The external temperature controller, illustrating the digital display for current and set temperatures, and the button for switching between Fahrenheit and Celsius.
6. Maintenance
- Cleaning: Before cleaning the aquarium or the heater, always unplug the heater and allow it to cool for at least 10 minutes.
- Heater Inspection: Regularly inspect the heater for any signs of damage, such as cracks in the glass or wear on the power cord. Discontinue use if damage is found.
- Water Circulation: Ensure good water circulation around the heater to prevent localized overheating and ensure even temperature distribution throughout the tank.
7. Troubleshooting
| Issue | LED Display | Possible Cause | Solution |
|---|---|---|---|
| Heater not heating, blue light on | Blue light constant | Set temperature has been reached. | No action required. Heater will resume heating if temperature drops. |
| Heater not heating, red light on | Red light constant | Heater is actively heating. | Allow time for the water to reach the set temperature. |
| Error Code E1 | Blue light and "E1" | Heater is not fully submerged in water or exposed to air. | Immediately unplug the heater. Ensure the heater is completely submerged before plugging it back in. |
| Overheat Protection | "HH" displayed | Water temperature exceeds 93°F (34°C). | Cut off power to the heater. Allow it to cool down to room temperature. Ensure good water circulation in the tank. Turn power on again. |
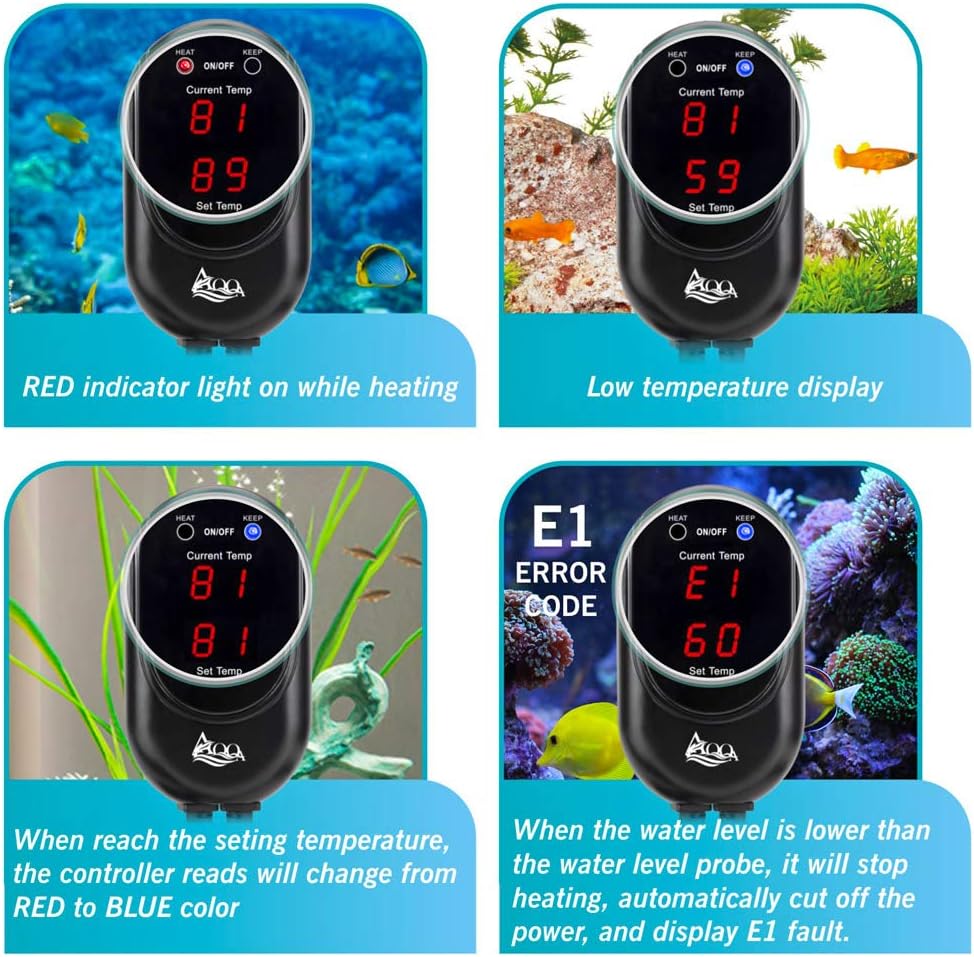
Image: The external controller showing different display states, including heating (red light), temperature reached (blue light), low temperature, and the E1 error code for non-submersion.
8. Specifications
| Specification | Detail |
|---|---|
| Model Number | GUS-AQ015-200W |
| Power | 200W |
| Recommended Tank Size | 45-80 Gallons |
| Temperature Range | 59°F - 93°F (15°C - 34°C) |
| Material | Quartz Glass, PC Plastic |
| Waterproof Rating | IP68 |
| Application | Freshwater and Saltwater Aquariums |
| Item Weight | 1.98 pounds |
| Dimensions (L x W x H) | 14.13 x 7.2 x 2.32 inches (Package) |
9. Warranty and Support
AQQA provides a 12-month warranty for this product. For any questions, concerns, or technical assistance, please contact AQQA customer service. Our professional after-sales service team is available to assist you.


