1. Product Overview
The TP-Link JetStream TL-SG2210MP is a 10-Port Gigabit Smart Managed PoE+ Switch designed for robust and flexible network deployments. It features 8 PoE+ (802.3at/af) 10/100/1000 Mbps RJ45 ports, each capable of providing up to 30W of power, with a total PoE power budget of 150W. Additionally, it includes 2 Gigabit SFP Slots for high-speed fiber connections.
This switch is integrated into the Omada Software Defined Networking (SDN) platform, allowing for centralized cloud management of network devices including switches, access points, and gateways. It supports various control options such as Omada Hardware Controller, Omada Software Controller, or Omada Cloud-based Controller, alongside a standalone mode.
Key features include advanced security features like 802.1Q VLAN, IP-MAC-Port binding, ACL, Port Security, DoS defend, Storm control, DHCP Snooping, and 802.1X radius authentication. It also offers advanced software features such as L2/L3/L4 QoS, IGMP Snooping, Link Aggregation, and Flow Control to prioritize traffic and ensure high-quality data transmission.

Figure 1: Front view of the TL-SG2210MP switch, showing 8 RJ45 ports and 2 SFP slots.

Figure 2: Angled view of the TL-SG2210MP switch, highlighting its compact design.
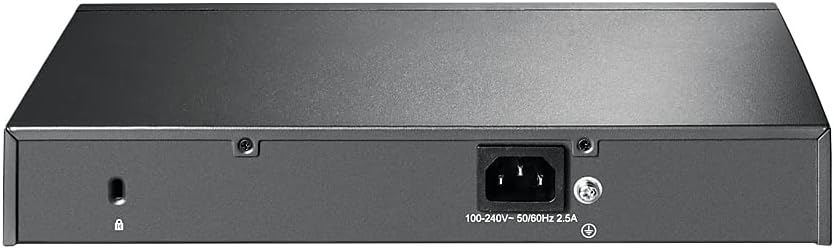
Figure 3: Rear view of the TL-SG2210MP switch, showing the power input and grounding screw.
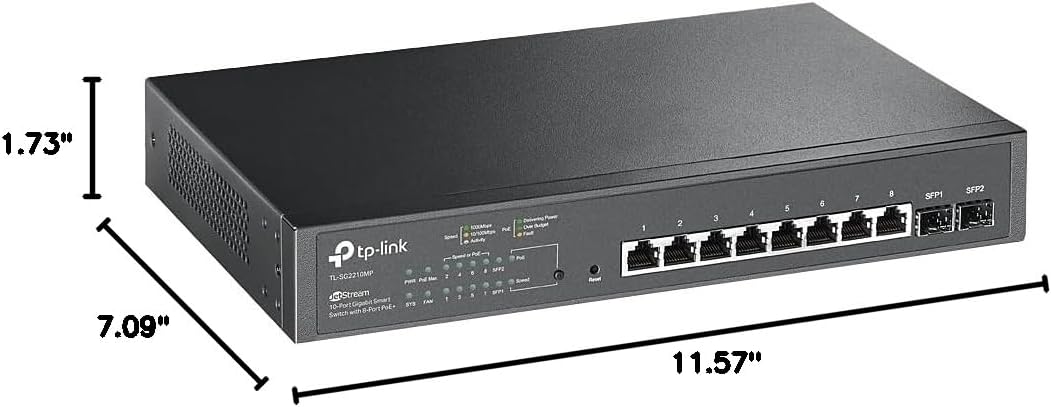
Figure 4: Diagram illustrating the physical dimensions of the TL-SG2210MP switch (11.57"L x 7.09"W x 1.73"H).
2. Package Contents
Verify that your package contains the following items:
- TP-Link TL-SG2210MP Smart Managed PoE Switch
- Power Cord
- Installation Guide
- Rackmount Kit
- Rubber Feet
If any items are missing or damaged, please contact your vendor or TP-Link support.
3. Setup and Installation
This section provides instructions for the physical installation of your TL-SG2210MP switch. For detailed network configuration, refer to the User Guide (PDF) provided with your product or available on the TP-Link website.
3.1 Safety Precautions
- Ensure the power is off before connecting or disconnecting any cables.
- Place the switch on a stable, level surface or mount it securely in a rack.
- Ensure adequate ventilation around the switch to prevent overheating.
- Do not expose the device to water or excessive humidity.
3.2 Physical Installation
- Desktop Placement: Attach the included rubber feet to the bottom of the switch to prevent slipping and protect the surface. Place the switch on a clean, flat surface.
- Rack Mounting: Use the provided rackmount kit to install the switch into a standard 19-inch equipment rack. Secure the mounting brackets to the sides of the switch with the screws provided, then attach the switch to the rack using appropriate rack screws.
- Connect Power: Connect the power cord to the AC inlet on the rear panel of the switch and then to a suitable power outlet.
- Connect Network Devices: Connect your network devices (e.g., computers, access points, IP cameras) to the RJ45 ports (1-8) on the front panel using standard Ethernet cables. For devices requiring Power over Ethernet (PoE), ensure they are PoE-compatible.
- Connect Uplink (Optional): Use the SFP slots (SFP1, SFP2) for fiber optic connections to other network devices or your core network, if required. Insert compatible SFP modules (not included) into the slots, then connect fiber optic cables.
4. Operating the Switch
The TL-SG2210MP is a Smart Managed switch, offering both plug-and-play functionality for basic connectivity and advanced management options for complex network configurations.
4.1 Powering On and Basic Operation
- Once the power cord is connected, the switch will automatically power on.
- Observe the LED indicators on the front panel:
- PWR LED: Indicates power status.
- PoE Max LED: Indicates the total PoE power budget usage.
- Link/Act LEDs (per port): Indicates network activity and link status.
- PoE LEDs (per port): Indicates PoE power delivery status for each port.
- Connected devices will automatically establish a network link and, if PoE-compatible, receive power from the switch.
4.2 Smart Management via Omada SDN
For advanced features and centralized management, the TL-SG2210MP can be integrated into the TP-Link Omada SDN platform. This allows for unified management of your network devices from a single interface.
- Omada Hardware Controller: A dedicated hardware device for managing your Omada network.
- Omada Software Controller: Software that can be installed on a PC or server for network management.
- Omada Cloud-based Controller: Provides remote cloud access and management via the Omada app, allowing control from anywhere, anytime.
Ensure your devices and controllers are running compatible SDN firmware versions for seamless integration. Refer to the TP-Link website for firmware updates and compatibility information.

Figure 5: Illustration of the PoE Recovery feature, showing how the switch can automatically restart unresponsive PoE-powered devices.
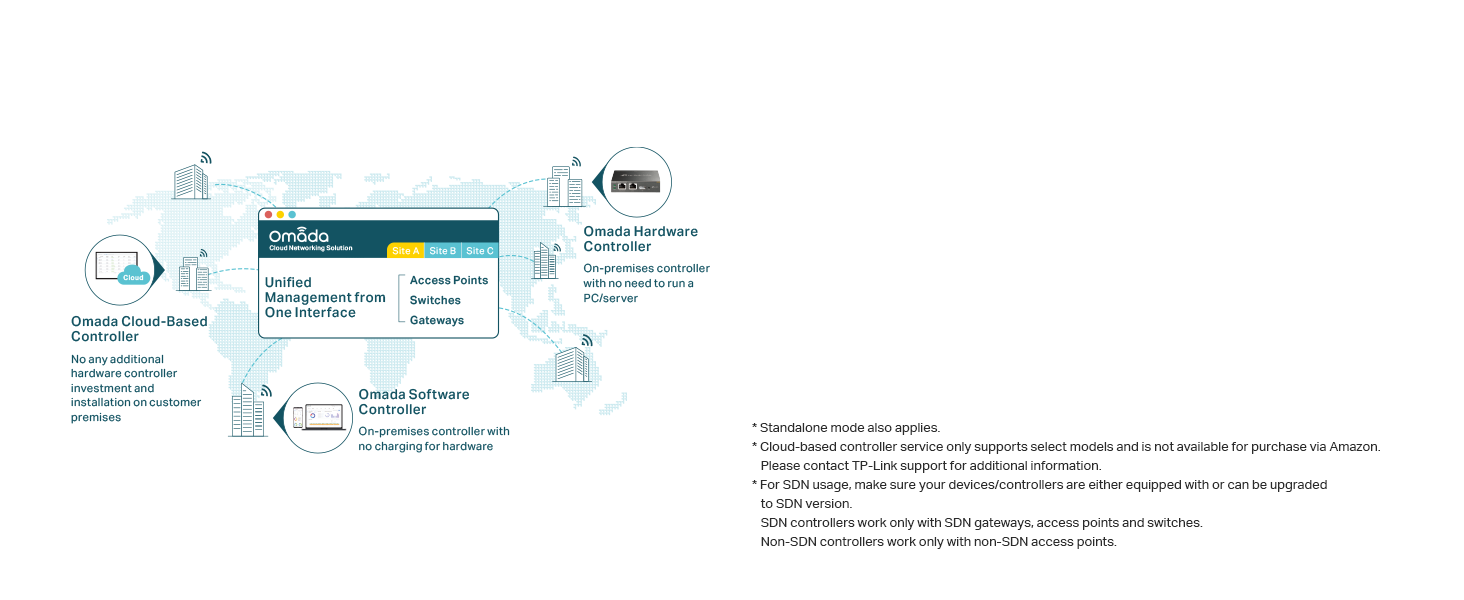
Figure 6: Overview of the Omada SDN platform, demonstrating unified management of access points, switches, and gateways from a single interface, with options for cloud, hardware, or software controllers.
5. Maintenance
Regular maintenance helps ensure the longevity and optimal performance of your TP-Link TL-SG2210MP switch.
- Cleaning: Use a soft, dry cloth to clean the exterior of the switch. Do not use liquid or aerosol cleaners.
- Ventilation: Ensure that the ventilation openings are clear of dust and obstructions. Proper airflow is crucial for heat dissipation.
- Firmware Updates: Periodically check the TP-Link official website for the latest firmware updates. Updating firmware can improve performance, add new features, and fix bugs.
- Cable Management: Keep network cables organized and neatly routed to prevent damage and improve airflow.
- Environmental Conditions: Operate the switch within its specified temperature and humidity ranges (refer to Specifications section).
6. Troubleshooting
This section addresses common issues you might encounter with your TL-SG2210MP switch.
6.1 No Power
- Ensure the power cord is securely connected to both the switch and a working power outlet.
- Verify that the power outlet is functional by plugging in another device.
- Check the PWR LED on the front panel. If it's off, there might be a power issue.
6.2 No Link/Activity on a Port
- Check the Ethernet cable connection between the switch port and the connected device. Ensure it is securely plugged in at both ends.
- Try a different Ethernet cable to rule out a faulty cable.
- Verify that the connected device is powered on and functioning correctly.
- Check the Link/Act LED for the specific port. If it's off, there's no active link.
- For SFP ports, ensure the SFP module is correctly inserted and compatible, and the fiber cable is intact.
6.3 PoE Device Not Receiving Power
- Ensure the connected device is PoE (802.3at/af) compatible.
- Check the PoE LED for the specific port. If it's off, power is not being delivered.
- Verify that the total PoE power budget (150W) is not exceeded. The PoE Max LED will indicate if the budget is nearing or exceeding its limit.
- Try connecting the PoE device to a different PoE port on the switch.
- Utilize the PoE Recovery feature if enabled, which can automatically restart unresponsive PoE devices.
6.4 Unable to Access Management Interface (Web GUI/Omada)
- Ensure your computer is on the same network segment as the switch.
- Verify the IP address of the switch. If using Omada SDN, ensure the controller is running and the switch is adopted.
- Temporarily disable any firewall or antivirus software on your computer that might be blocking access.
- Perform a factory reset if you have forgotten the login credentials or if the switch is unresponsive (Warning: This will erase all configurations). Use a paperclip to press and hold the Reset button for approximately 5-10 seconds until the LEDs flash.
7. Specifications
| Feature | Description |
|---|---|
| Model | TL-SG2210MP |
| Switch Type | Managed PoE Network Switch |
| Ports | 8x PoE+ (802.3at/af) 10/100/1000 Mbps RJ45 Ports, 2x Gigabit SFP Slots |
| PoE Power Budget | 150W |
| Dimensions (L x W x H) | 11.57" x 7.09" x 1.73" (294 x 180 x 44 mm) |
| Item Weight | 3.23 pounds (1.47 Kilograms) |
| Case Material | Metal |
| Data Transfer Rate | 1000 Megabits Per Second (Gigabit) |
| Operating Temperature | Up to 50 Degrees Celsius |
| Compatible Devices | PoE-enabled devices, devices with Ethernet port, supporting Omada SDN |
8. Warranty and Support
The TP-Link TL-SG2210MP JetStream Smart Managed PoE Switch is backed by a comprehensive 5-year manufacturer warranty. This warranty covers defects in materials and workmanship under normal use.
For technical support, product information, and warranty claims, please contact TP-Link customer service. Free technical support is available from 6 AM to 6 PM PST, Monday to Friday.
Additional resources, including the full User Guide and Installation Manual, can be found on the official TP-Link website or through the provided links:
Legal Disclaimer: This product contains chemicals known to the State of California to cause cancer and birth defects or other reproductive harm.