1. Introduction
This user manual provides essential information for the safe and efficient operation of your new Hisense H20MOWS3G Microwave Oven. Please read this manual thoroughly before using the appliance and retain it for future reference. This microwave oven is designed for household use to heat, cook, and defrost food items.
2. Important Safety Instructions
When using electrical appliances, basic safety precautions should be followed, including the following:
- Read all instructions before using the appliance.
- Do not attempt to operate this oven with the door open as this can result in harmful exposure to microwave energy.
- Do not place any object between the oven front face and the door or allow soil or cleaner residue to accumulate on sealing surfaces.
- Do not operate the oven if it is damaged. It is particularly important that the oven door closes properly and that there is no damage to the: (1) door (bent), (2) hinges and latches (broken or loosened), (3) door seals and sealing surfaces.
- Only qualified service personnel should adjust or repair the oven.
- Do not heat liquids or other foods in sealed containers since they are liable to explode.
- Do not use corrosive chemicals or vapors in this appliance.
- Always ensure proper ventilation around the appliance.
- Never operate the microwave empty.
- Use only microwave-safe cookware. Metal containers or foil should not be used in microwave mode.
3. Product Overview
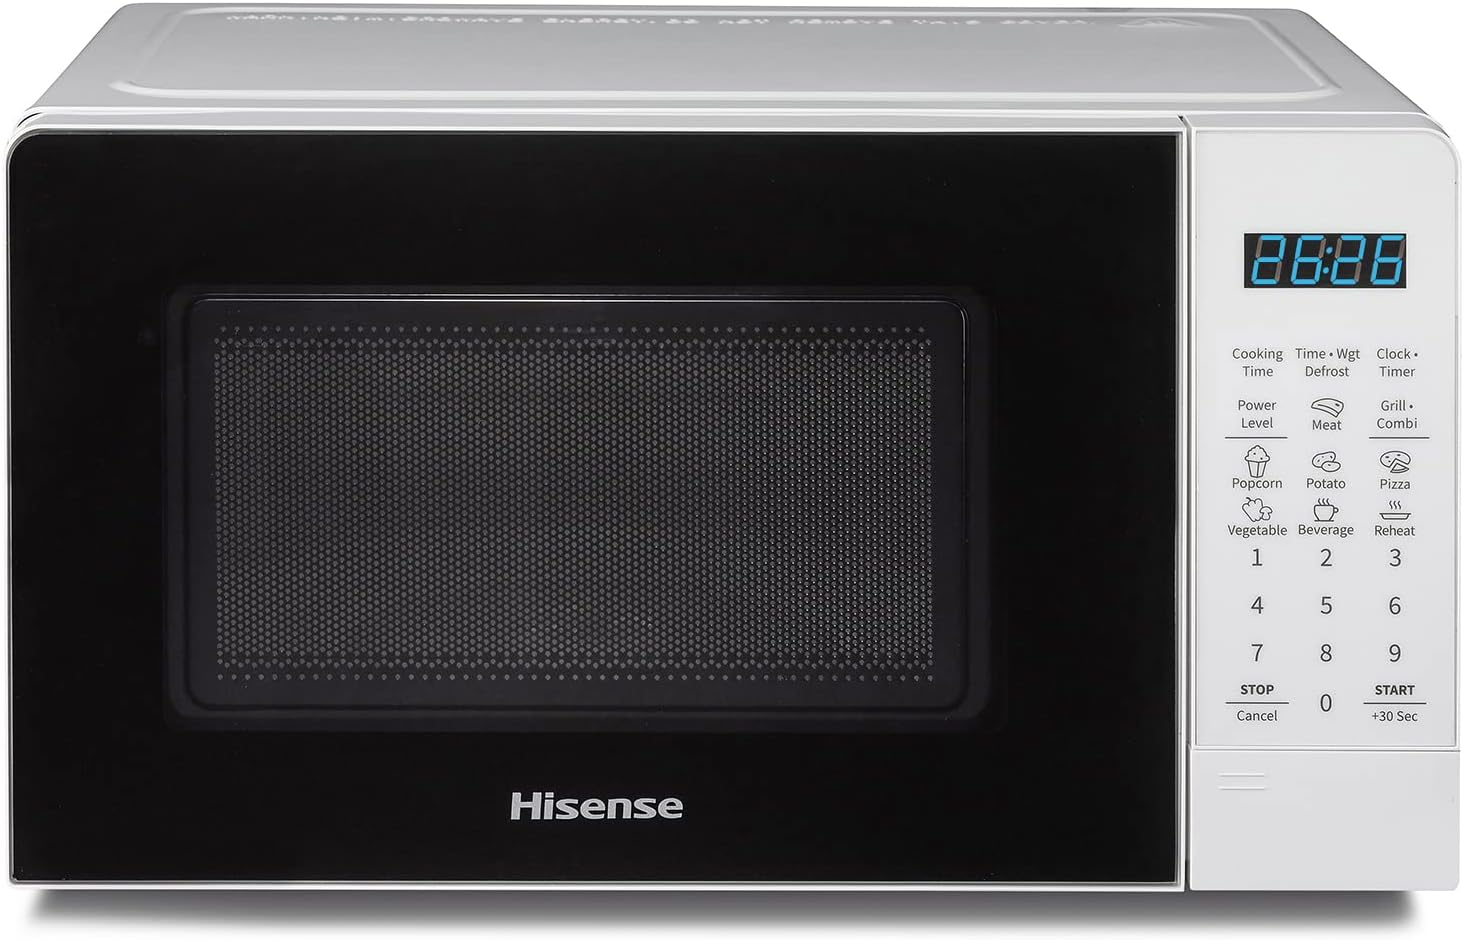
Figure 3.1: Front view of the Hisense H20MOWS3G Microwave Oven, showing the door, control panel, and display.

Figure 3.2: Interior view of the microwave oven, showing the glass turntable and cavity.
3.1 Components
- Oven Cavity: The internal cooking space.
- Glass Turntable: Rotates food for even cooking.
- Turntable Ring: Supports the glass turntable.
- Door: Equipped with a safety lock system.
- Control Panel: Features an LED display and touch-sensitive buttons for operation.
- Grill Element: Located at the top of the cavity for grilling functions.
3.2 Control Panel

Figure 3.3: Close-up of the electronic touch control panel.
The Hisense H20MOWS3G features an intuitive electronic touch control panel with an LED display. Key functions include:
- Display: Shows time, cooking settings, and indicators.
- Power Level: Adjusts microwave power.
- Time Defrost / Weight Defrost: For defrosting food by time or weight.
- Clock / Setting: To set the clock and other system settings.
- Timer: Functions as a kitchen timer.
- Grill / Combi: Activates grill or combination cooking modes.
- Preset Programs (Popcorn, Potato, Pizza, Vegetable, Beverage, Reheat): One-touch cooking for common items.
- Number Buttons (1-9, 0): For inputting time or weight.
- STOP / Cancel: Stops cooking or clears settings.
- START / +30 Sec: Starts cooking or adds 30 seconds to cooking time.
4. Setup
4.1 Unpacking
Carefully remove the microwave oven from its packaging. Remove all packing materials, including any protective film or tape from the oven surfaces and accessories. Check for any damage during transit. If any damage is found, do not operate the appliance and contact your retailer.
4.2 Placement
Place the microwave oven on a flat, stable, heat-resistant surface. Ensure there is adequate ventilation space around the appliance:
- Minimum 20 cm (8 inches) of free space above the oven.
- Minimum 10 cm (4 inches) of free space at the rear and sides.
4.3 Initial Cleaning
Before first use, wipe the interior and exterior surfaces of the oven with a soft, damp cloth. Wash the glass turntable and turntable ring in warm, soapy water, rinse thoroughly, and dry. Ensure all parts are completely dry before placing them back into the oven.
4.4 Power Connection
Plug the power cord into a grounded electrical outlet. Ensure the voltage and frequency match the specifications on the appliance rating label.
4.5 Setting the Clock
To set the clock:
- Press the "Clock/Setting" button once.
- Use the number buttons to enter the current time (e.g., 12:30).
- Press the "Clock/Setting" button again to confirm.
Note: Some users have reported minor clock inaccuracies over time. This is a known characteristic and does not affect cooking performance.
5. Operating Instructions
5.1 Basic Microwave Cooking
- Place food in a microwave-safe container on the glass turntable.
- Close the oven door securely.
- Press the "Power Level" button repeatedly to select the desired power level (e.g., P100 for 100% power, P70 for 70% power).
- Use the number buttons to enter the desired cooking time.
- Press "START / +30 Sec" to begin cooking.
5.2 Grill Function
The grill function uses direct heat to brown and crisp food. This is ideal for items like toast, small cuts of meat, or gratins.
- Place food on a heat-resistant rack or plate suitable for grilling.
- Press the "Grill / Combi" button once to select the grill mode (G-1).
- Use the number buttons to enter the desired grilling time.
- Press "START / +30 Sec" to begin grilling.

Figure 5.1: Examples of dishes prepared using the Grill + Microwave function.
5.3 Combination Cooking (Grill + Microwave)
This function combines microwave energy with grill heat for faster cooking and browning. There are typically three combination levels:
- Combi 1 (C-1): 30% Microwave, 70% Grill (e.g., for poultry, gratin).
- Combi 2 (C-2): 50% Microwave, 50% Grill (e.g., for fish, omelets).
- Combi 3 (C-3): 70% Microwave, 30% Grill (e.g., for vegetables, pasta).
- Press the "Grill / Combi" button repeatedly to select the desired combination mode (C-1, C-2, or C-3).
- Use the number buttons to enter the desired cooking time.
- Press "START / +30 Sec" to begin cooking.
5.4 Rapid Defrost
The rapid defrost function modulates microwave power to uniformly defrost frozen foods, preserving their texture and flavor.

Figure 5.2: Visual representation of food before and after rapid defrosting.
You can defrost by time or by weight:
- Time Defrost: Press "Time Defrost", enter the desired defrosting time using number buttons, then press "START / +30 Sec".
- Weight Defrost: Press "Weight Defrost", enter the weight of the food (in grams) using number buttons, then press "START / +30 Sec". The oven will automatically calculate the defrosting time.
5.5 Preset Programs
The microwave oven comes with several convenient preset programs for common food items. Simply select the program and the oven will automatically set the optimal cooking time and power.

Figure 5.3: Visual guide to the available preset programs.
To use a preset program:
- Place the food in the oven.
- Press the corresponding preset button (e.g., "Popcorn", "Potato", "Pizza", "Vegetable", "Beverage", "Reheat").
- Press "START / +30 Sec" to begin.
5.6 Multi-stage Cooking
This feature allows you to program two or three cooking stages at different power levels or functions (e.g., defrost then cook). This is useful for recipes that require varying cooking methods.

Figure 5.4: Multi-stage cooking allows for sequential cooking programs.
Refer to the detailed instructions in the included printed manual for specific programming steps for multi-stage cooking.
6. Maintenance and Cleaning
Regular cleaning and maintenance will ensure the longevity and optimal performance of your microwave oven.
Figure 6.1: Cleaning the turntable and microwave interior.
- Interior Cleaning: After each use, wipe the interior cavity with a damp cloth to remove food splatters. For stubborn stains, use a mild detergent or a microwave-safe cleaner. Do not use abrasive cleaners or scouring pads.
- Exterior Cleaning: Clean the exterior surfaces with a soft, damp cloth. Avoid getting water into the ventilation openings.
- Turntable and Ring: The glass turntable and turntable ring can be washed in warm, soapy water or in a dishwasher. Ensure they are completely dry before returning them to the oven.
- Door Seals: Regularly clean the door seals and adjacent parts with a damp cloth to ensure proper sealing and prevent microwave leakage.
- Always unplug the oven from the power outlet before cleaning.
7. Troubleshooting
If you encounter issues with your microwave oven, refer to the following table for common problems and solutions.
| Problem | Possible Cause | Solution |
|---|---|---|
| Oven will not start. | Door is not closed properly. Power cord is not plugged in. Fuse is blown or circuit breaker is tripped. | Ensure the door is securely closed. Plug the power cord firmly into the outlet. Check your household fuse/circuit breaker. |
| Food is not heating. | Cooking time or power level is set too low. Food is not suitable for microwave cooking. | Increase cooking time or power level. Ensure food is in a microwave-safe container. |
| Unusual noise during operation. | Turntable is not correctly placed. Foreign object in the cavity. | Ensure the turntable and ring are correctly seated. Check for any foreign objects and remove them. |
| Clock loses time or is inaccurate. | Minor internal clock drift. | Reset the clock as needed. This is a minor characteristic and does not affect cooking performance. |
If the problem persists after trying these solutions, please contact Hisense customer support or a qualified service technician.
8. Specifications
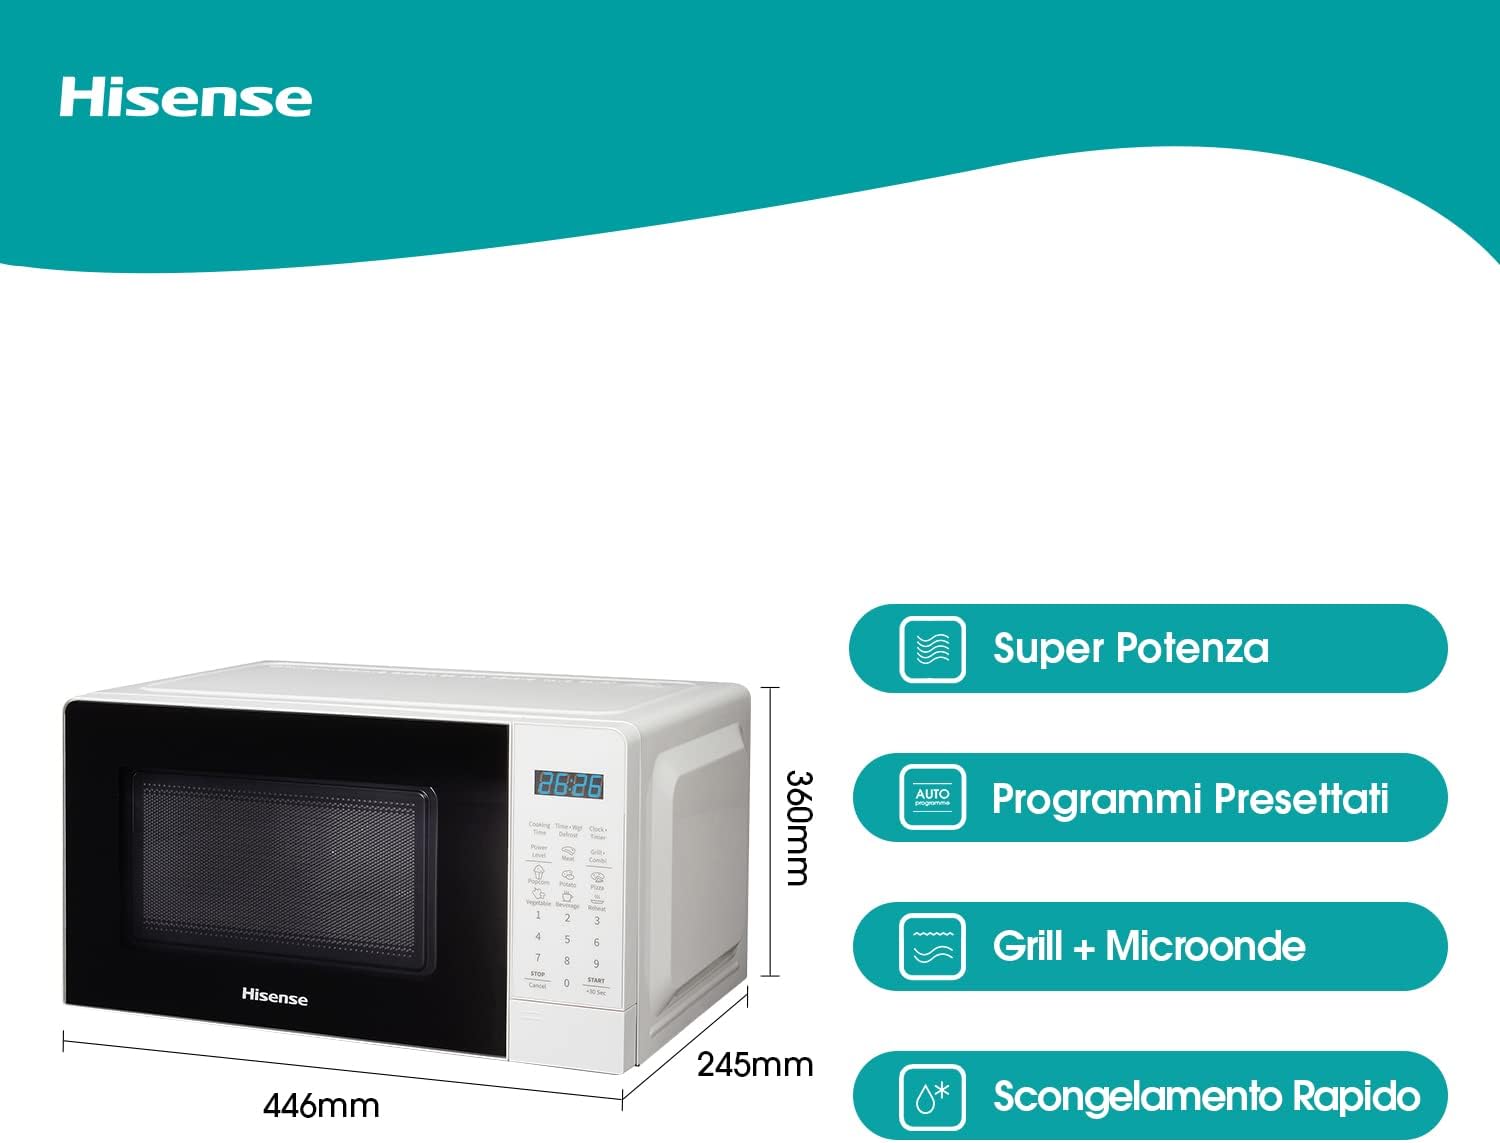
Figure 8.1: Product dimensions (Width: 446mm, Depth: 332mm, Height: 245mm).
| Feature | Detail |
|---|---|
| Model Number | H20MOWS3G |
| Type | Freestanding Electronic Microwave Oven |
| Capacity | 20 Liters |
| Microwave Power | 700 W |
| Grill Power | 900 W |
| Dimensions (W x D x H) | 44.6 x 33.2 x 24.5 cm |
| Weight | Approximately 11.36 kg |
| Material | Stainless Steel, Glass |
| Control Type | Electronic Touch Control with LED Display |
| Special Features | Automatic Menus, Multi-stage Cooking, Rapid Defrost |
| Components Included | Microwave Oven, Instruction Manual, Glass Turntable |
9. Warranty and Support
Hisense products are manufactured to high-quality standards and are backed by a manufacturer's warranty. For detailed information regarding the warranty period and terms, please refer to the warranty card included with your product or visit the official Hisense website.
For technical support, service inquiries, or to purchase replacement parts, please contact Hisense customer service through their official channels. Keep your purchase receipt as proof of purchase for warranty claims.
You can find more information and support on the official Hisense website: www.hisense.com