
1. Introduction
This manual provides comprehensive instructions for the installation, operation, and maintenance of your WOOX R7067 Zigbee Smart Radiator Valve Kit. This kit is designed to offer intelligent control over radiator temperatures in your home or office, enhancing comfort and energy efficiency. Please read this manual thoroughly before using the product to ensure correct setup and optimal performance.
2. Package Contents
Verify that all items listed below are present in your package:
- Smart Radiator Valve x 2
- AA Battery x 4
- Danfoss RA, RAV, RAVL Adapters (3 adapters)
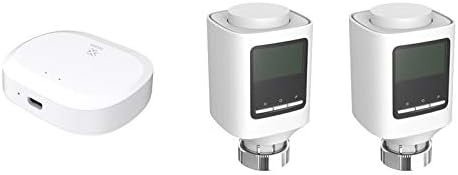
Image 2.1: The WOOX R7067 Zigbee Smart Radiator Valve Kit, including two smart radiator valves and the Zigbee gateway.
3. Product Overview
The WOOX R7067 Smart Radiator Valve Kit consists of two smart radiator valves and a Zigbee gateway. The smart valves replace existing manual or thermostatic radiator valves, allowing for precise temperature control via a connected smart home system. The Zigbee gateway acts as a central hub, connecting the valves to your home network and enabling remote control through the WOOX Home app.

Image 3.1: A WOOX R7067 Smart Radiator Valve installed on a radiator, demonstrating control via a smartphone application.

Image 3.2: Diagram illustrating the Zigbee smart home ecosystem, showing how WOOX devices connect to a gateway, router, cloud, and integrate with voice assistants like Amazon Alexa and Google Assistant.
4. Setup
4.1. Gateway Installation
- Connect the Zigbee gateway to a power source using the provided USB cable and power adapter (if included).
- Ensure the gateway is within range of your Wi-Fi router and the smart radiator valves.
- Download the WOOX Home app from your smartphone's app store (iOS or Android).
- Register or log in to your WOOX Home account.
- In the app, add the Zigbee gateway by following the on-screen instructions. This typically involves pressing a button on the gateway to enter pairing mode.
4.2. Smart Radiator Valve Installation
- Remove Existing Valve: Turn off your heating system. Remove your existing radiator valve. You may need a wrench. Be prepared for a small amount of water leakage.
- Insert Batteries: Open the battery compartment of the WOOX Smart Radiator Valve and insert the 2 AA batteries provided.
- Attach Valve: Screw the WOOX Smart Radiator Valve onto the radiator. If the valve does not fit directly, use one of the provided Danfoss RA, RAV, or RAVL adapters. Ensure it is securely tightened but do not overtighten.
- Pair with Gateway: Once the valve is installed, open the WOOX Home app. Select your Zigbee gateway and choose to add a new device. Follow the app's instructions to put the smart radiator valve into pairing mode (usually by pressing and holding a button on the valve). The valve will connect to the gateway.
- Calibration: After successful pairing, the valve will perform an automatic calibration process. This may involve the valve opening and closing to learn the stroke length of your radiator.
- Repeat for all valves: Repeat steps 2-5 for any additional smart radiator valves.
5. Operating the Smart Radiator Valve
5.1. Manual Control
You can adjust the temperature directly on the smart radiator valve:
- Rotate the Dial: Turn the dial on the valve clockwise to increase the temperature or counter-clockwise to decrease it.
- Display: The current set temperature will be shown on the valve's display.
5.2. App Control
For advanced control and scheduling, use the WOOX Home app:
- Select Device: Open the WOOX Home app and select the desired smart radiator valve.
- Adjust Temperature: Use the app interface to set the desired temperature.
- Scheduling: Create heating schedules based on your daily routine to optimize energy usage.
- Modes: Switch between different modes (e.g., Comfort, Eco, Away) if supported by the app.
5.3. Temperature Settings
The temperature interval setting for the valve is 5 ℃ to 29.5 ℃. The display range is 0.5 ℃ to 29.5 ℃.
6. Maintenance
- Battery Replacement: The smart radiator valve uses 2 AA batteries. When the battery level is low, an indicator will appear on the valve's display and in the WOOX Home app. Replace batteries promptly to ensure continuous operation. Expected battery life is approximately 18 months.
- Cleaning: Clean the valve and gateway with a soft, dry cloth. Do not use abrasive cleaners or solvents.
- Firmware Updates: Periodically check the WOOX Home app for available firmware updates for your devices. Updates can improve performance and add new features.
7. Troubleshooting
- Valve not responding: Check battery level. Ensure the valve is within Zigbee range of the gateway. Re-pair the valve if necessary.
- Gateway offline: Check power connection and Wi-Fi connectivity of the gateway. Restart your router and gateway if needed.
- Incorrect temperature readings: Ensure the valve is not obstructed and has proper airflow around it.
- Valve not fitting: Use the appropriate Danfoss adapter if the standard M30x1.5mm connector does not fit your radiator.
- App issues: Ensure your WOOX Home app is updated to the latest version. Try restarting the app or your smartphone.
8. Specifications
| Feature | Specification |
|---|---|
| Model Number | 741679 (R7067) |
| Battery | DC 1.5V AA x 2 |
| Battery Life | Approximately 18 months |
| Connector | M30x1.5 mm |
| Linear Stroke | 4.3 mm |
| Temperature Interval Setting | 5 ℃ - 29.5 ℃ |
| Display Temperature Range | 0.5 ℃ - 29.5 ℃ |
| Motor Noise | <30 dB |
| Wireless Connection | Zigbee 3.0 |
| Connection Distance | 10-30 m (internal) |
| Frequency | 2.4-2.483 GHz |
| Operating Temperature | -5 ℃ - 45 ℃ |
| Working Humidity | 5-90 % RH, non-condensing |
| Dimensions (H x W x D) | 115 mm x 63.7 mm x 60.4 mm |
| Weight | 820 grams |
| Manufacturer | WOOX |
9. Safety Information
- Do not expose the device to extreme temperatures, direct sunlight, or moisture.
- Do not attempt to disassemble or repair the device yourself. Refer to qualified service personnel.
- Keep batteries out of reach of children. Dispose of used batteries according to local regulations.
- Ensure the heating system is turned off before installing or removing radiator valves.
10. Warranty and Support
Information regarding product warranty and availability of spare parts is not provided in the product data. For support or warranty inquiries, please contact your retailer or visit the official WOOX website.