Introduction
This manual provides detailed instructions for the installation, operation, and maintenance of your KAOLALI 6 Gang Rocker Switch Panel. Designed for various 12V/24V applications, including cars, boats, trucks, yachts, caravans, buses, and trailers, this pre-wired switch panel offers reliable control for multiple electrical devices. Please read this manual thoroughly before installation and use to ensure proper function and safety.
Safety Information
- Always disconnect the power source before installing or performing maintenance on the switch panel to prevent electrical shock.
- Ensure all wiring connections are secure and properly insulated to avoid short circuits.
- Do not exceed the maximum current rating of 20A for 12V DC systems or 10A for 24V DC systems per switch. Overloading can cause damage to the switch panel and connected devices, and poses a fire risk.
- Verify that the voltage of your electrical system matches the panel's specifications (12V/24V DC).
- This product is rated IP65 waterproof, meaning it is protected against dust and low-pressure water jets. While suitable for marine environments, avoid prolonged submersion.
Package Contents
Please check the package for the following items:
- 1 x KAOLALI 6 Gang Rocker Switch Panel (Pre-wired)
- 1 x Sheet of Customizable Labels
- 4 x Mounting Screws

Image: The 6-gang rocker switch panel, showing the pre-wired connections, a sheet of customizable labels, and four mounting screws.
Specifications
| Brand | KAOLALI |
| Model | 6 Gang Toggle Switch |
| Operating Voltage | 12V / 24V DC |
| Current Rating (Max) | 12V 20A DC / 24V 10A DC (per switch) |
| Switch Type | ON-OFF Rocker Switch |
| LED Color | Blue |
| Waterproof Rating | IP65 |
| Material | ABS, PC, Aluminum |
| Operating Temperature | -25°C to +80°C |
| Dimensions (Approx.) | 19.5 cm x 10 cm x 8 cm (7.68 in x 3.94 in x 3.15 in) |
| Item Weight | 322 g |
| Certifications | CE |

Image: Diagram showing the approximate dimensions of the switch panel: 180mm length, 68mm height, 90mm depth, with a two-hole distance of 163mm.
Setup and Installation
The KAOLALI 6 Gang Rocker Switch Panel comes pre-wired for ease of installation. Follow these steps for proper setup:
- Choose a Mounting Location: Select a flat, secure surface in your vehicle or boat dashboard that can accommodate the panel's dimensions (approx. 19.5 cm x 10 cm). Ensure there is sufficient space behind the panel for wiring connections.
- Prepare the Opening: Carefully cut an opening in the chosen mounting surface according to the panel's dimensions. Use the provided dimensions diagram as a guide.
- Wiring Connections:
- Identify the main power input wires: The red wire is for the positive (+) connection, and the black wire is for the negative (-) or ground connection.
- Connect the main positive (+) wire to your vehicle's 12V/24V DC power source (e.g., battery, fuse box) via an appropriate fuse (not included, recommended to match total load).
- Connect the main negative (-) wire to a reliable ground point on your vehicle or boat.
- Each individual switch has output wires (typically red for positive output) that connect to your desired electrical accessories (e.g., lights, pumps, fans). Connect these output wires to the positive terminal of each accessory. The negative terminal of each accessory should be connected to a common ground.
- Secure the Panel: Insert the switch panel into the prepared opening. Use the four provided mounting screws to secure the panel firmly to the surface.
- Apply Labels: Use the customizable labels provided to clearly identify the function of each switch. Peel and stick the appropriate labels onto the designated areas above each rocker switch.
- Test Functionality: Once all connections are made and the panel is secured, reconnect the main power source and test each switch to ensure proper operation of the connected accessories and the blue LED indicators.
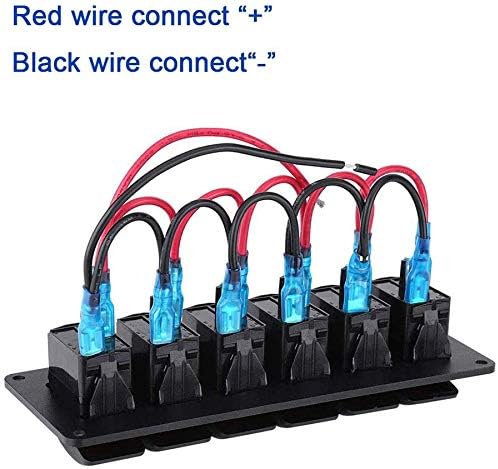
Image: A close-up view of the pre-wired connections on the back of the switch panel, indicating the red wire for positive (+) and black wire for negative (-).

Image: An example of the 6-gang rocker switch panel integrated into a vehicle's dashboard, showing the blue LED illumination.
Operating Instructions
The KAOLALI 6 Gang Rocker Switch Panel features six independent ON-OFF rocker switches, each with a blue LED indicator.
- Switching ON/OFF: To activate a connected device, press the top part of the rocker switch. The blue LED indicator for that switch will illuminate, indicating that the circuit is closed and power is being supplied to the device. To turn off the device, press the bottom part of the rocker switch. The LED will turn off, indicating the circuit is open.
- LED Indicators: The blue LED on each switch provides visual confirmation of its operational status (ON/OFF).
- Customizable Labels: Use the applied labels to quickly identify which switch controls which accessory, enhancing usability and safety.

Image: Front view of the 6-gang rocker switch panel, highlighting the individual switches and their blue LED indicators.
Maintenance
To ensure the longevity and optimal performance of your KAOLALI 6 Gang Rocker Switch Panel, follow these maintenance guidelines:
- Regular Cleaning: Periodically wipe the surface of the switch panel with a soft, damp cloth to remove dust and grime. Avoid using harsh chemicals or abrasive cleaners.
- Inspect Wiring: Annually inspect all wiring connections for signs of corrosion, fraying, or looseness. Tighten any loose connections and replace damaged wires immediately.
- Check Waterproof Seals: Ensure the rubber caps on the terminals (if applicable) and the panel's mounting remain sealed to maintain its IP65 waterproof rating.
- Avoid Overloading: Always ensure that the current draw of connected devices does not exceed the maximum rating of each switch (20A for 12V, 10A for 24V). Overloading can lead to switch failure and potential hazards.
Troubleshooting
If you encounter issues with your switch panel, refer to the following troubleshooting tips:
| Problem | Possible Cause | Solution |
|---|---|---|
| Switch does not turn ON / LED does not light up. |
|
|
| Connected device does not work, but switch LED is ON. |
|
|
| Switch panel or wiring gets hot. |
|
|
Warranty Information
KAOLALI products are manufactured to high-quality standards. This product is covered by a standard manufacturer's warranty against defects in materials and workmanship. Please retain your proof of purchase for warranty claims. For specific warranty duration and terms, refer to the product packaging or contact KAOLALI customer support.
Support
For further assistance, technical support, or inquiries regarding your KAOLALI 6 Gang Rocker Switch Panel, please refer to the contact information provided on the product packaging or the official KAOLALI website. When contacting support, please have your product model number and purchase details ready.