
1. Introduction
This manual provides detailed instructions for the safe and efficient operation of your BenQ MS560 SVGA Projector. Please read this manual thoroughly before using the projector and retain it for future reference. The BenQ MS560 projector is designed for reliable performance in various environments, offering 4000 ANSI Lumens brightness, a 20000:1 contrast ratio, and versatile connectivity options including dual HDMI inputs.
2. Safety Information
Observe the following safety precautions to ensure proper operation and prevent damage to the projector or injury to yourself.
- Power Source: Use only the power cord and adapter supplied with the projector. Ensure the power outlet matches the voltage requirements.
- Ventilation: Do not block ventilation openings. Allow adequate space around the projector for proper airflow to prevent overheating.
- Heat: The projector lamp operates at high temperatures. Avoid touching the projector casing near the lamp area during or immediately after operation.
- Moisture: Do not expose the projector to rain, moisture, or excessive humidity. Keep liquids away from the device.
- Cleaning: Unplug the projector before cleaning. Use a soft, dry cloth. Do not use liquid or aerosol cleaners.
- Lamp Replacement: Refer to the maintenance section for safe lamp replacement procedures. Always allow the projector to cool down completely before attempting lamp replacement.
- Eye Safety: Do not look directly into the projector lens when the lamp is on. The bright light can cause eye damage.
3. Package Contents
Verify that all items are present in your package. If any items are missing or damaged, contact your dealer immediately.
- BenQ MS560 SVGA Projector
- Power Cord
- Remote Control with Batteries
- VGA Cable
- Quick Start Guide
- Warranty Card
4. Product Overview
4.1 Front and Side Views

Figure 4.1: Front view of the BenQ MS560 projector, showing the lens, focus/zoom rings, and ventilation grilles.
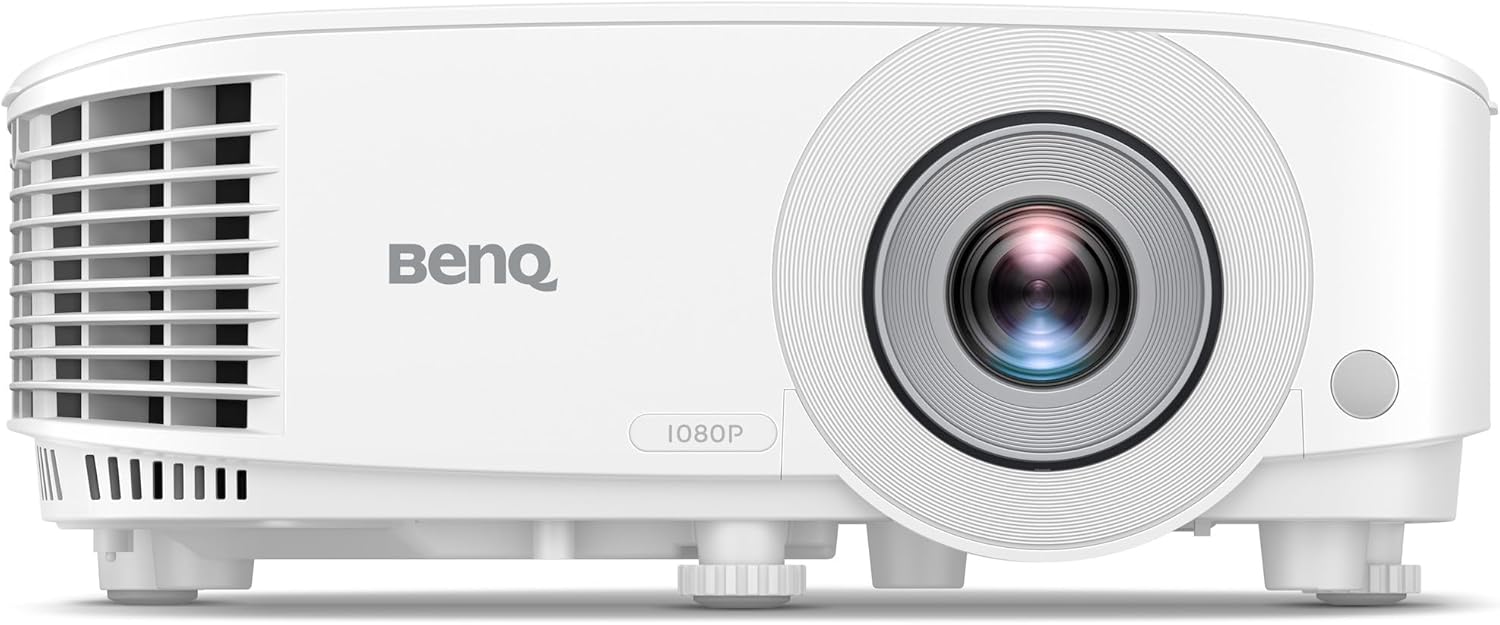
Figure 4.2: Side view of the BenQ MS560 projector, highlighting the ventilation system.

Figure 4.3: Angled front view of the BenQ MS560 projector, showing the lens and front panel details.

Figure 4.4: Another angled front view of the BenQ MS560 projector, providing a different perspective of its design.
4.2 Top Panel Controls

Figure 4.5: Top panel of the BenQ MS560 projector, featuring the control buttons for power, menu navigation, source selection, and eco blank mode.
The top panel includes buttons for power on/off, menu access, navigation (up, down, left, right, OK), source selection, and an Eco Blank function. The focus and zoom rings are located near the lens for image adjustment.
4.3 Rear Panel Connections
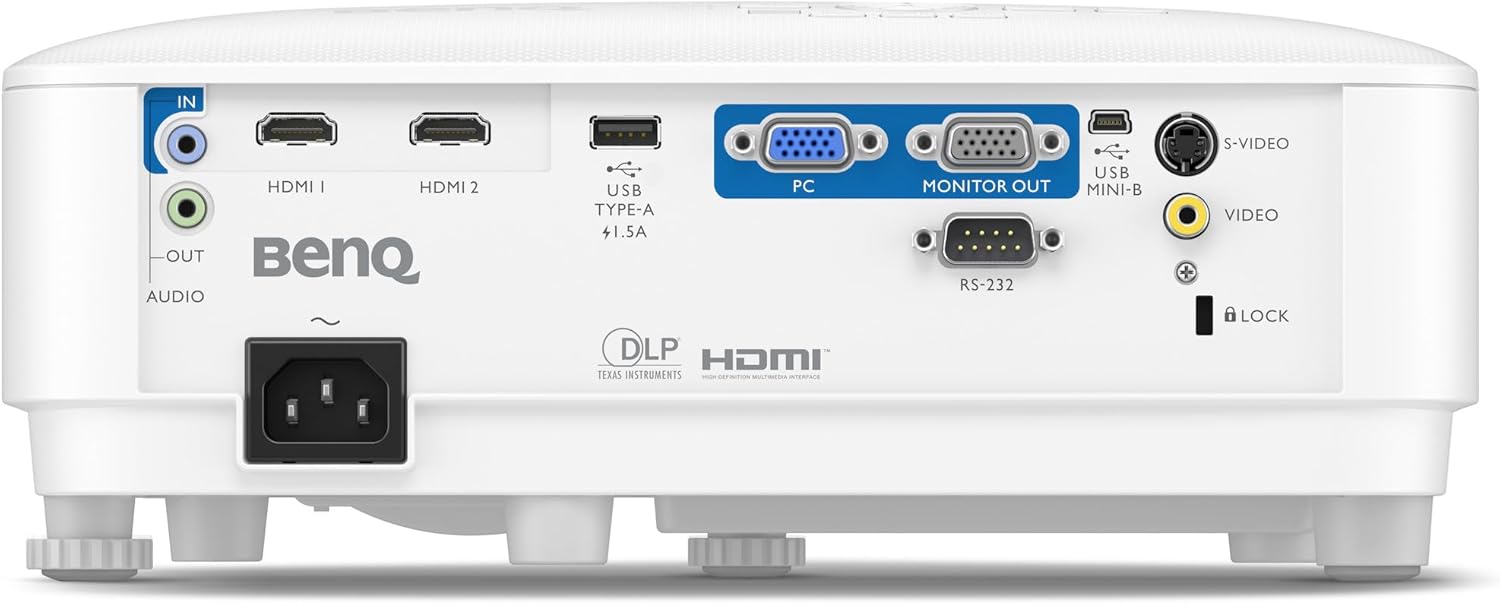
Figure 4.6: Rear panel of the BenQ MS560 projector, displaying various input and output ports including HDMI, VGA, USB, S-Video, Video, Audio In/Out, and RS-232.
The rear panel provides the following connectivity options:
- HDMI 1 & 2: Digital video and audio inputs.
- VGA (PC In): Analog video input for computers.
- Monitor Out: VGA output for connecting an external monitor.
- USB Type-A (5V/1.5A): Power output for USB devices.
- USB Mini-B: Service port.
- S-Video: Analog video input.
- Video (RCA): Composite video input.
- Audio In/Out: 3.5mm audio jacks.
- RS-232: Serial port for projector control.
- Power Inlet: For connecting the power cord.
5. Setup
5.1 Projector Placement
Position the projector on a stable, flat surface or mount it securely. Ensure the projector is perpendicular to the screen for a rectangular image. Adjust the projector's feet to level the image if necessary. Maintain adequate distance from the screen to achieve the desired image size.
5.2 Connecting Devices
- Power Connection: Connect the power cord to the projector's power inlet and then to a grounded electrical outlet.
- Video Source:
- For digital sources (e.g., Blu-ray player, laptop): Connect an HDMI cable from your device to one of the projector's HDMI ports.
- For analog sources (e.g., older PC): Connect a VGA cable from your device to the projector's PC In port.
- For other analog video sources: Use the S-Video or Video (RCA) ports as appropriate.
- Audio Connection: If using a VGA or composite video source, connect an audio cable from your source device to the projector's Audio In port. HDMI connections transmit audio automatically.
5.3 Power On/Off
- Power On: Press the Power button on the projector's top panel or the remote control. The power indicator light will turn blue.
- Power Off: Press the Power button twice. The projector will enter a cooling cycle, and the power indicator will flash before turning off. Do not unplug the projector during the cooling cycle.
6. Operation
6.1 Image Adjustment
- Focus: Rotate the Focus Ring on the projector lens until the image is sharp and clear.
- Zoom: Rotate the Zoom Ring on the projector lens to adjust the image size.
- Keystone Correction: If the image appears trapezoidal, use the Keystone Correction function in the projector's OSD (On-Screen Display) menu to square the image.
6.2 Source Selection
Press the Source button on the projector's top panel or remote control to cycle through available input sources (HDMI 1, HDMI 2, PC, S-Video, Video).
6.3 Menu Navigation
Press the Menu button to access the OSD. Use the arrow buttons to navigate through menu options and the OK button to confirm selections. Press Menu again to exit.
6.4 Picture Adjustments
Within the OSD menu, you can adjust various picture settings:
- Brightness/Contrast: Adjust for optimal image visibility.
- Color/Tint: Fine-tune color reproduction.
- Aspect Ratio: Select between 4:3, 16:9, or other available aspect ratios to match your content.
- Picture Mode: Choose from preset modes (e.g., Presentation, sRGB, Cinema) or customize your own.
6.5 3D Functionality
The BenQ MS560 supports 3D Blu-ray content. To view 3D content:
- Ensure your source device (e.g., Blu-ray player) is 3D-compatible and connected via HDMI.
- Play 3D content. The projector should automatically detect the 3D signal.
- Wear compatible DLP Link 3D glasses (sold separately) for the 3D effect.
- If 3D mode does not activate automatically, check the 3D settings in the projector's OSD menu.
7. Maintenance
Regular maintenance ensures optimal performance and extends the lifespan of your projector.
7.1 Lamp Replacement
The lamp has a limited lifespan. When the lamp indicator lights up or a warning message appears, the lamp needs to be replaced. Always use an authorized BenQ replacement lamp.
- Turn off the projector and unplug the power cord.
- Allow the projector to cool down for at least 60 minutes.
- Locate the lamp cover (refer to the projector diagram in the full user manual for exact location).
- Unscrew the lamp cover and carefully remove the old lamp module.
- Install the new lamp module, ensuring it is securely seated.
- Replace the lamp cover and screw it back into place.
- Plug in the power cord and reset the lamp timer in the OSD menu.
Note: Lamp replacement should be performed by qualified service personnel if you are unsure.
7.2 Filter Cleaning
The air filter prevents dust from entering the projector. Clean the filter regularly (e.g., every 100-200 hours of operation) to maintain proper cooling.
- Turn off and unplug the projector.
- Locate the air filter cover.
- Remove the filter and gently clean it with a soft brush or vacuum cleaner. Do not wash the filter with water.
- Reinstall the clean filter and replace the cover.
7.3 General Cleaning
- Projector Casing: Wipe with a soft, lint-free cloth. For stubborn marks, dampen the cloth slightly with water. Avoid harsh chemicals.
- Lens: Use a professional lens cleaning cloth and lens cleaning solution. Do not use abrasive materials.
8. Troubleshooting
This section addresses common issues you might encounter with your BenQ MS560 projector.
| Problem | Possible Cause | Solution |
|---|---|---|
| No image on screen |
|
|
| Image is blurry |
|
|
| Image is trapezoidal |
|
|
| No audio |
|
|
For more detailed troubleshooting, refer to the complete user manual or contact BenQ customer support.
9. Specifications
| Feature | Description |
|---|---|
| Brand | BenQ |
| Model Number | MS560 (9H.JND77.13E) |
| Display Resolution (Native) | 800 x 600 (SVGA) |
| Display Resolution (Maximum) | 800 x 600 |
| Brightness | 4000 ANSI Lumens |
| Contrast Ratio | 20000:1 |
| Connectivity Technology | HDMI, VGA, USB, S-Video, RCA Video, RS-232 |
| Special Feature | Blu-ray 3D Support |
| Item Weight | 5.07 pounds |
| Product Dimensions | 8.7 x 11.65 x 4.72 inches |
10. Warranty and Support
For warranty information and technical support, please refer to the warranty card included with your product or visit the official BenQ website. You can find detailed support resources, FAQs, and contact information for customer service there.
BenQ Official Website: www.benq.com