
Selec PIC101A-VI-230
Selec Make Process Indicator PIC101A-VI-230 User Manual
Model: PIC101A-VI-230
1. Introduction
This user manual provides detailed instructions for the installation, operation, maintenance, and troubleshooting of the Selec Make Process Indicator, Model PIC101A-VI-230. This device is designed for precise measurement and indication of voltage and current inputs in industrial applications. Please read this manual thoroughly before using the product to ensure safe and efficient operation.
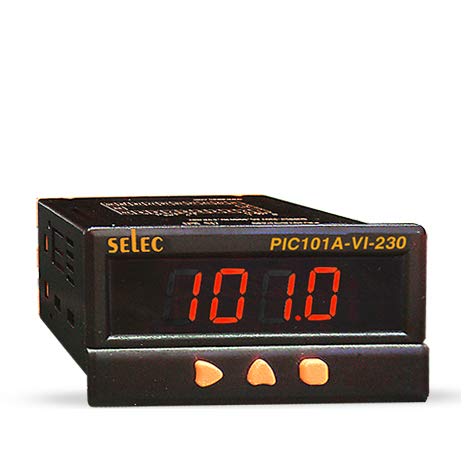
Figure 1: Front view of the Selec Make Process Indicator PIC101A-VI-230, showing the digital display and control buttons.
2. Safety Information
Always observe the following safety precautions to prevent injury or damage to the device:
- Ensure the power supply matches the device's specifications (230V AC).
- Do not operate the device in environments exceeding specified temperature and humidity ranges.
- Only qualified personnel should perform installation and maintenance.
- Disconnect power before making any connections or performing maintenance.
- Avoid exposing the device to direct sunlight, excessive dust, or corrosive gases.
3. Product Overview
3.1. Key Features
- Voltage/Current Input: 0-10V DC, 0-20mA, 4-20mA DC.
- 4-digit, 7-segment LED single display.
- Compact dimensions: 48(W) x 96(H) x 76(D)mm.
- Panel mounting.
- Supply Voltage: 230V AC, ± 20%, 50/60 Hz.
3.2. Dimensions
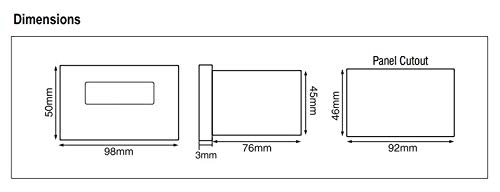
Figure 2: Dimensional drawing of the PIC101A-VI-230, including front, side, and panel cutout views with measurements in millimeters.
4. Installation and Setup
4.1. Mounting
The PIC101A-VI-230 is designed for panel mounting. Ensure the panel cutout dimensions match the specifications provided in Figure 2 (46mm x 92mm). Secure the device firmly using the provided mounting clamps.
4.2. Wiring and Terminal Connections
Refer to the wiring diagram below for correct terminal connections. Ensure all connections are secure and properly insulated to prevent short circuits or electrical hazards.
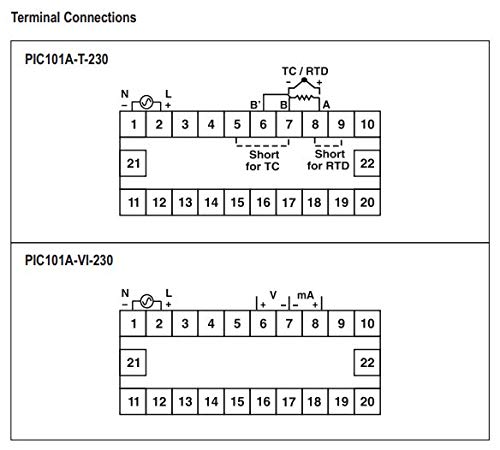
Figure 3: Terminal connection diagram for the PIC101A-VI-230, showing power input (N, L), and voltage/current input terminals (V, mA).
- Power Supply (230V AC): Connect Neutral (N) to terminal 1 and Live (L) to terminal 2.
- Voltage Input: Connect the positive (+) voltage input to terminal 6 and the negative (-) to terminal 7.
- Current Input: Connect the positive (+) current input to terminal 8 and the negative (-) to terminal 9.
5. Operating Instructions
5.1. Power On
Once all connections are made, apply 230V AC power to the device. The 4-digit LED display will illuminate and show the measured process value.
5.2. Display and Input Specifications
The device displays the input value on its 4-digit, 7-segment LED display. The input type (Voltage or Current) and range are configured internally. For the PIC101A-VI-230, the inputs are 0-10V DC, 0-20mA, and 4-20mA DC.
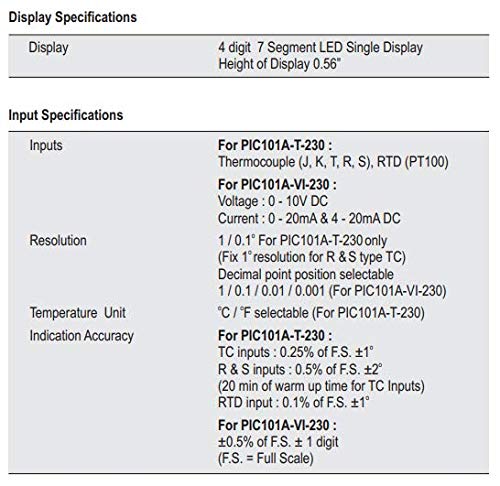
Figure 4: Detailed specifications for the display and input types, including resolution and indication accuracy for the PIC101A-VI-230 model.
5.3. Button Functions
The front panel features control buttons for potential calibration or setting adjustments. Specific functions may vary based on the internal configuration. Refer to the device's internal programming guide for detailed button operations if available.
6. Maintenance
The Selec Make Process Indicator is designed for minimal maintenance. However, regular checks can ensure optimal performance and longevity.
- Cleaning: Use a soft, dry cloth to clean the display and casing. Do not use abrasive cleaners or solvents.
- Connection Checks: Periodically inspect all wiring connections for looseness or corrosion.
- Environmental Conditions: Ensure the operating environment remains within the specified temperature and humidity ranges to prevent damage.
7. Troubleshooting
This section provides solutions to common issues you might encounter.
| Problem | Possible Cause | Solution |
|---|---|---|
| Display is blank | No power supply; Incorrect wiring; Blown fuse (internal) | Check power connections (230V AC); Verify wiring according to Figure 3; Contact support if fuse is suspected. |
| Incorrect reading | Incorrect input wiring; Sensor malfunction; Calibration required | Verify input wiring (Voltage/Current); Check sensor functionality; Refer to calibration procedures if applicable. |
| Display shows "Err" | Input out of range; Internal error | Ensure input signal is within specified range (0-10V DC, 0-20mA, 4-20mA DC); Power cycle the device; Contact support if error persists. |
8. Specifications
8.1. Display Specifications
- Display: 4 digit, 7 Segment LED Single Display
- Height of Display: 0.56"
8.2. Input Specifications (PIC101A-VI-230)
- Voltage: 0 - 10V DC
- Current: 0 - 20mA & 4 - 20mA DC
- Resolution: 1 / 0.1 / 0.01 / 0.001 (Decimal point position selectable)
- Indication Accuracy: ±0.5% of F.S. ± 1 digit (F.S. = Full Scale)
Figure 5: Table detailing display and input specifications, including resolution and accuracy.
8.3. Auxiliary Supply Specifications
- Supply Voltage: 230V AC, ± 20%, 50/60 Hz
- Power Consumption: 5 VA max@ 230 V AC
8.4. Environmental Specifications
- Operating Temperature: 0 to 50°C (32 to 122°F)
- Storage Temperature: -20 to 75°C (-4 to 167°F)
- Humidity (non-condensing): 95% RH
8.5. Mechanical Specifications
- Mounting: Panel
- Weight (PIC101A-VI-230): 195 gms
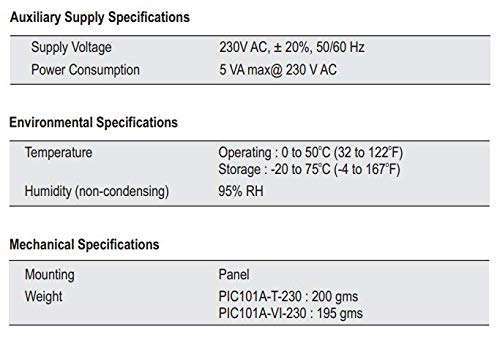
Figure 6: Table summarizing auxiliary supply, environmental, and mechanical specifications for the process indicator.
8.6. Input Sensor Range (For PIC101A-T-230 Model)
Note: The following table is primarily for the PIC101A-T-230 model (Thermocouple/RTD input). For the PIC101A-VI-230, refer to the Voltage/Current input ranges specified in section 8.2.
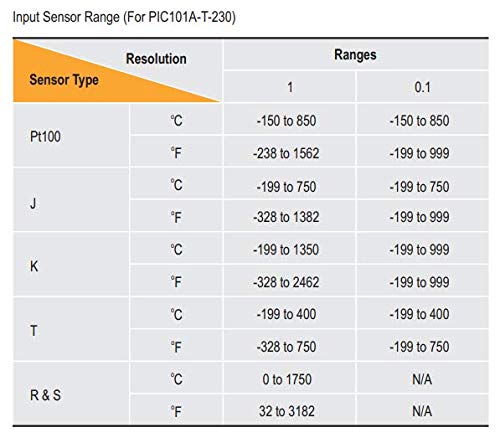
Figure 7: Table showing input sensor ranges and resolutions for various thermocouple and RTD types (primarily for PIC101A-T-230 model).
9. Warranty and Support
9.1. Warranty Information
Specific warranty details are typically provided with the product packaging or on the manufacturer's official website. Please retain your purchase receipt for warranty claims. The manufacturer warrants this product against defects in materials and workmanship under normal use for a specified period from the date of purchase.
9.2. Technical Support
For technical assistance, troubleshooting beyond this manual, or service inquiries, please contact Selec Make customer support. Contact information can usually be found on the product packaging or the official Selec website.
Related documentsPIC101A-VI-230


Ask a question about this manual
Ask about setup, troubleshooting, compatibility, parts, safety, or missing instructions. Manuals+ will review the question and use this page’s manual context to help answer it.