1. Introduction
Thank you for choosing the WIFI SMART CAMERA IP Camera. This manual provides detailed instructions for the installation, operation, maintenance, and troubleshooting of your new outdoor dome HD WiFi camera. This camera is designed for reliable surveillance, featuring infrared night vision, two-way audio, and robust weather resistance.

Figure 1.1: WIFI SMART CAMERA IP Camera with its mobile application interface.
2. Product Overview
2.1 Key Features
- High Definition Video: Captures clear 1080P video.
- Pan & Tilt Functionality: Offers 355° horizontal and 100° vertical rotation for wide coverage.
- Dual Connectivity: Supports both wireless (Wi-Fi) and wired (RJ45 cable) network connections.
- Infrared Night Vision: Provides clear monitoring in total darkness.
- Two-Way Audio: Built-in microphone and speaker for communication.
- Motion Detection & Alerts: Notifies your mobile device upon detecting movement.
- Humanoid Tracking: Automatically tracks human movement.
- Weather Resistance: Designed to withstand outdoor conditions (waterproof, anti-lightning, heat and cold resistant).
- Storage Options: Supports Micro SD card up to 128GB and cloud storage.
2.2 Components Diagram

Figure 2.1: Detailed view of camera components and dimensions.
- 1. Dual Antennas: For enhanced Wi-Fi signal reception.
- 2. Speaker: For two-way audio communication.
- 3. Infrared Sensor: Detects ambient light for automatic night vision activation.
- 4. Microphone: For capturing audio during surveillance and two-way communication.
- 5. Lenses: Main camera lens for video capture.
- 6. LEDs: Infrared LEDs for night vision and white LEDs for color night vision (if applicable).
- 7. Micro SD Card Slot: For local video storage.
3. Setup
3.1 Physical Installation
- Choose a Location: Select a suitable outdoor or indoor location that provides the desired viewing angle and is within range of your Wi-Fi network or wired connection point. Ensure the location is protected from direct, extreme weather conditions if possible, despite its weather resistance.
- Mounting: Use the provided mounting bracket and screws to securely attach the camera to a wall or ceiling. Ensure the camera is stable and cannot be easily dislodged.
- Power Connection: Connect the camera to a 12V power source using the provided power adapter. Ensure the power cable is routed safely and protected from damage.
3.2 Network Connection
The camera supports two connection methods: wireless (Wi-Fi) and wired (RJ45 Ethernet cable).
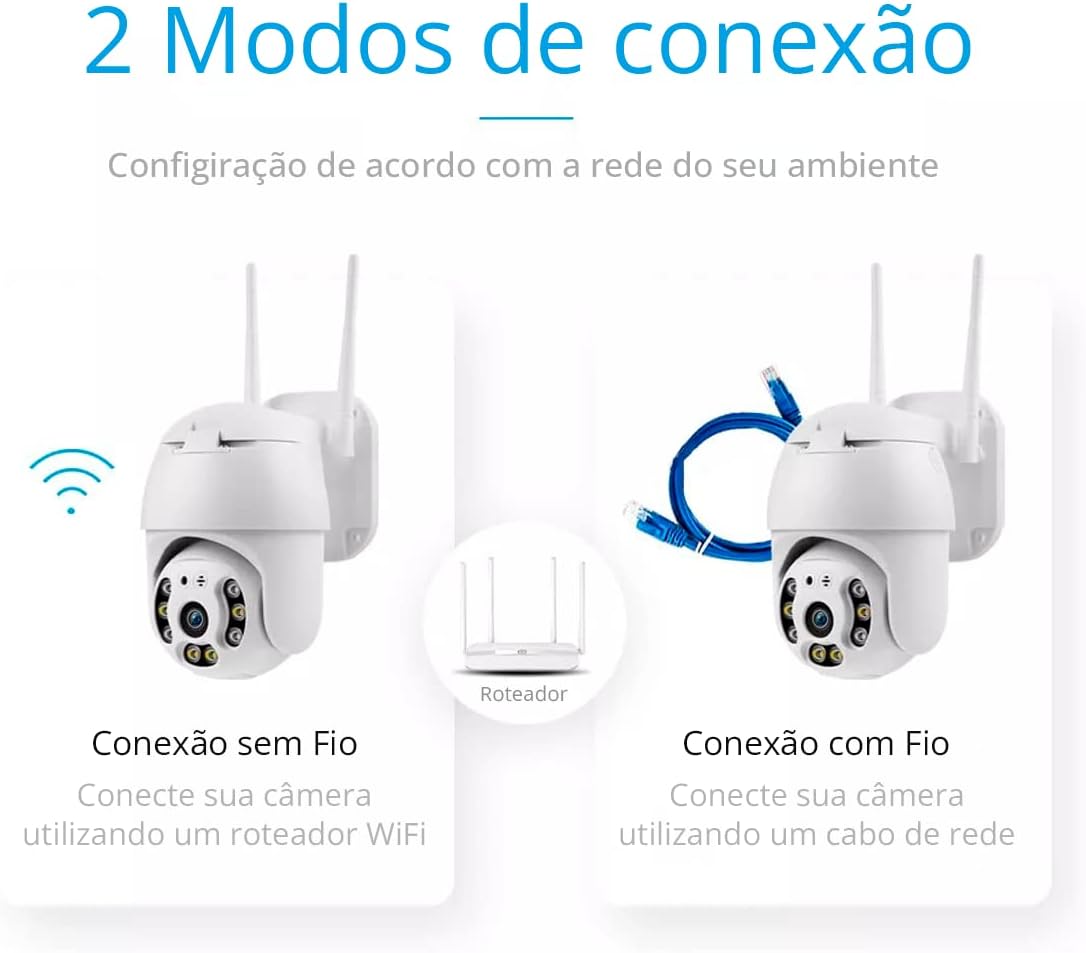
Figure 3.1: Wireless and Wired Connection Options.
3.2.1 Wireless Connection (Wi-Fi)
- Ensure your Wi-Fi router is powered on and broadcasting a 2.4GHz network. This camera does not support 5GHz Wi-Fi.
- Proceed to App Installation and Pairing (Section 3.3) to connect the camera to your Wi-Fi network via the app.
3.2.2 Wired Connection (RJ45)
- Connect one end of an RJ45 Ethernet cable to the camera's Ethernet port.
- Connect the other end of the Ethernet cable to an available LAN port on your router or network switch.
- The camera will automatically attempt to establish a wired connection.
3.3 App Installation and Pairing
- Download the App: Search for "ICsee" in your mobile device's app store (Google Play Store for Android or Apple App Store for iOS) and download the official application.
- Register/Log In: Open the ICsee app and follow the prompts to register a new account or log in if you already have one.
- Add Device: Tap the "+" icon or "Add new device" option within the app.
- Select Device Type: Choose the appropriate camera type (e.g., "Wi-Fi Camera" or "Wired Camera" depending on your connection method).
- Follow On-Screen Instructions: The app will guide you through the pairing process, which may involve scanning a QR code on the camera, connecting to a temporary Wi-Fi hotspot created by the camera, or entering your Wi-Fi credentials.
- Set Password: Create a strong password for your camera to ensure security.
- Name Camera: Assign a recognizable name to your camera (e.g., "Front Door Camera", "Backyard").
4. Operating Instructions

Figure 4.1: Overview of Camera Features.
4.1 Live View and Pan/Tilt Control
- Open the ICsee app and select your camera from the device list to access the live video feed.
- Use the directional controls within the app to remotely pan the camera horizontally (up to 355°) and tilt it vertically (up to 100°) to adjust the viewing angle.
4.2 Two-Way Audio
- While in live view, tap the microphone icon in the app to speak through the camera's speaker.
- The camera's built-in microphone will capture audio from the camera's surroundings, which you can hear through your phone.
4.3 Motion Detection and Alerts
- Navigate to the camera settings in the ICsee app to enable and configure motion detection.
- Adjust sensitivity levels and set up notification preferences to receive alerts on your mobile device when motion is detected.
- The camera also supports automatic humanoid tracking, which can be enabled in settings to follow detected human figures.
4.4 Recording and Playback

Figure 4.2: Micro SD Card Storage Capacity and Recording Days.
- Micro SD Card Storage: Insert a Micro SD card (up to 128GB, Class 10 or higher recommended) into the designated slot on the camera. The camera will automatically begin recording based on your settings (e.g., continuous, motion-triggered).
- Cloud Storage: The ICsee app may offer optional cloud storage services for a subscription fee. Refer to the app for details on activating and managing cloud storage.
- Playback: Access recorded footage through the playback feature in the ICsee app. You can filter by date and time to review specific events.
4.5 Night Vision
- The camera is equipped with infrared LEDs for automatic night vision. In low-light conditions, the camera will automatically switch to infrared mode, providing clear black-and-white video.
- Some models may also feature white LEDs for color night vision when motion is detected. Check your camera's specific capabilities in the app settings.
5. Maintenance
- Cleaning: Periodically clean the camera lens and housing with a soft, damp cloth to remove dust and dirt. Do not use harsh chemicals or abrasive materials.
- Firmware Updates: Check the ICsee app regularly for firmware updates. Keeping your camera's firmware up-to-date ensures optimal performance, security, and access to new features.
- Power Supply: Ensure the power adapter and cable are in good condition and free from damage.
- Network Stability: Maintain a stable Wi-Fi or wired network connection for uninterrupted camera operation.
6. Troubleshooting
| Problem | Possible Cause | Solution |
|---|---|---|
| Camera offline/Cannot connect | No power, Wi-Fi signal too weak, incorrect Wi-Fi password, router issue, camera too far from router. | Check power supply. Move camera closer to router. Verify Wi-Fi password. Restart router and camera. Ensure 2.4GHz Wi-Fi is used. |
| Poor image quality | Dirty lens, insufficient lighting, network bandwidth issues. | Clean the camera lens. Ensure adequate lighting or check night vision settings. Check network speed. |
| Motion alerts not received | Motion detection disabled, app notifications off, incorrect sensitivity settings. | Enable motion detection in app settings. Check phone's notification settings for the ICsee app. Adjust motion detection sensitivity. |
| SD card not recording | SD card full, faulty SD card, incorrect recording settings, SD card not inserted correctly. | Format or replace SD card. Ensure recording mode is enabled in app. Reinsert SD card. Use a Class 10 or higher SD card. |
| Two-way audio not working | Microphone/speaker muted in app, network delay. | Check audio settings in the app. Ensure microphone and speaker icons are not muted. Check network stability. |
7. Specifications
| Feature | Specification |
|---|---|
| Model | B08HLPC8DG |
| Brand | WIFI SMART CAMERA |
| Connectivity | Wi-Fi (2.4GHz), RJ45 Ethernet |
| Resolution | 1080P (2 MP) |
| Pan Range | 355° Horizontal |
| Tilt Range | 100° Vertical |
| Night Vision | Infrared (Automatic) |
| Audio | Two-Way Audio (Built-in Microphone & Speaker) |
| Storage | Micro SD Card (up to 128GB), Cloud Storage (subscription may apply) |
| Power Source | Wired Electric (12 Volts) |
| Material | Plastic |
| Operating App | ICsee (Android/iOS) |
| Weather Resistance | Waterproof, Anti-lightning, Heat/Cold Resistant |
8. Warranty and Support
This product comes with a standard manufacturer's warranty. For specific warranty terms and conditions, please refer to the documentation included with your purchase or contact the seller directly. For technical support, troubleshooting assistance, or any inquiries regarding your WIFI SMART CAMERA IP Camera, please reach out to the customer support channels provided by your retailer or the manufacturer.