
Homcloud AS-DM2
Homcloud Smart Wi-Fi 2-Channel In-Wall Dimmer Module
Model: AS-DM2
1. Product Overview
The Homcloud AS-DM2 is an intelligent 2-channel Wi-Fi dimmer module designed for in-wall installation. It allows for remote control of lighting via a smartphone application, as well as integration with smart home voice assistants like Amazon Alexa and Google Home. This module provides convenient dimming capabilities for compatible light sources.
Key Features:
- 2-channel Wi-Fi smart dimmer module for in-wall installation.
- Remote control via dedicated smartphone application.
- Compatibility with Amazon Alexa and Google Home for voice control.
- Supports both physical switch control and app control.

Image 1.1: The Homcloud Smart Wi-Fi 2-Channel Dimmer Module, showcasing its compact design.
2. Safety Information
Please read all safety warnings and instructions carefully before installation and operation. Failure to follow these instructions may result in electric shock, fire, or serious injury.
- Professional Installation Recommended: Electrical installation should be performed by a qualified electrician.
- Power Off Before Installation: Always disconnect power at the circuit breaker before installing or servicing the device.
- Voltage Compatibility: Ensure the module's voltage rating (220-240V~ 50Hz) matches your electrical system.
- Load Limits: Do not exceed the maximum load capacity of 2x100W. Overloading can cause damage or fire.
- Indoor Use Only: This device is designed for indoor use in dry locations.
- Keep Away from Water: Do not expose the device to water or moisture.
3. Package Contents
Verify that all components are present in the package:
- 1 x Homcloud Smart Wi-Fi 2-Channel Dimmer Module (AS-DM2)
- 1 x User Manual (this document)
4. Specifications
| Specification | Value |
|---|---|
| Brand | Homcloud |
| Model | AS-DM2 |
| Installation Type | Wall Mount |
| Compatible Devices | Amazon Alexa, Google Home, iOS, Android |
| Package Dimensions (L x W x H) | 29.4 x 5.9 x 2.7 cm |
| Included Components | Wi-Fi Switch |
| Product Reference | AS-DM2 |
| Material | Plastic |
| Operating Mode | ON-OFF (Dimming functionality via app/smart home) |
| Contact Type | Virtual Button |
| Terminal | Screw |
| Circuit Type | 2-way |
| Actuator Type | Push Button |
| International Protection Rating (IP Code) | IP00 |
| Max Load | 2x100W |
| Voltage | 220-240V~ 50Hz |

Image 4.1: Product label showing model, voltage, and maximum load specifications.
5. Setup and Installation
Important: Ensure power is disconnected at the circuit breaker before beginning installation.
5.1 Wiring Diagram
Refer to the following diagram for correct wiring. The module supports 2-way switching configurations.
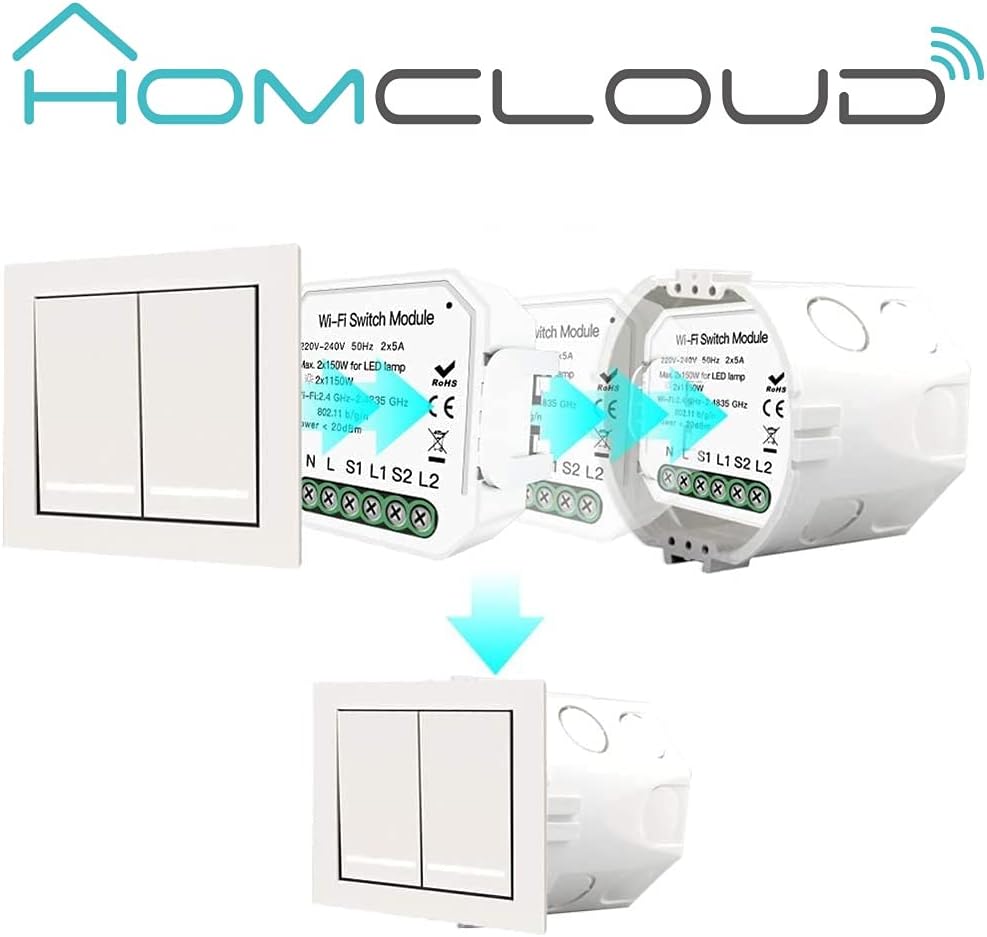
Image 5.1: Wiring diagram for a 2-gang, 2-way setup. Connect Neutral (N), Live (L), and switch inputs (S1, S2) to the module. L1 and L2 are outputs to the lights.
5.2 Physical Installation
- Disconnect Power: Turn off the main power supply to the circuit at your home's circuit breaker.
- Prepare Wiring: Identify the Live (L), Neutral (N), and switch wires (S1, S2, L1, L2) in your wall box.
- Connect Wires: Connect the wires to the corresponding terminals on the Homcloud dimmer module as shown in the wiring diagram (Image 5.1). Ensure all connections are secure.
- Insert Module: Carefully place the dimmer module into the wall box behind your existing switch. Ensure it fits without obstruction.


Image 5.2: The dimmer module is designed to be installed discreetly behind a standard wall switch, fitting into the existing wall box.
5.3 App Installation and Pairing
- Download App: Download the Homcloud Smart Home Solutions app from the App Store (iOS) or Google Play Store (Android). You can use the QR codes provided below or visit smartapp.tuya.com/homcloudsmart.
- Register/Login: Open the app and register a new account or log in with an existing one.
- Add Device: Power on the circuit at the breaker. The module should enter pairing mode (often indicated by a blinking light). In the app, tap 'Add Device' or the '+' icon.
- Select Device Type: Choose 'Lighting' or 'Dimmer' from the device list.
- Connect to Wi-Fi: Follow the in-app instructions to connect the module to your 2.4GHz Wi-Fi network. Ensure your phone is also connected to the same Wi-Fi network.
- Complete Pairing: Once connected, you can rename the device and assign it to a room.

Image 5.3: QR codes for downloading the Homcloud Smart Home Solutions app from Apple App Store and Google Play Store.
6. Operating Instructions
6.1 App Control
Once paired, you can control the dimmer module directly from the Homcloud app:
- On/Off: Tap the power icon to turn the connected lights on or off.
- Dimming: Use the slider or specific percentage controls within the app interface to adjust the brightness level.
- Scheduling: Set schedules or timers for automatic on/off or dimming routines.
- Scene Creation: Create custom scenes to control multiple devices simultaneously.

Image 6.1: Screenshot of the Homcloud app interface, demonstrating remote control capabilities for the dimmer module.
6.2 Physical Switch Control
The module retains functionality with your existing physical wall switch. A short press typically toggles the light on/off, while a long press may initiate dimming (depending on switch type and configuration).
6.3 Smart Home Integration (Alexa/Google Home)
To enable voice control, link your Homcloud account to Amazon Alexa or Google Home:
- Open Smart Home App: Open the Amazon Alexa or Google Home app.
- Enable Skill/Action: Search for and enable the 'Homcloud' skill (for Alexa) or 'Homcloud' action (for Google Home).
- Link Account: Log in with your Homcloud app credentials when prompted.
- Discover Devices: Once linked, ask your voice assistant to discover new devices (e.g., "Alexa, discover my devices" or "Hey Google, sync my devices").
- Voice Commands: You can now use voice commands such as:
- "Alexa, turn on [Light Name]"
- "Hey Google, dim [Light Name] to 50%"
- "Alexa, turn off [Light Name]"

Image 6.2: The Homcloud system supports multiple users controlling a single device, or a single user controlling multiple devices, enhancing smart home flexibility.
7. Maintenance
The Homcloud dimmer module requires minimal maintenance.
- Cleaning: If necessary, gently wipe the surface of the wall switch (not the module itself) with a soft, dry cloth. Do not use harsh chemicals or abrasive cleaners.
- Firmware Updates: Periodically check the Homcloud app for available firmware updates for your device. Updates can improve performance and add new features.
8. Troubleshooting
If you encounter issues with your Homcloud dimmer module, try the following troubleshooting steps:
| Problem | Possible Cause | Solution |
|---|---|---|
| Device not connecting to Wi-Fi | Incorrect Wi-Fi password; Module too far from router; 5GHz Wi-Fi network; Module not in pairing mode. | Ensure correct 2.4GHz Wi-Fi password. Move module closer to router. Confirm module is blinking for pairing. Reset module if necessary (refer to app for reset procedure). |
| Lights not dimming or flickering | Incompatible bulb type; Overload; Wiring issue. | Ensure bulbs are dimmable LED or incandescent. Check total wattage does not exceed 2x100W. Verify wiring connections are secure. |
| Physical switch not working | Incorrect wiring of S1/S2 terminals; Loose connection. | Double-check wiring according to Image 5.1. Ensure switch wires are securely connected to S1/S2. |
| Module loses connection frequently | Weak Wi-Fi signal; Network interference; Cloud connection issues. | Improve Wi-Fi signal strength (e.g., Wi-Fi extender). Reduce interference from other devices. Restart module and router. |
| Only one channel works | Wiring error for L2; Faulty channel. | Verify the L2 output wiring to the light. If wiring is correct, the module may be faulty. |
| Delay in light turning on/off | Normal operation for some smart dimmers; Network latency. | A slight delay (e.g., 1-2 seconds) can be normal for Wi-Fi controlled dimmers. Ensure stable Wi-Fi connection. |
| Interference with S1/S2 inputs (multiple buttons) | Sensitive inputs picking up induced currents. | Consider adding small capacitors (e.g., 1.5 microFarad 400V) between S1/S2 inputs and Neutral to filter interference, especially in complex multi-button setups. Consult a qualified electrician. |
9. Warranty and Support
9.1 Warranty Information
Homcloud products are designed for reliability and performance. For specific warranty terms and conditions, please refer to the warranty card included with your product or visit the official Homcloud website. Keep your purchase receipt as proof of purchase for warranty claims.
9.2 Customer Support
For technical assistance, troubleshooting, or product inquiries, please visit the official Homcloud website or contact their customer support:
- Website: www.homcloud.com
- App Support: Use the 'Feedback' or 'Help' section within the Homcloud app.
Related documentsAS-DM2


Ask a question about this manual
Ask about setup, troubleshooting, compatibility, parts, safety, or missing instructions. Manuals+ will review the question and use this page’s manual context to help answer it.