
LEPOWER YY02C-BR
LEPOWER 1600LM LED Solar Security Light Instruction Manual
Model: YY02C-BR
1. Product Overview
The LEPOWER 1600LM LED Solar Security Light (Model YY02C-BR) is a solar-powered outdoor lighting solution designed for security and illumination. It features three adjustable LED heads, a motion sensor, and a separate solar panel for flexible installation. This light provides 5500K white light with a brightness of up to 1600 lumens and is rated IP65 for outdoor use.

Image Description: A brown LEPOWER solar security light unit, consisting of a central body with a motion sensor and three adjustable LED light heads, is shown alongside its separate solar panel and connecting cable. This image provides a complete view of the product components.
2. Package Contents
Verify that all components are present before beginning installation:
- LEPOWER 1600LM LED Solar Security Light Fixture
- Solar Panel
- Mounting Accessories (screws, anchors)
- 15-foot Connecting Cable
- Instruction Manual
3. Installation Guide
This solar security light is designed for easy installation without the need for main power wiring. Ensure the solar panel is placed in a location that receives maximum direct sunlight.
3.1 Choosing an Installation Location
- Light Fixture: Mount the light fixture on a wall or under an eave in the desired illumination area (e.g., porch, yard, garage, driveway).
- Solar Panel: The solar panel should be installed in a location that receives at least 6-8 hours of direct sunlight daily. The 15-foot cable allows for flexible placement of the solar panel away from the light fixture.

Image Description: An illustration of a house with the solar panel mounted on the roof and the light fixture installed on the wall below. An orange arrow highlights the 15-foot cable connecting the two components, demonstrating the flexibility in placement.
3.2 Mounting the Light Fixture
- Separate the mounting bracket from the light fixture. This may require gently prying it off with a flat-head screwdriver.
- Position the mounting bracket at the desired location and mark the drill holes.
- Drill holes and insert wall anchors if necessary.
- Secure the mounting bracket to the wall using the provided screws.
- Slide the light fixture onto the secured mounting bracket until it clicks into place.
- Adjust the three light heads and the motion sensor to cover the desired area.
3.3 Mounting the Solar Panel
- Position the solar panel in a sunny location and mark the drill holes for its bracket.
- Drill holes and insert wall anchors if necessary.
- Secure the solar panel bracket to the surface.
- Attach the solar panel to its bracket and adjust its angle to face the sun directly.
- Connect the solar panel cable to the light fixture.
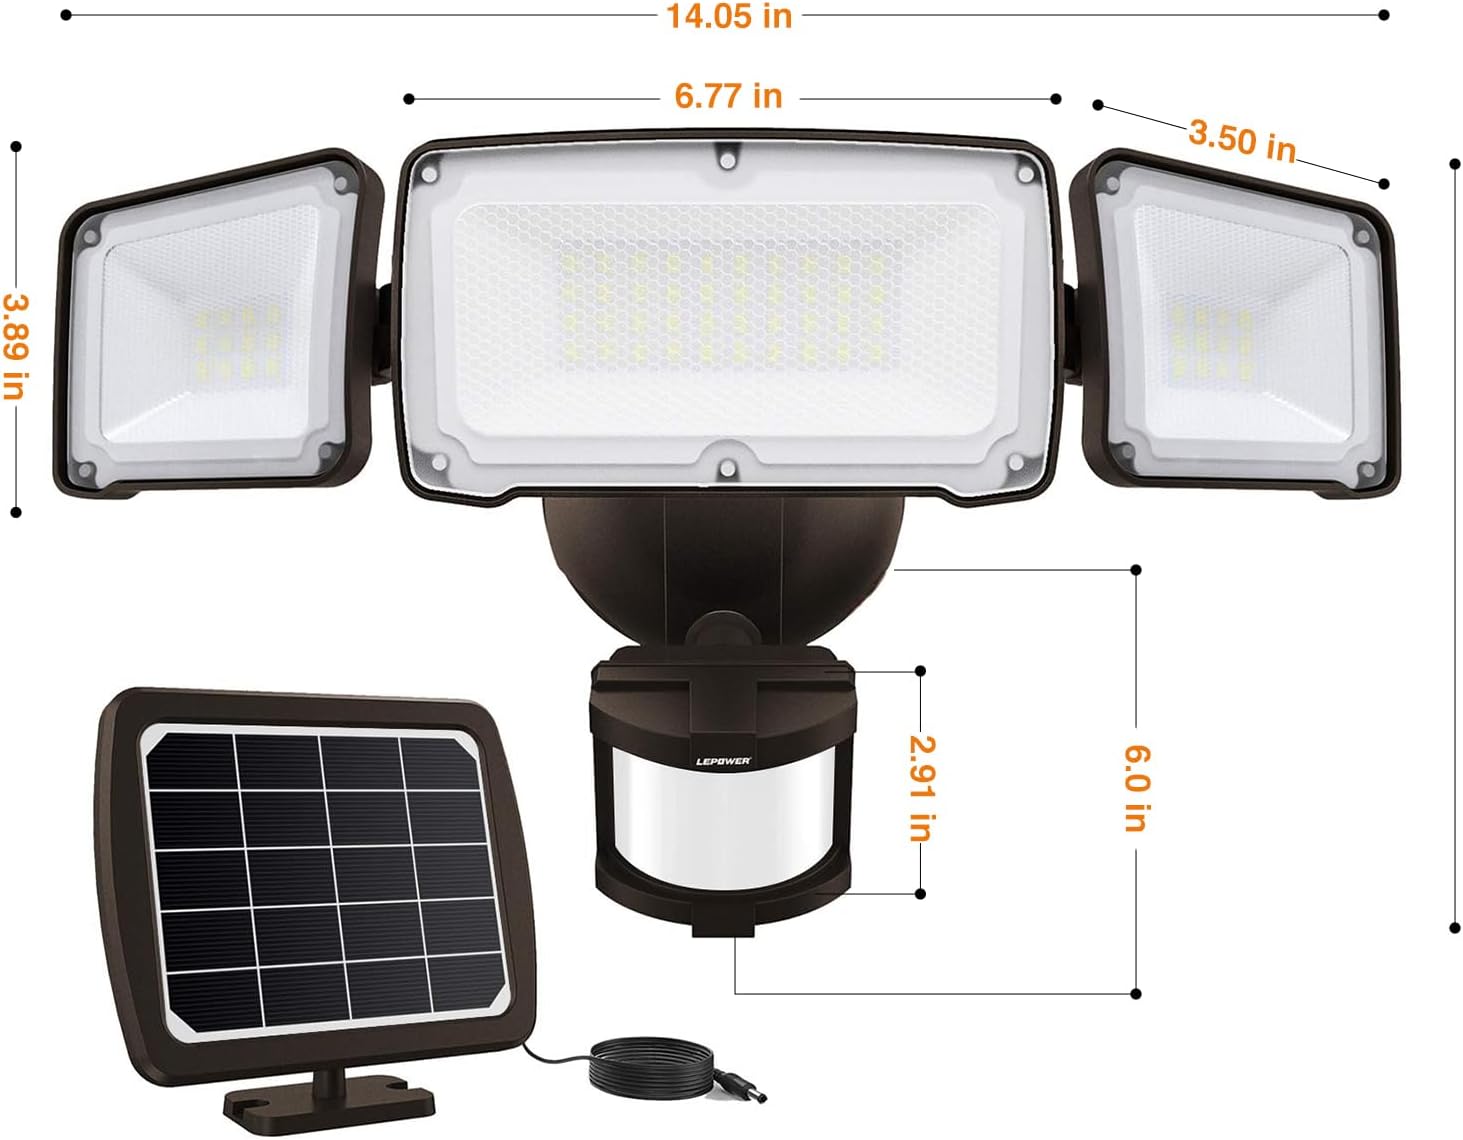
Image Description: A detailed diagram illustrating the dimensions of both the LEPOWER solar security light fixture and its separate solar panel. Measurements are provided in inches for length, width, and height of each component.
4. Operating Instructions
The LEPOWER solar security light features a stepless adjustable switch for controlling its operational modes and motion sensor sensitivity.
4.1 Operational Modes
The light offers three distinct operational modes, selected via the switch on the motion sensor unit:
- Test Mode: For quick adjustment and testing during installation. The light turns on for approximately 7 seconds when motion is detected, regardless of ambient light conditions (day or night).
- Auto Mode: The light activates at night or in dimly lit environments when motion is detected. It remains on for a duration adjustable between 10 seconds and 120 seconds (maximum).
- Normally On Mode: Push the switch to "ON". The light will stay on for approximately 50 minutes after a full charge, providing continuous illumination.

Image Description: A close-up view of the motion sensor unit, showing the adjustable dials for timer and sensitivity. To the right, three panels illustrate the 'Test Mode' (7s light duration), 'Auto Mode' (10s-120s light duration upon motion detection), and 'Normally On Mode' (50 min continuous light after full charge).
4.2 Motion Sensor Adjustment
The motion sensor head features a stepless adjustable switch to customize the sensing distance from 0 to 72 feet. Rotate the dial to increase or decrease the detection range according to your needs.

Image Description: A nighttime scene showing a child and a dog in a grassy yard, illuminated by the security light. An overlay indicates a 180-degree detection angle extending up to 72 feet, highlighting the wide coverage area for detecting humans, cars, and pets.
5. Maintenance
To ensure optimal performance and longevity of your LEPOWER Solar Security Light, follow these maintenance guidelines:
- Solar Panel Cleaning: Regularly clean the surface of the solar panel to remove dust, dirt, leaves, or snow. A clean panel ensures maximum sunlight absorption and efficient charging. Use a soft, damp cloth for cleaning.
- Clear Obstructions: Ensure no new obstructions (e.g., growing trees, new structures) block direct sunlight from reaching the solar panel.
- Fixture Cleaning: Occasionally wipe down the light fixture with a soft, damp cloth to keep it clean.
- Inspection: Periodically check the connecting cable for any signs of damage or wear.

Image Description: A solar panel is mounted on the roof of a house under a clear sky with a bright sun, illustrating the process of solar energy absorption for charging the light's battery. Text on the image indicates a '2400 mAh Solar Battery' and 'Energy saving & No electricity bills'.
6. Troubleshooting
If you encounter issues with your LEPOWER Solar Security Light, refer to the following common problems and solutions:
- Light does not turn on at night:
- Ensure the solar panel is receiving adequate direct sunlight for charging (6-8 hours daily).
- Verify the light is not set to 'Test Mode' permanently. Adjust the knob on the motion detector to 'Auto Mode' or 'Normally On Mode'.
- Check if the solar panel or light sensor is obstructed by dirt or debris.
- Confirm the connecting cable between the solar panel and the light fixture is securely plugged in.
- Light turns on during the day:
- The light has a built-in light sensor to prevent activation during daylight. Ensure the motion sensor's ambient light setting (if available) is not set incorrectly.
- Verify the light is not in 'Test Mode', which can activate during the day for testing purposes.
- Motion sensor not detecting movement:
- Adjust the motion sensor's sensitivity dial to increase the detection range.
- Ensure there are no obstructions blocking the sensor's field of view.
- Confirm the sensor is aimed correctly at the desired detection area.
- Light duration is too short or too long:
- In 'Auto Mode', adjust the timer dial on the motion sensor unit to set the desired illumination duration (10-120 seconds).
7. Product Specifications
| Brand | LEPOWER |
| Model Name | YY02C-BR |
| Brightness | 1600 Lumens |
| Light Color | 5500K White Light |
| Power Source | Solar Powered |
| Motion Sensor Range | Up to 72 feet |
| Detection Angle | 180 degrees |
| Water Resistance Level | IP65 (Water Resistant) |
| Cable Length (Solar Panel) | 15 feet |
| Number of Light Sources | 3 (Adjustable Heads) |
| Battery Type | Lithium Ion (2 included) |
| Material | Acrylonitrile Butadiene Styrene, Polycarbonate |
| Product Dimensions | 14.09"L x 6.26"W x 7.6"H |
| Item Weight | 2.25 pounds |

Image Description: An exploded view diagram illustrating the internal layers of the solar panel, including Tempered Glass, PET, EVA, and the solar Cell, highlighting the construction for durability and efficiency.

Image Description: A diagram showing the back of one of the light heads with orange arrows indicating airflow, illustrating the heat dissipation mechanism designed to maintain optimal operating temperature.

Image Description: An exploded view of a light head, revealing the arrangement of LED lamp beads and the professional optical designed filter lens, which contributes to better illumination with soft, anti-glare light.
8. Warranty Information
The LEPOWER 1600LM LED Solar Security Light (Model YY02C-BR) is covered by a 1-year manufacturer's warranty from the date of purchase. This warranty covers defects in materials and workmanship under normal use. Please retain your proof of purchase for warranty claims.
9. Customer Support
For further assistance, technical support, or warranty inquiries, please contact LEPOWER customer service through the retailer where the product was purchased or visit the official LEPOWER website for contact information.
Related documentsYY02C-BR


Ask a question about this manual
Ask about setup, troubleshooting, compatibility, parts, safety, or missing instructions. Manuals+ will review the question and use this page’s manual context to help answer it.