1. Introduction
Thank you for purchasing the Crenova Home Video Projector. This projector is designed to deliver a superior visual experience with its native 1080P Full HD resolution, high contrast ratio, and bright LED lamp. It supports a large image display of up to 200 inches, making it ideal for home theater setups and outdoor movie nights. This manual provides detailed instructions for setup, operation, maintenance, and troubleshooting to ensure optimal performance and longevity of your device.
2. Safety Information
- Do not look directly into the projector lens when the lamp is on, as the bright light can cause eye damage.
- Ensure proper ventilation around the projector. Do not block ventilation openings.
- Use only the power adapter supplied with the projector.
- Avoid placing the projector in areas with high humidity, dust, or extreme temperatures.
- Do not attempt to disassemble or repair the projector yourself. Refer all servicing to qualified personnel.
- Keep the projector away from water or other liquids.
3. Package Contents
Please check the package contents upon unboxing. If any items are missing or damaged, contact customer support.
- Crenova Home Video Projector (Model A6500)
- Power Cable
- Remote Control
- HDMI Cable
- User Manual
4. Product Overview
4.1 Projector Components
Familiarize yourself with the main components of your Crenova projector.
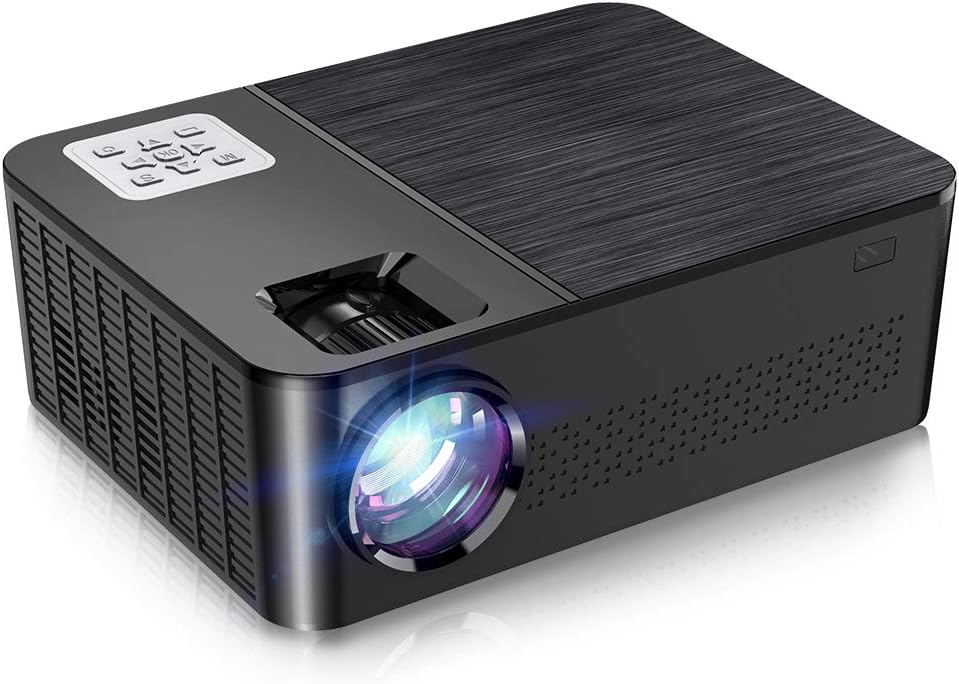
Figure 4.1: Front and top view of the Crenova A6500 Projector, showing the lens and control panel.

Figure 4.2: Top-down view of the Crenova A6500 Projector surrounded by compatible multimedia devices, highlighting its various input ports.
4.2 Control Panel and Adjustments
The projector features an intuitive control panel on top and adjustment dials for focus and keystone correction.

Figure 4.3: Close-up view of the Crenova A6500 Projector, illustrating the focus ring and keystone correction dial for image clarity and shape adjustment.
5. Setup
5.1 Placement
Choose a flat, stable surface for the projector. The projection distance will determine the screen size. For optimal viewing, a screen size of 100"-120" is recommended with a projection distance of 10-13 feet (approximately 3-4 meters). The projector supports a wide range of screen sizes from 30" to 200" with projection distances from 1.5m to 6.5m.
5.2 Power Connection
- Connect the power cable to the projector's power input port.
- Plug the other end of the power cable into a power outlet.
- The power indicator light will illuminate.
5.3 Initial Power On
Press the power button on the projector or the remote control to turn on the device. The fan will start, and the projector lamp will light up.
6. Operating Instructions
6.1 Source Selection
After powering on, use the 'Source' button on the remote control or the projector's control panel to select your desired input source (e.g., HDMI1, HDMI2, USB, AV).
6.2 Menu Navigation
Use the arrow keys on the remote control or control panel to navigate through the on-screen menu options. Press 'OK' or 'Enter' to confirm selections and 'Return' or 'Exit' to go back.
7. Connectivity
The Crenova A6500 projector offers multiple connectivity options for various multimedia devices.
- HDMI: Connect your TV Stick, Chromecast, PC, laptop, PS4, Xbox, or other HDMI-enabled devices using an HDMI cable.
- USB: Insert a USB drive to play media files directly.
- Wired Mirroring: The projector supports wired mirroring from multi-media devices. For iPhone, an extra Lightning to HDMI adapter is required (not included). For Android phones, a Micro USB/Type C to HDMI adapter is needed (not included), and the phone must support MHL function.Note: Copyrighted content from services like Hulu and Netflix cannot be mirrored or screencast due to protection protocols.
- TF Card: Insert a TF (MicroSD) card to access media files.

Figure 7.1: Illustration of wired mirroring in use, showing a family enjoying content projected onto a large screen.
8. Image and Sound Adjustment
8.1 Focus and Keystone Correction
Focus: Rotate the focus ring near the lens until the projected image is clear and sharp.
Keystone Correction: Use the keystone correction dial (±15°) to adjust the image shape if it appears trapezoidal. This corrects for projection angles where the projector is not perfectly perpendicular to the screen.
8.2 Zoom Function
The projector allows you to adjust the screen size from 75% to 100% using the remote control. This is useful for fine-tuning the image size without moving the projector, especially when ceiling mounted or in small rooms.
8.3 Image Quality and Sound
Experience remarkable image quality with native 1080P resolution and a 7000:1 high dynamic contrast ratio. The projector also supports Dolby sound and features a built-in HiFi speaker for an immersive audio experience.

Figure 8.1: Visual comparison demonstrating the superior clarity and detail of 1080P image quality with a higher contrast ratio.
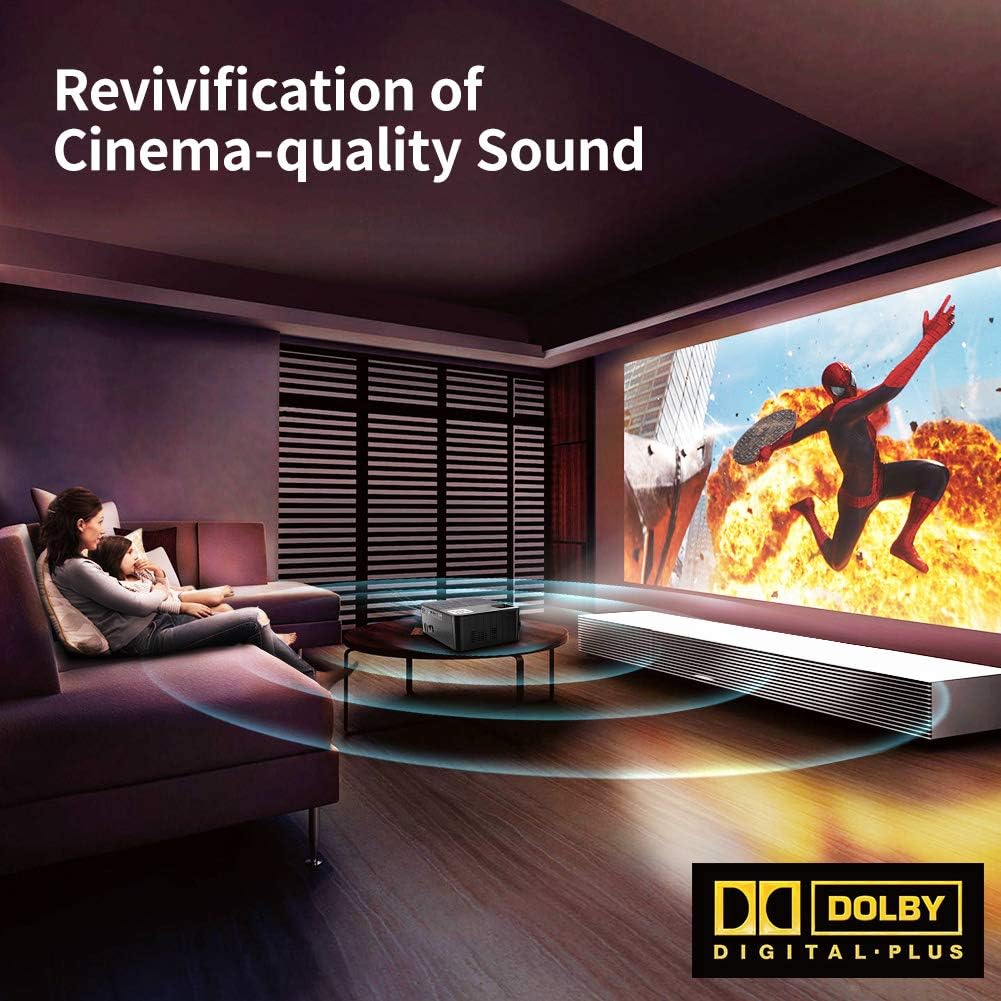
Figure 8.2: Depiction of the projector providing cinema-quality sound with Dolby Digital Plus support in a home environment.

Figure 8.3: An outdoor setting showcasing the projector's capability to display a massive large screen, perfect for outdoor entertainment.
9. Maintenance
- Lens Cleaning: Use a soft, lint-free cloth specifically designed for optical lenses to gently wipe the projector lens. Avoid abrasive materials or harsh chemicals.
- Dust Filter Cleaning: Regularly check and clean the dust filter to ensure proper airflow and prevent overheating. Refer to the diagram for filter location.
- Ventilation: Ensure the projector's ventilation ports are clear of obstructions.
- Lamp Life: The LED lamp has a life expectancy of 60,000 hours. No regular lamp replacement is typically needed under normal usage.
10. Troubleshooting
| Problem | Possible Cause | Solution |
|---|---|---|
| No picture | Incorrect input source selected; Loose cable connection; Device not powered on. | Select the correct input source. Check all cable connections. Ensure connected device is powered on. |
| No sound | Volume too low or muted; Audio cable not connected; Source device audio settings. | Increase volume or unmute. Ensure audio cables are securely connected. Check audio output settings on the source device. |
| Image is blurry | Focus not adjusted; Projector too close/far from screen. | Adjust the focus ring. Adjust projection distance. |
| Image is trapezoidal | Keystone not adjusted. | Adjust the keystone correction dial. |
| Projector overheats or shuts down | Blocked ventilation; Prolonged use in hot environment. | Ensure ventilation ports are clear. Allow projector to cool down. Use in a well-ventilated area. |
11. Specifications
- Model: A6500
- Native Resolution: 1920 x 1080 (Full HD)
- Contrast Ratio: 7000:1
- Brightness: 7000 Lumen
- Lamp Life: 60,000 hours
- Projection Size: 30" - 200"
- Projection Distance: 1.5m - 6.5m
- Keystone Correction: ±15° Manual
- Zoom Function: 75% - 100% (via remote control)
- Speaker Type: Built-In, Stereo (Dolby Supported)
- Connectivity Technology: HDMI, USB, TF Card
- Item Weight: 7.61 pounds (approx. 3.45 kg)
- Product Dimensions: 14.37 x 6.1 x 13.78 inches (approx. 36.5 x 15.5 x 35 cm)
12. Warranty and Support
For detailed warranty information and customer support, please refer to the warranty card included in your package or visit the official Crenova website. You may also contact the seller directly for assistance.


