Introduction
The Mksutary XF-508 Walkie Talkies are designed to provide reliable communication for indoor and outdoor use, ideal for keeping families connected. This manual provides essential information for setting up, operating, and maintaining your walkie talkies, ensuring optimal performance and longevity.

Figure 1: Mksutary XF-508 Walkie Talkies (4-pack)
This image displays four Mksutary XF-508 walkie talkies, featuring an orange body with black accents and an LCD screen. They are shown alongside charging cables and a power adapter, indicating they are ready for use.
Key Features
- 8 Channels: Offers a wide range of communication options.
- Extended Range: Provides an impressive range of up to 5 kilometers (approximately 3 miles) in open outdoor environments without obstructions.
- Clear Sound Quality: Delivers good audio clarity for effective communication.
- 10 Ring Tones: Multiple alert tones for incoming calls.
- VOX Mode: Enables hands-free operation for convenience.
- Easy-to-Read LCD Display: Provides clear visibility of channel and settings.
- Keypad Lock: Prevents accidental changes to settings during use.
- Compact and Durable Design: Perfectly sized for children (5.8 x 3.8 x 16.5 cm) with an anti-fall construction for enhanced durability.
- Adjustable Volume: Allows users to set the listening volume to their preference.
- Low Battery Alarm: Notifies users when battery levels are low, prompting a recharge or replacement.
- 122 Privacy Codes: Each channel can utilize 122 sub-codes to ensure private conversations.
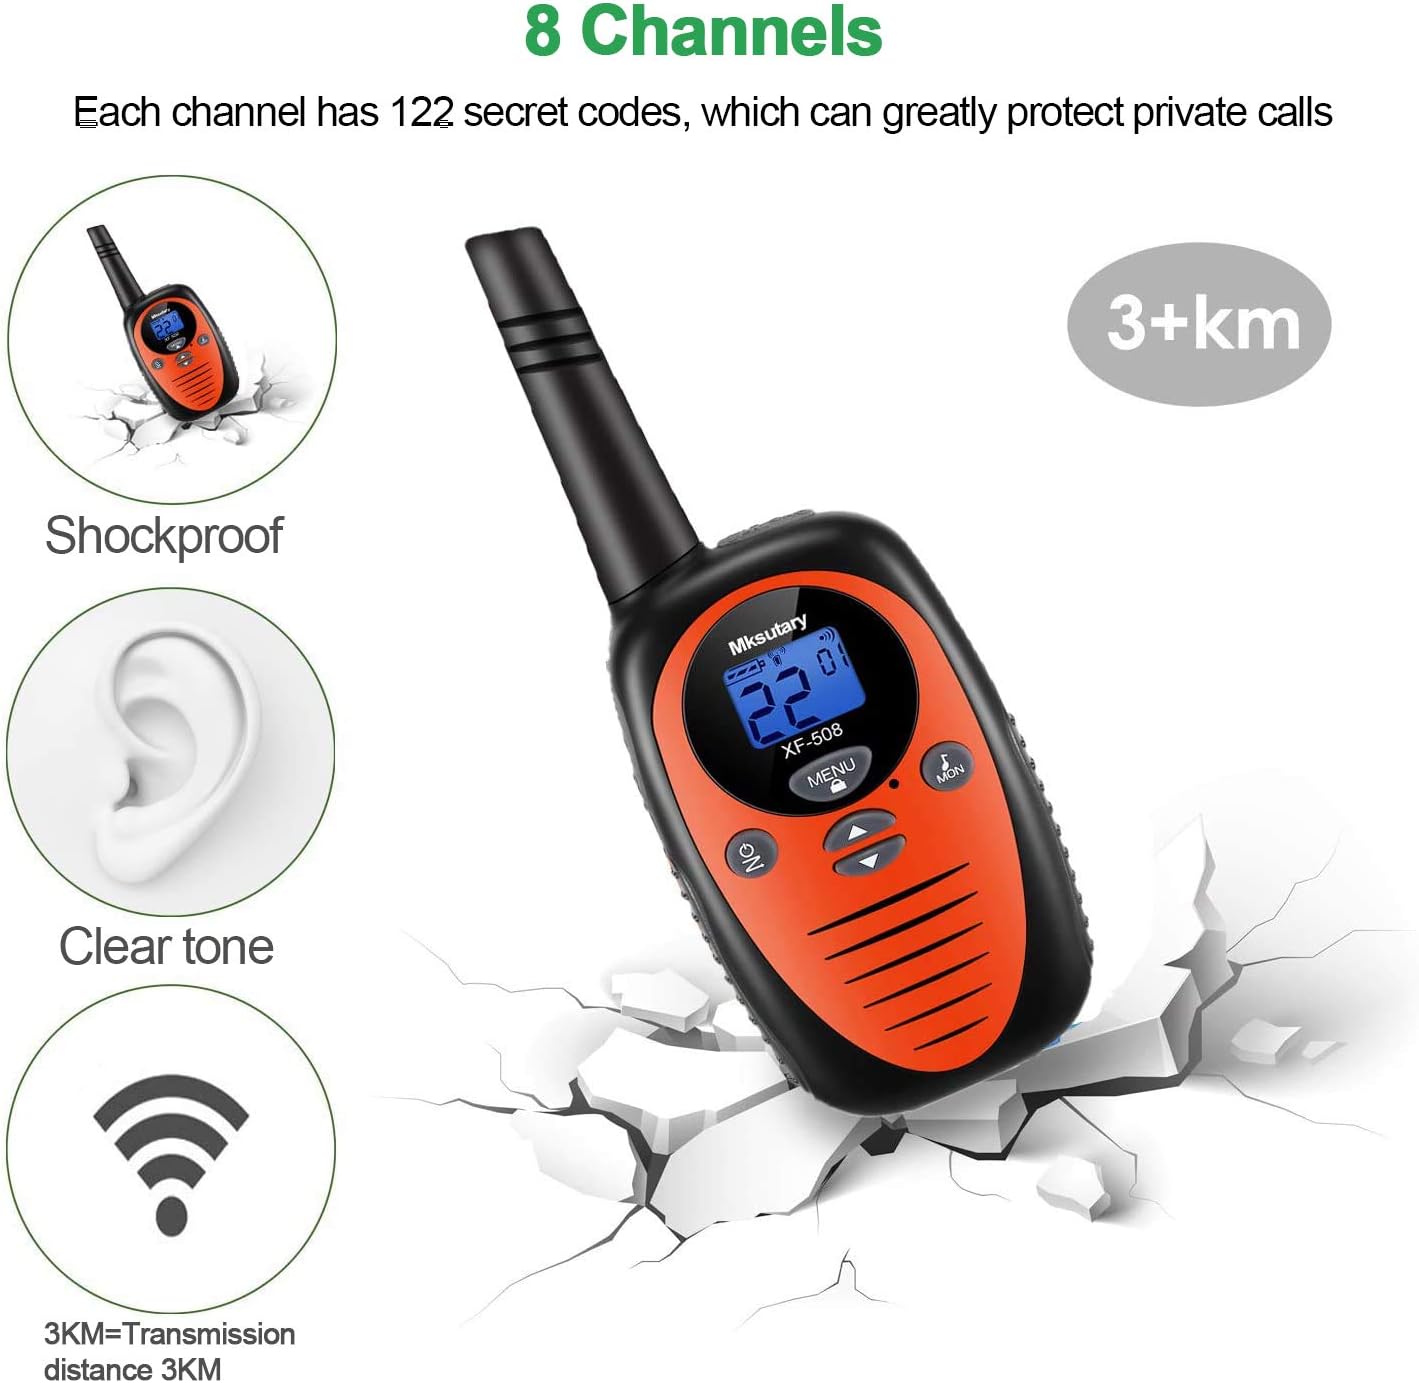
Figure 2: Key Features Overview
This image highlights several key features of the Mksutary XF-508 walkie talkie, including its shockproof design, clear tone, 8 channel capability, and a transmission range of over 3 kilometers. The device is depicted against a cracked ground background, emphasizing its durability.

Figure 3: Sound Quality and Range Illustration
This illustration emphasizes the excellent sound quality and transmission distance of the Mksutary XF-508 walkie talkie. It shows a curved line representing the signal path from a walkie talkie to a distant location, indicating a transmission range of 3KM (up to 5KM).
Product Components and Controls
Familiarize yourself with the various parts and controls of your Mksutary XF-508 Walkie Talkie:
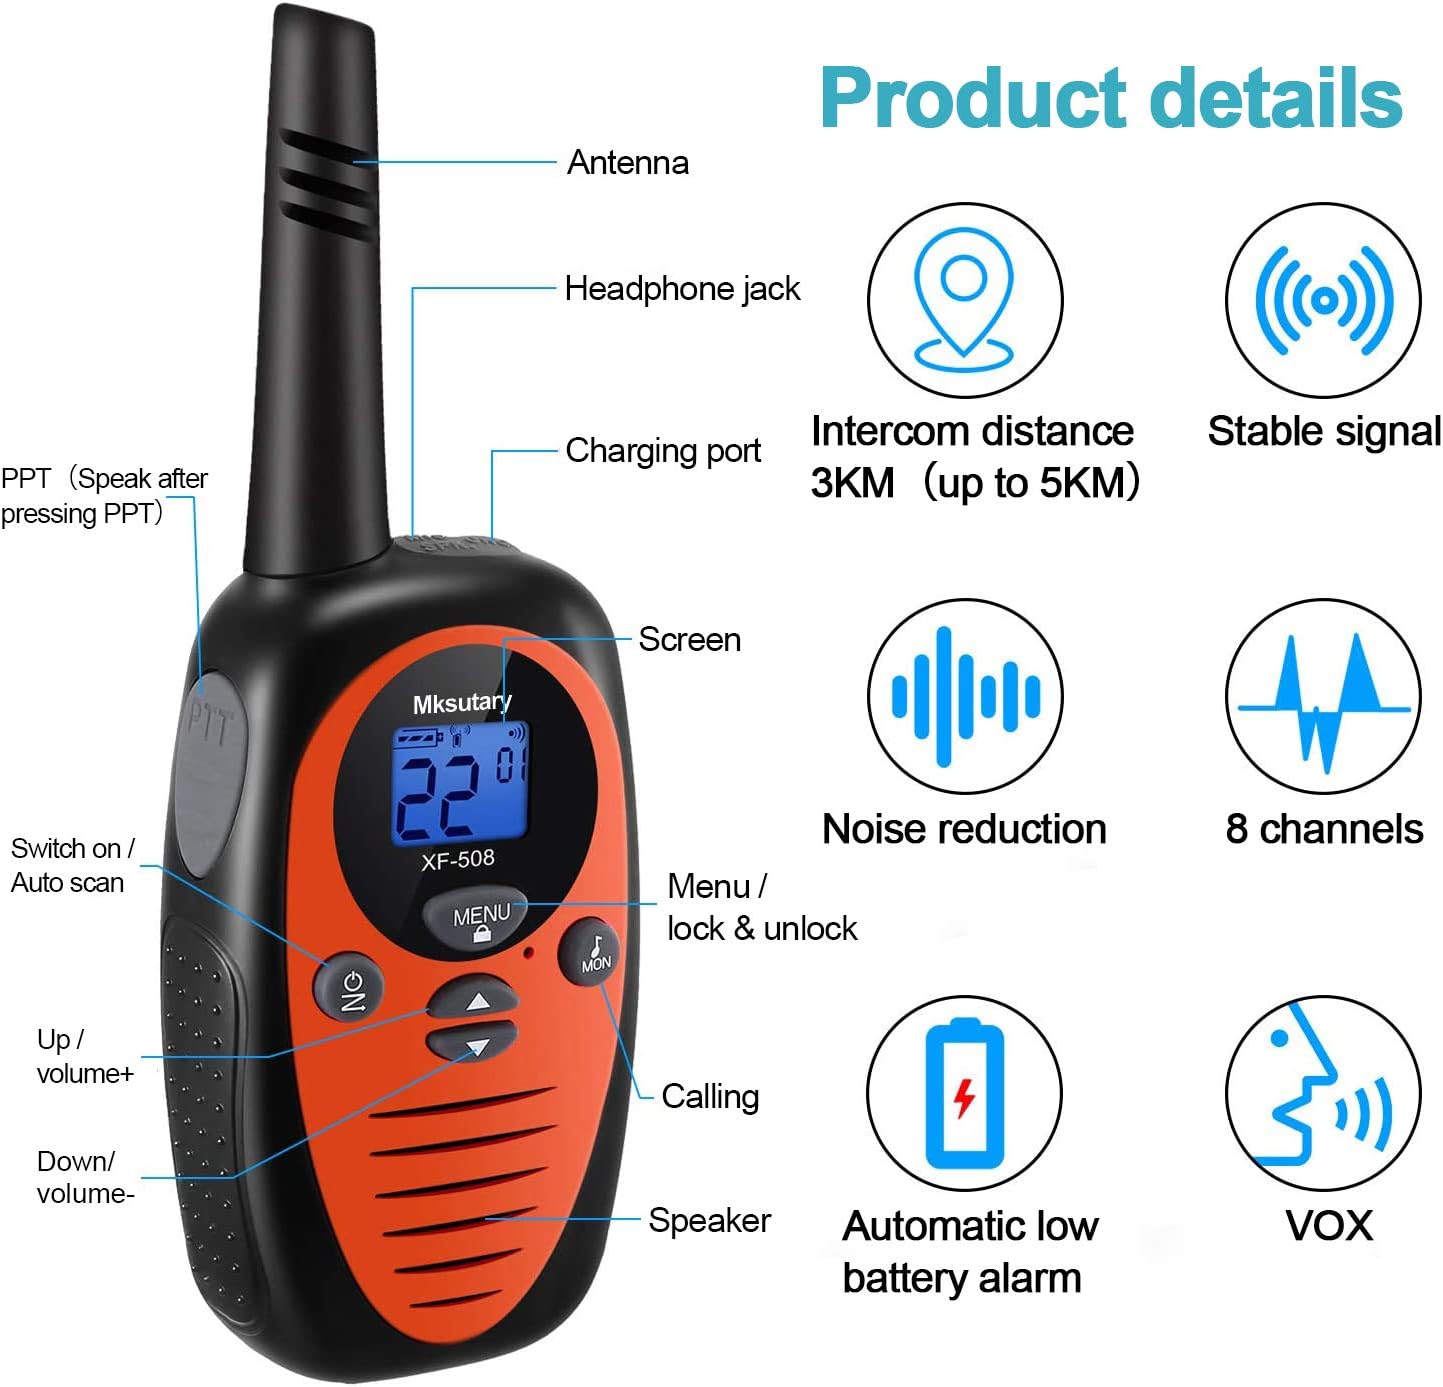
Figure 4: Walkie Talkie Components
This detailed diagram labels the key components of the Mksutary XF-508 walkie talkie, including the Antenna, Headphone jack, Charging port, Screen, PTT (Push-to-Talk) button, Switch on/Auto scan button, Menu/lock & unlock button, Up/volume+ button, Down/volume- button, Calling button, and Speaker. It also highlights features like intercom distance, stable signal, noise reduction, 8 channels, automatic low battery alarm, and VOX function.
- Antenna: For transmitting and receiving signals.
- Headphone Jack: For connecting external headphones (not included) for private listening.
- Charging Port: For connecting the charging cable.
- Screen (LCD Display): Shows channel number, battery status, and other indicators.
- PTT (Push-to-Talk) Button: Press and hold to transmit your voice.
- ON/OFF Button: Powers the unit on or off. Also functions as Auto Scan.
- MENU Button: Accesses settings and locks/unlocks the keypad.
- Up/Volume+ Button: Increases volume and navigates menu options upwards.
- Down/Volume- Button: Decreases volume and navigates menu options downwards.
- Calling Button: Sends a call tone to other walkie talkies on the same channel.
- Speaker: Outputs incoming audio.
Setup Guide
Battery Installation
Each Mksutary XF-508 Walkie Talkie requires 3 AA batteries (regular or rechargeable). Batteries are included with the product.
- To remove the belt clip, press the small button on the back of the walkie-talkie and pull the belt clip upwards.
- Locate the battery box button on the back of the unit. Press this button and pull upwards to open the battery compartment cover.
- Insert 3 AA batteries into the compartment, ensuring correct polarity (+ and - ends match the diagram inside).
- Close the battery compartment cover securely until it clicks into place.
- Reattach the belt clip by sliding it back into position until it locks.

Figure 5: Battery Installation Steps
This image provides visual instructions for accessing the battery compartment. It shows how to press the small button on the back to remove the belt clip and how to press the battery box button to open the battery cover, revealing the empty battery slots.
Powering On/Off
Press and hold the ON button (located on the front, below the screen) to turn the walkie talkie on or off. The LCD screen will illuminate when powered on.
Operating Instructions
1. Selecting a Channel
To communicate with other walkie talkies, all units must be set to the same channel.
- With the walkie talkie powered on, press the MENU button. The channel number on the LCD display will start blinking.
- Use the Up or Down buttons to select your desired channel (1-8).
- Press the PTT button (on the side of the walkie talkie) to confirm and save the selected channel.
2. Transmitting (Talking)
To speak to another person:
- Ensure your walkie talkie is on the same channel as the recipient's unit.
- Press and hold the PTT button firmly. Speak clearly into the microphone (located near the speaker).
- Release the PTT button when you have finished speaking to allow the other person to respond.
3. Receiving (Listening)
When not pressing the PTT button, your walkie talkie is in receive mode, listening for incoming transmissions on the selected channel.
4. Adjusting Volume
Use the Up button to increase the volume and the Down button to decrease the volume.
5. Activating VOX (Voice Operated Exchange)
VOX mode allows for hands-free transmission when your voice is detected.
- Simultaneously press and hold the ON button and the PTT button.
- Release both buttons once VOX is activated. The VOX icon will appear on the LCD screen.
- To deactivate VOX, repeat the same steps.
6. Keypad Lock
The keypad lock feature prevents accidental changes to your settings. To activate or deactivate the keypad lock, press and hold the MENU button until the lock icon appears or disappears on the screen.
Technical Specifications
| Brand | Mksutary |
| Model | XF-508 |
| Tuner Technology | UHF |
| Number of Channels | 8 |
| Maximum Talk Range | Up to 5 Kilometers (in open air) |
| Batteries Required | 3 AA batteries per unit (included) |
| Product Dimensions | 17 x 8 x 6 cm (6.7 x 3.1 x 2.4 inches) |
| Product Weight | 476 g (1.05 lbs) |
| ASIN | B08HHVN8TS |

Figure 6: Product Dimensions
This image shows two Mksutary XF-508 walkie talkies side-by-side, with one displaying its height (6.5 inches) and the other its width (2.3 inches) and depth (1.5 inches) at the base, providing a clear understanding of the product's compact size.
Maintenance
- Cleaning: Wipe the walkie talkie with a soft, damp cloth. Do not use harsh chemicals or abrasive cleaners.
- Storage: Store the walkie talkie in a cool, dry place when not in use. If storing for extended periods, remove the batteries to prevent leakage.
- Avoid Water: These walkie talkies are not waterproof. Avoid exposing them to rain, splashes, or submersion in water.
- Battery Care: If using rechargeable batteries, follow the manufacturer's guidelines for charging. Dispose of old batteries responsibly according to local regulations.
Troubleshooting
If you encounter issues with your Mksutary XF-508 Walkie Talkies, refer to the common problems and solutions below:
- Problem: No voice or very low volume.
- Solution: Ensure the volume is not set to minimum. You can adjust the volume by pressing the Up or Down buttons. Also, check if the walkie talkie is powered on and has sufficient battery.
- Problem: Multiple units (2 or 4) cannot communicate with each other.
- Solution: Ensure that all walkie talkies you wish to communicate with are set to the exact same channel and sub-code (e.g., "3 01" on the display). If the two characters on the display are identical and they still do not work together, please contact Mksutary technical support for assistance.
Warranty and Support
Mksutary provides a one-year manufacturer's warranty for all Mksutary products, effective from the date of purchase.
For any technical assistance, warranty claims, or further inquiries, please contact Mksutary technical support via email:
Please include your product model (XF-508) and a detailed description of your issue when contacting support to ensure a prompt resolution.


