1. Introduction
This manual provides essential information for the safe and efficient operation of your iKonix Juki Industrial Lockstitch DDL8100e Sewing Machine. Please read all instructions carefully before assembly and operation to ensure proper use and longevity of the machine.
2. Safety Information
- Always disconnect the power supply before cleaning, servicing, or when the machine is not in use.
- Keep hands and fingers away from the needle area and moving parts during operation.
- Use only recommended needles and threads for optimal performance and to prevent damage.
- Ensure the machine is placed on a stable, level surface.
- Do not operate the machine if any parts are damaged or missing.
3. Package Contents
The iKonix Juki DDL8100e package includes the following components. Please verify all items are present upon unboxing.
- Juki DDL8100e Machine Head
- Industrial Sewing Machine Table
- Electronic DC Servo Motor (3/4 H.P, 1 PHASE, 110 VOLT, 0 ~3300 RPM)
- Bobbin Winder
- Thread Stand
- Machine Oil
- Instruction Manual (this document)
- Oil Pan
- Knee Lifter
- V Belt
- Drawer
- Tools
- LED Lamp
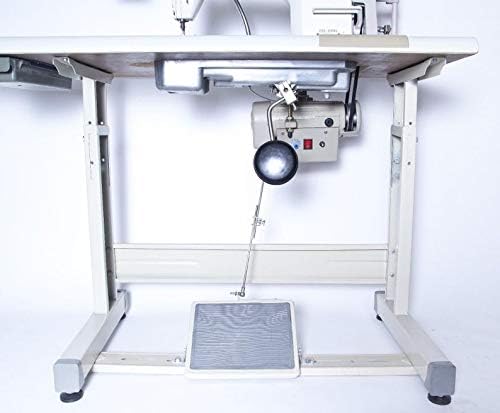
Figure 3.1: Various accessories included with the machine.
4. Assembly Instructions
Note: Professional assembly may be required. The machine comes unassembled. Follow these steps carefully.
- Assemble the Table Stand: Connect the table legs and crossbars to form a sturdy stand. Ensure all bolts are tightened securely.
- Mount the Tabletop: Place the tabletop onto the assembled stand. Align the pre-drilled holes and secure the tabletop using the provided screws.
- Install the Machine Head: Carefully lower the Juki DDL8100e machine head into the cutout on the tabletop. Ensure it sits flush and is stable.
- Attach the Servo Motor: Mount the Electronic DC Servo Motor underneath the tabletop, aligning it with the machine head's pulley. Secure it with the provided hardware. Connect the V-belt between the motor pulley and the machine head pulley.
- Install Knee Lifter and Oil Pan: Attach the knee lifter mechanism and the oil pan according to the diagrams in the detailed manual. The knee lifter allows for hands-free presser foot lifting.
- Set up Thread Stand and Bobbin Winder: Assemble the thread stand and place it behind the machine. Install the bobbin winder on the machine head as indicated.
- Connect LED Lamp: Attach the LED lamp to provide illumination to the sewing area.

Figure 4.1: Fully assembled Juki DDL8100e industrial sewing machine with table and motor.

Figure 4.2: Close-up of the servo motor mounted beneath the machine table.

Figure 4.3: View of the knee lifter and other components under the sewing table.

Figure 4.4: Dimensional overview of the assembled sewing machine.
5. Operating Instructions
5.1. Threading the Machine
Refer to the detailed threading diagrams in your included instruction manual for precise steps. Proper threading is crucial for consistent stitch quality.
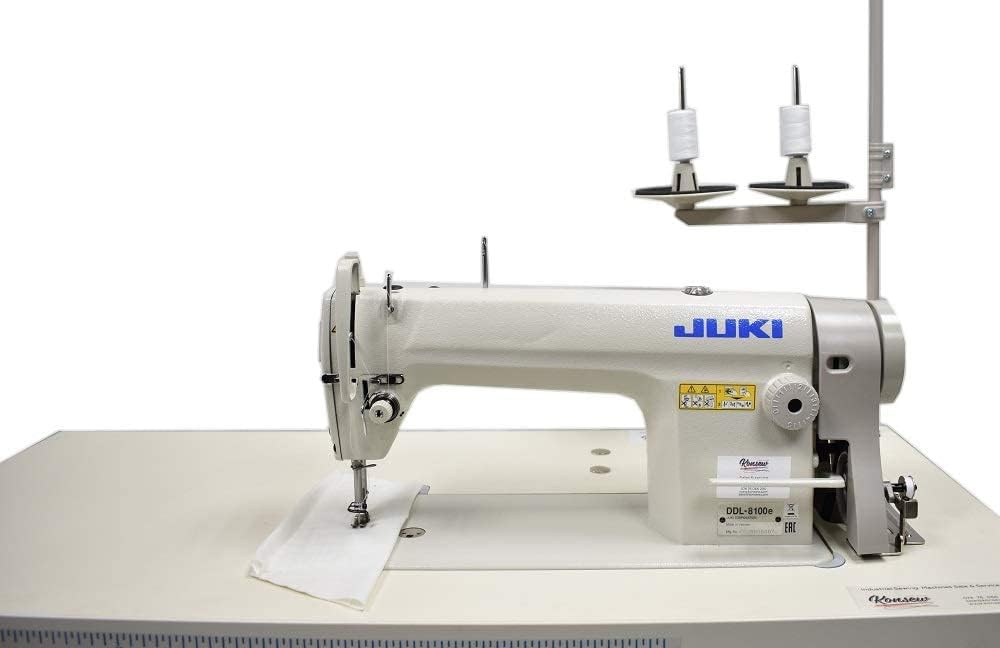
Figure 5.1: Close-up of the machine head, showing the upper threading path.
5.2. Bobbin Winding
The machine features an integrated bobbin winder. Place an empty bobbin onto the winder spindle, guide the thread as instructed, and engage the winder. The large M-style industrial bobbin allows for extended sewing without frequent changes.
5.3. Adjusting Stitch Length
The maximum stitch length is 5 mm. Adjust the stitch length dial on the machine head to achieve the desired stitch size for your material.
5.4. Presser Foot Lift
The presser foot can be lifted by hand (max. 5.5 mm) or by using the knee lifter (max. 13 mm). This high lift capacity is beneficial for handling thicker materials.
5.5. Servo Motor Speed Control
The Electronic DC Servo Motor offers variable speed control from 0 to 3300 RPM, allowing for precise speed adjustments suitable for various sewing tasks and materials.
6. Maintenance
Regular maintenance ensures the longevity and optimal performance of your sewing machine.
- Oiling: The machine features an auto-lubricating full rotary hook. Regularly check the oil level in the oil pan and refill with machine oil as needed. Refer to the oil level indicators (HIGH/LOW).
- Cleaning: Keep the machine head and surrounding area clean from lint and dust. Use a soft brush or cloth.
- Needle Replacement: Replace needles regularly, especially when working with different materials or if the needle shows signs of wear. Recommended needles: 9-18 DBX1 (16x231) up to size 19.
7. Troubleshooting
If you encounter issues, refer to the following common troubleshooting tips:
- Skipped Stitches: Check if the needle is inserted correctly, if it's bent or dull, or if the threading is correct.
- Thread Breakage: Inspect the thread path for obstructions, ensure proper tension, and check for burrs on the needle or machine parts.
- Uneven Stitches: Verify correct tension settings for both upper and bobbin threads. Ensure the presser foot pressure is appropriate for the fabric.
- Machine Not Starting: Check power connections, ensure the motor switch is on, and verify the V-belt is properly engaged.
- Physical Damage: Upon receiving the product, inspect all components for any shipping damage. Contact your seller immediately if damage is found.
8. Specifications
| Feature | Specification |
|---|---|
| Model Name | DDL 8100 |
| Product Dimensions | 20 x 48 x 30 inches (20"D x 48"W x 30"H) |
| Item Weight | 229 pounds |
| Maximum Foot Lift (by hand) | 5.5 mm |
| Maximum Foot Lift (by knee) | 13 mm |
| Maximum Stitch Length | 5 mm |
| Maximum Stitches per Inch | 6 |
| Needle Bar Stroke | 30.7 mm |
| Needles | 9-18 DBX1 (16x231) up to size 19 |
| Sewing Speed (max.) | 5,500 spm |
| Hook Type | Auto-lubricating full rotary hook |
| Motor | Electronic DC Servo Motor 3/4 H.P, 1 PHASE, 110 VOLT, 0 ~3300 RPM |
| UPC | 880872015674 |
Figure 8.1: Manufacturer specifications for the Juki DDL-8100A (similar to DDL8100e).
9. Warranty and Support
For warranty information and technical support, please refer to the documentation provided with your purchase or contact iKonix customer service directly. Keep your proof of purchase for any warranty claims.


