1. Introduction
Thank you for choosing the YISSVIC YGH397S Wireless Weather Station. This device provides accurate indoor and outdoor temperature and humidity readings, a weather forecast, time display, calendar, and an alarm clock function. Please read this manual carefully before use to ensure proper operation and to maximize the product's lifespan.
2. Package Contents
Please check the package contents upon opening. If any items are missing or damaged, please contact customer support.
- YISSVIC YGH397S Main Weather Station Unit
- Wireless Outdoor Sensor
- USB Power Cable
- Power Adapter
- User Manual

Image 2.1: Contents of the YISSVIC YGH397S Weather Station package. The image displays the main weather station unit, a wireless outdoor sensor, a USB power cable, a power adapter, and the user manual, all neatly arranged next to the product box.
3. Product Overview
3.1 Main Unit Display and Buttons

Image 3.1: Front view of the YISSVIC YGH397S Weather Station main unit. The large LCD color display shows time, date, weather forecast, indoor temperature/humidity, and outdoor temperature/humidity. Buttons on the right side include SNOOZE, M/S, -/CF, +/CH, and MEM.
The main unit features a clear LCD color display and several control buttons:
- SNOOZE: Activates snooze function during an alarm; adjusts backlight brightness.
- M/S (Mode/Set): Switches display modes; enters setting mode.
- -/CF: Decreases values during setting; switches between Celsius and Fahrenheit.
- +/CH: Increases values during setting; switches display channels for multiple outdoor sensors.
- MEM (Memory): Displays maximum/minimum temperature and humidity records.
3.2 Wireless Outdoor Sensor

Image 3.2: Rear view of the YISSVIC YGH397S Wireless Outdoor Sensor. It features a hanging hole for wall mounting and a red LED indicator light. The image also shows examples of suitable placement locations: outdoors, in a bedroom, and in a living room.
The outdoor sensor transmits temperature and humidity data wirelessly to the main unit. It has a small LED indicator and a mounting hole for easy placement.
4. Setup
4.1 Battery Installation
- Outdoor Sensor: Open the battery compartment on the back of the outdoor sensor. Insert 2 x AAA batteries (not included) according to the polarity markings (+/-). Close the compartment.
- Main Unit: Open the battery compartment on the back of the main unit. Insert 3 x AAA batteries (not included) according to the polarity markings (+/-). Close the compartment. Note: Batteries for the main unit are for backup only. For continuous display and backlight, use the power adapter.
4.2 Powering the Main Unit
For optimal performance and continuous display, connect the main unit to power using the provided USB cable and power adapter.

Image 4.1: Powering options for the YISSVIC YGH397S Weather Station. The device can be powered via a power bank, a standard wall adapter, or a laptop's USB port, offering flexible power solutions.
4.3 Sensor Pairing
After inserting batteries into both the main unit and the outdoor sensor, the main unit will automatically search for the outdoor sensor. The outdoor temperature and humidity will appear on the display within a few minutes. If the outdoor data does not appear, press and hold the "+/CH" button on the main unit to manually initiate a search for the sensor.
4.4 Sensor Placement
Place the outdoor sensor in a shaded, dry location, protected from direct sunlight and rain, to ensure accurate readings. Avoid placing it near heat sources or metal objects that could interfere with the wireless signal.
5. Operating Instructions
5.1 Time and Date Setting
- Press and hold the "M/S" button for 3 seconds to enter time setting mode. The hour digit will flash.
- Use the "+/CH" and "-/CF" buttons to adjust the hour.
- Press "M/S" again to confirm and move to the next setting (minute, year, month, day, 12/24 hour format).
- Repeat steps 2 and 3 until all settings are complete. Press "M/S" to exit setting mode.
5.2 Alarm Setting
- Press the "M/S" button repeatedly until the alarm time is displayed (usually indicated by an alarm icon).
- Press and hold the "M/S" button for 3 seconds. The alarm hour digit will flash.
- Use the "+/CH" and "-/CF" buttons to adjust the alarm hour.
- Press "M/S" again to confirm and move to the alarm minute setting.
- Repeat steps 2 and 3. Press "M/S" to exit alarm setting mode.
- To activate/deactivate the alarm, press the "+/CH" button while the alarm time is displayed. An alarm icon will appear/disappear on the screen.
5.3 Snooze Function
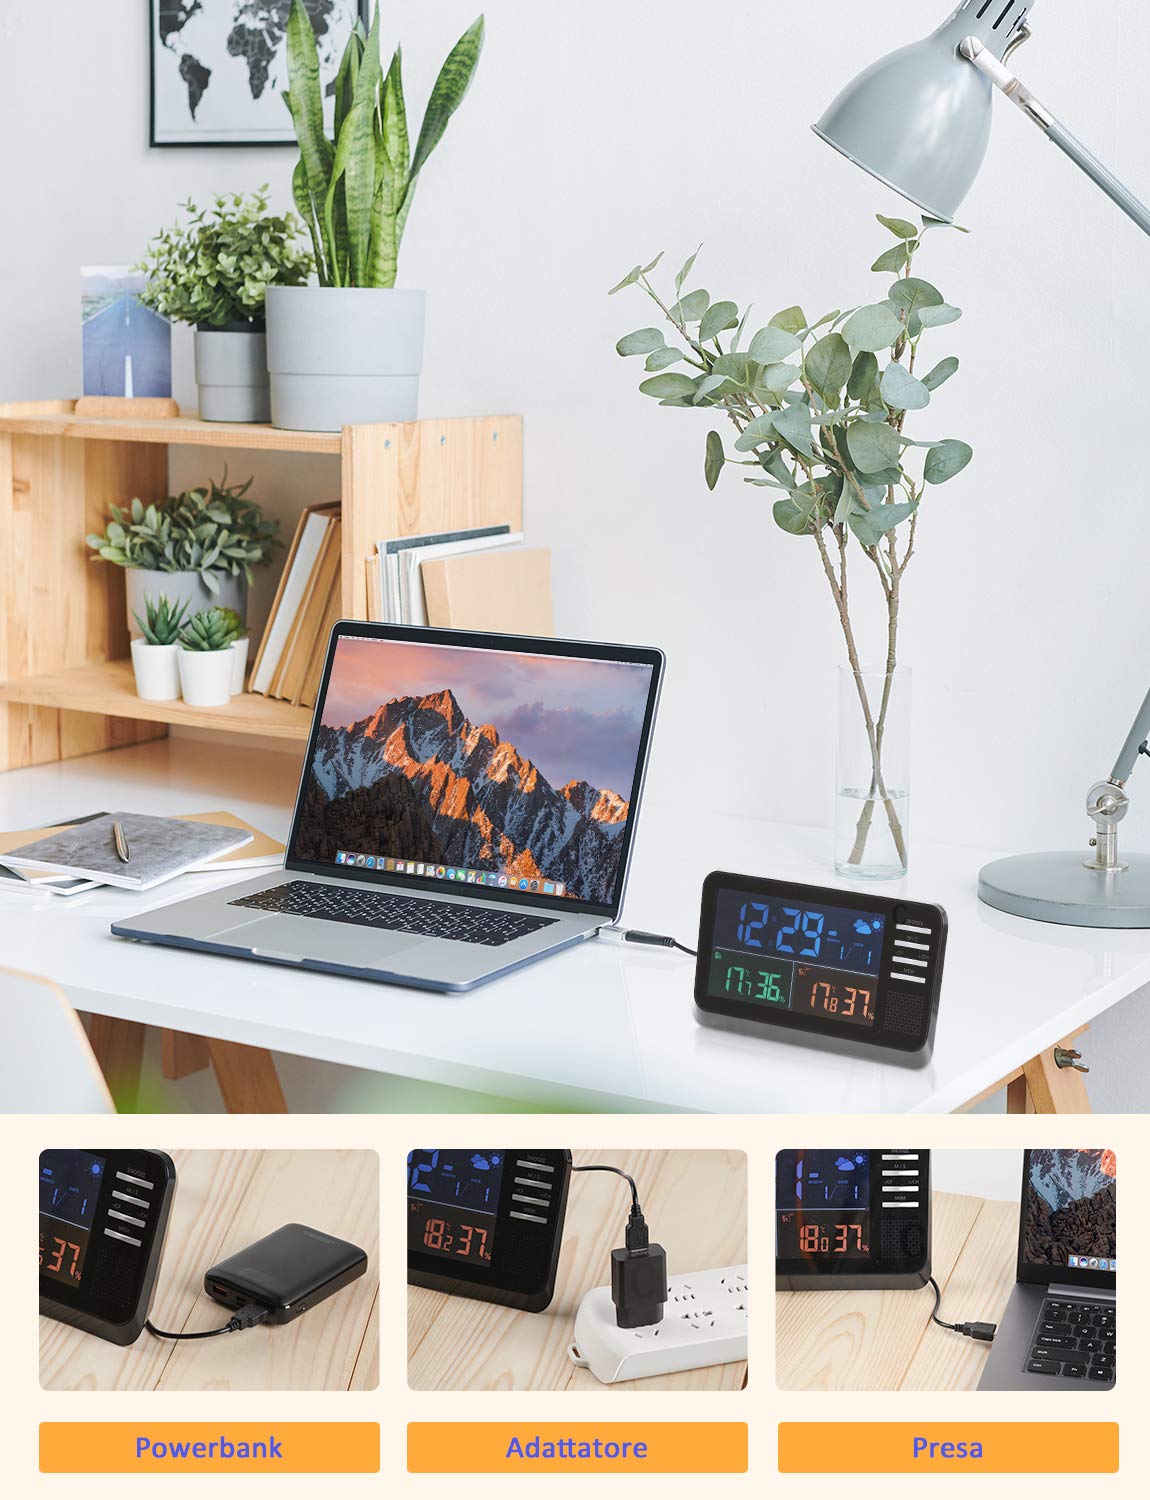
Image 5.1: The YISSVIC YGH397S Weather Station showing an alarm set for 8:00. The snooze function is indicated by the 'SNZ' icon and can be activated by pressing the SNOOZE button when the alarm sounds.
When the alarm sounds, press the "SNOOZE" button to activate the snooze function. The alarm will temporarily stop and sound again after approximately 5 minutes. To stop the alarm completely, press any other button.
5.4 Temperature Unit Conversion (℃/℉)
Press the "-/CF" button to switch between Celsius (℃) and Fahrenheit (℉) temperature units.
5.5 Weather Forecast

Image 5.2: The YISSVIC YGH397S Weather Station's display showing different weather forecast icons. These icons represent Sunny, Partially Cloudy, Cloudy, and Rainy conditions, indicating the predicted weather for the next 12-24 hours.
The weather station provides a forecast for the next 12-24 hours based on atmospheric pressure changes. The display shows one of four icons:
- Sunny: Clear skies expected.
- Partially Cloudy: Some clouds with periods of sun.
- Cloudy: Overcast conditions.
- Rainy: Precipitation expected.
Note: The weather forecast is an estimation and may not always reflect current conditions.
5.6 Max/Min Temperature and Humidity Records
Press the "MEM" button to view the maximum and minimum recorded indoor and outdoor temperature and humidity values. Press "MEM" again to cycle through Max, Min, and current readings. To clear the records, press and hold the "MEM" button for 3 seconds while viewing the Max/Min values.
5.7 Backlight Adjustment
When the main unit is powered by the adapter, press the "SNOOZE" button to adjust the backlight brightness (3 levels) or turn it off.
6. Maintenance
- Clean the device with a soft, damp cloth. Do not use abrasive cleaners or solvents.
- Avoid exposing the main unit to direct sunlight, extreme temperatures, or moisture.
- If the device will not be used for an extended period, remove the batteries from both the main unit and the outdoor sensor.
- Ensure the outdoor sensor is protected from heavy rain and snow to prolong its lifespan.
7. Troubleshooting
| Problem | Possible Cause | Solution |
|---|---|---|
| No display on main unit | Batteries are dead or incorrectly inserted; power adapter not connected or faulty. | Check battery polarity and replace if necessary. Ensure power adapter is securely connected. |
| Outdoor temperature/humidity not displayed | Outdoor sensor batteries are dead; sensor out of range; interference; sensor not paired. | Replace sensor batteries. Move sensor closer to the main unit. Avoid obstacles. Press and hold "+/CH" to re-pair. |
| Inaccurate readings | Sensor exposed to direct sunlight, rain, or heat sources. | Relocate the outdoor sensor to a shaded, protected area. Ensure proper ventilation around both units. |
| Alarm not sounding | Alarm is not activated. | Ensure the alarm icon is displayed on the screen (refer to section 5.2). |
8. Specifications
- Model: YGH397S
- Indoor Temperature Range: 0 ℃ to 50 ℃ (32 ℉ to 122 ℉)
- Outdoor Temperature Range: -20 ℃ to 50 ℃ (-4 ℉ to 122 ℉)
- Temperature Accuracy: ±0.1 ℃
- Humidity Range: 20% to 95% RH
- Humidity Accuracy: ±1% RH
- Wireless Range: Up to 60 meters (open air)
- Power Supply (Main Unit): USB power adapter (included) or 3 x AAA batteries (not included)
- Power Supply (Outdoor Sensor): 2 x AAA batteries (not included)
- Dimensions (Main Unit): Approximately 14.5 cm x 9.9 cm x 3.3 cm (5.7 x 3.9 x 1.3 inches)
- Dimensions (Outdoor Sensor): Approximately 9.7 cm x 4.6 cm x 2.0 cm (3.8 x 1.8 x 0.8 inches)
- Weight: Approximately 600g (total package)

Image 8.1: Detailed dimensions of the YISSVIC YGH397S Weather Station main unit and its wireless outdoor sensor, showing measurements in inches.
9. Warranty and Support
YISSVIC products are designed for reliability and performance. For warranty information or technical support, please refer to the contact details provided with your purchase or visit the official YISSVIC website. Please retain your proof of purchase for warranty claims.


