
1. Introduction
This manual provides essential information for the safe and efficient operation of your Mabe Aqua Saver Green 19 kg Automatic Washing Machine, model LMA79115VBAB0. Please read these instructions thoroughly before installation and use, and keep them for future reference.
Your washing machine features an agitator wash system, designed for effective cleaning and garment care. Key features include:
- Aqua Saver Green Technology: Designed to optimize water consumption.
- New Agitator Design: Enhances cleaning performance and fabric care.
- Express Wash: Allows for quick washing cycles, completing laundry in approximately 20 minutes.
2. Safety Instructions
To reduce the risk of fire, electric shock, or injury when using your appliance, follow these basic precautions:
- Read all instructions before using the appliance.
- Do not wash articles that have been previously cleaned in, washed in, soaked in, or spotted with gasoline, dry-cleaning solvents, or other flammable or explosive substances, as they emit vapors that could ignite or explode.
- Do not allow children to play on or in the appliance. Close supervision of children is necessary when the appliance is used near children.
- Do not reach into the appliance if the tub or agitator is moving.
- Do not install or store this appliance where it will be exposed to the weather.
- Do not tamper with controls.
- Do not repair or replace any part of the appliance or attempt any servicing unless specifically recommended in the user-maintenance instructions or in published user-repair instructions that you understand and have the skills to carry out.
- Always disconnect the appliance from the power supply before attempting any service.
3. Setup and Installation
3.1 Unpacking
Carefully remove all packaging materials, including the shipping base and any internal packing. Ensure no parts are left inside the drum. Keep packaging materials away from children.
3.2 Location Requirements
Place the washing machine on a firm, level floor. Ensure there is adequate space for water inlet hoses, drain hose, and power cord. Avoid installing in areas where it may be exposed to freezing temperatures or direct sunlight.

Figure 1: Front-right view of the Mabe 19 kg Automatic Washing Machine. This image shows the overall design and dimensions of the appliance, useful for planning installation space.
3.3 Connecting Water Hoses
Connect the hot and cold water inlet hoses to the corresponding valves on the back of the washer and to your household water supply. Ensure connections are tight to prevent leaks. Use new hoses provided with the washer to prevent water leakage or damage.
3.4 Connecting Drain Hose
Securely attach the drain hose to the drain outlet on the back of the washer. Place the other end of the drain hose into a standpipe or laundry tub, ensuring it is properly secured to prevent it from dislodging during the drain cycle.
3.5 Power Connection
Plug the power cord into a grounded electrical outlet. Do not use extension cords or adapters. Ensure the electrical supply meets the requirements specified in the 'Specifications' section.
3.6 Leveling the Machine
Use a level to ensure the washing machine is perfectly balanced. Adjust the leveling feet at the bottom of the washer as needed. A properly leveled machine reduces vibration and noise during operation.
4. Operating Instructions
4.1 Control Panel Overview
The control panel features 5 knobs and various indicators for selecting wash cycles and options. Familiarize yourself with the functions of each control before operating the machine.
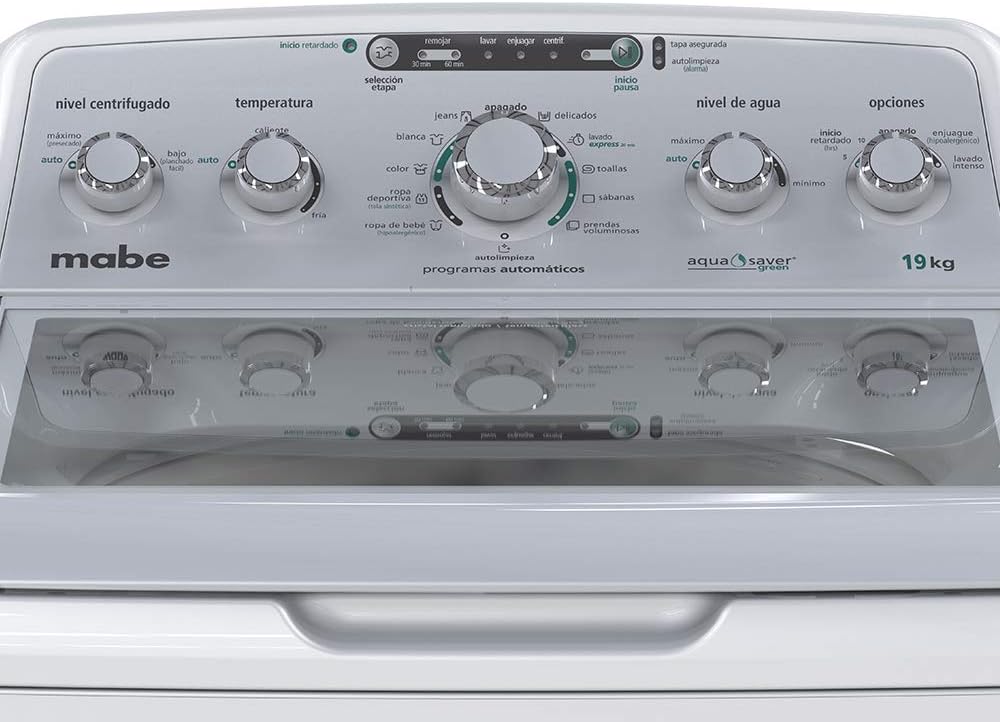
Figure 2: Detailed view of the washing machine's control panel. This image highlights the 5 control knobs for spin level, temperature, automatic programs, water level, and additional options.
- Nivel Centrifugado (Spin Level): Adjusts spin speed (Auto, Bajo, Máximo).
- Temperatura (Temperature): Selects water temperature (Fría, Caliente).
- Programas Automáticos (Automatic Programs): Dial to select one of 11 wash cycles.
- Nivel de Agua (Water Level): Automatically detects load size (5 automatic load sizes).
- Opciones (Options): Additional functions like Delay, Hypoallergenic Rinse, Intense Wash.
4.2 Loading Laundry
Open the lid and load clothes loosely around the agitator. Do not overload the machine, as this can affect washing performance and cause damage. Close the lid securely before starting a cycle.

Figure 3: Interior view of the washing machine drum, showing the central agitator. This illustrates how laundry should be loaded around the agitator for optimal washing.

Figure 4: Close-up of the washing machine's agitator. The new design is engineered for improved cleaning and fabric care.
4.3 Adding Detergent, Softener, and Bleach
Your washer is equipped with dispensers for detergent, bleach, and fabric softener:
- Detergent: Add the recommended amount of detergent directly into the drum with the clothes, or into the designated dispenser if available (not explicitly mentioned in JSON, but common).
- Bleach Dispenser: Located on the lid. Add liquid bleach to this dispenser before starting the cycle.
- Fabric Softener Dispenser: Integrated into the agitator. Add liquid fabric softener to this dispenser. It will be dispensed automatically during the rinse cycle.
4.4 Selecting a Wash Cycle
Turn the "Programas Automáticos" knob to select one of the 11 available cycles:
- Autolimpieza (Self-Clean - with alarm)
- Ropa de Bebé (Baby Clothes)
- Ropa Deportiva (Sportswear)
- Ciclo Rápido (Quick Cycle)
- Blancos (Whites)
- Ropa de Color (Color Clothes)
- Jeans
- Prendas Voluminosas (Bulky Items)
- Delicados (Delicates)
- Sábanas (Sheets)
- Toallas (Towel)
4.5 Adjusting Settings and Options
After selecting a cycle, you can customize settings using the other knobs and buttons:
- Temperature: Choose between Cold (Fría) or Hot (Caliente) water.
- Spin Level: Select Auto, Low (Bajo), or Maximum (Máximo) spin speed.
- Water Level: The machine automatically detects the load size and adjusts the water level from 5 available options.
- Wash Stages: Select specific stages like Spin (Centrifugar), Rinse (Enjuagar), Wash (Lavar), or Soak (Remojo - 30 or 60 min).
- Additional Functions (Opciones):
- Delay (Delay): Set a delayed start for 5 or 10 hours.
- Hypoallergenic Rinse (Enjuague Hipoalergénico): Adds an extra rinse to remove detergent residues.
- Intense Wash (Lavado Intenso): Provides a more vigorous wash for heavily soiled items.
4.6 Starting a Wash Cycle
Once laundry is loaded, detergent added, and cycle/options selected, close the lid and press the Start button (if available, or turn the main knob to start position). The lid will lock, and the cycle will begin.
The lid features a safety lock mechanism. The lid will remain locked during operation and will unlock once the cycle is complete or paused safely.
5. Maintenance
5.1 Cleaning the Washer
Regular cleaning helps maintain the performance and longevity of your washing machine.
- Autoclean Cycle: Use the "Autolimpieza" cycle with an alarm feature to clean the washer tub. Follow the instructions for this specific cycle.
- Exterior Cleaning: Wipe the exterior surfaces with a soft, damp cloth. Do not use abrasive cleaners or solvents.
5.2 Cleaning Dispensers
Periodically clean the bleach and fabric softener dispensers to prevent buildup. Remove the dispensers (if removable) and rinse them under warm water. Clean any residue with a small brush if necessary.
5.3 Winterizing (Storage)
If the washer is to be stored in an area subject to freezing temperatures, or if it will be unused for an extended period, follow these steps to prevent damage:
- Turn off water supply faucets.
- Disconnect water inlet hoses from the faucets and drain any remaining water.
- Run a drain/spin cycle to remove water from the tub and pump.
- Unplug the washer from the electrical outlet.
6. Troubleshooting
Before contacting service, review this section for solutions to common issues.
| Problem | Possible Cause | Solution |
|---|---|---|
| Washer does not start. | Power cord unplugged; lid not closed; circuit breaker tripped. | Ensure power cord is securely plugged in. Close the lid completely. Check and reset circuit breaker. |
| Water does not fill. | Water supply faucets off; inlet hoses kinked; water pressure too low. | Open water supply faucets. Straighten inlet hoses. Check household water pressure. |
| Water does not drain. | Drain hose kinked or clogged; pump filter clogged. | Straighten drain hose. Check for obstructions in the drain hose. (Consult service if pump filter access is not user-serviceable). |
| Excessive vibration. | Washer not level; load unbalanced. | Adjust leveling feet to ensure the machine is stable. Redistribute laundry evenly in the tub. |
| Lid will not unlock. | Cycle in progress; safety lock engaged. | Wait for the cycle to complete. If stuck, try unplugging the machine for a few minutes and plugging it back in. |
If the problem persists after attempting these solutions, please contact customer support.
7. Specifications
| Feature | Detail |
|---|---|
| Brand | Mabe |
| Model Number | LMA79115VBAB0 |
| Capacity | 19 Kilograms |
| Access Type | Top Load |
| Color | White |
| Control Type | Push Button (Pulsador) |
| Operation Mode | Fully Automatic |
| Maximum Spin Speed | 800 RPM |
| Standard Cycles | 11 |
| Installation Method | Freestanding |
| Product Dimensions (L x W x H) | 165.1 cm x 172.72 cm x 281.94 cm (65 in x 68 in x 111 in) |
| Product Weight | 51 kg |
8. Warranty Information
Mabe provides a limited warranty for this washing machine. The duration and terms of the warranty may vary by region and purchase date. Please refer to the warranty card included with your product or visit the official Mabe website for detailed information regarding warranty coverage, terms, and conditions.
Keep your proof of purchase (receipt or invoice) as it will be required for any warranty claims.
9. Customer Support
For technical assistance, service requests, or inquiries about your Mabe washing machine, please contact Mabe customer support.
Contact information can typically be found on the Mabe official website, in the product packaging, or on a label affixed to the appliance.
When contacting support, please have your model number (LMA79115VBAB0) and serial number ready to expedite service.