
BN-LINK BNC-U3S
BN-LINK BNC-U3S Outdoor 7-Day Programmable Digital Power Stake Instruction Manual
Model: BNC-U3S
Introduction
This manual provides detailed instructions for the safe and effective use of your BN-LINK BNC-U3S Outdoor 7-Day Programmable Digital Power Stake. This device is designed to automate the control of outdoor electrical appliances and lighting, offering convenience and energy efficiency. Please read this manual thoroughly before installation and operation.
Safety Information
WARNING: To reduce the risk of electric shock or fire, observe the following precautions:
- Do not immerse the unit in water.
- Ensure the unit is securely staked into the ground and elevated at least 1 foot above ground level to prevent water ingress.
- Do not exceed the maximum electrical rating of 15A / 1875W.
- Always plug the unit into a Ground Fault Circuit Interrupter (GFCI) protected outlet.
- Keep the protective cover closed when not accessing the outlets or programming the timer.
- Do not attempt to open or repair the unit. Refer all servicing to qualified personnel.
- Ensure all connected devices are suitable for outdoor use.
Product Overview
The BN-LINK BNC-U3S is an outdoor power stake with a digital timer, designed for versatile control of multiple electrical devices.

Figure 1: BN-LINK Outdoor Power Stake with 6 outlets and digital timer, shown with its 6-foot power cord and ground stake.
Components:
- Digital Timer Display: Shows current time, program status, and settings.
- Control Buttons: WEEK, HOUR, MIN, CLOCK, PROG, MANUAL, R (Reset).
- 6 Grounded Outlets: For connecting multiple devices.
- Protective Cover: Shields the outlets and timer from weather elements.
- Ground Stake: For secure installation in soil.
- 6-Foot Extension Cord: Provides flexible placement.
- Overload Protection: Integrated safety feature.
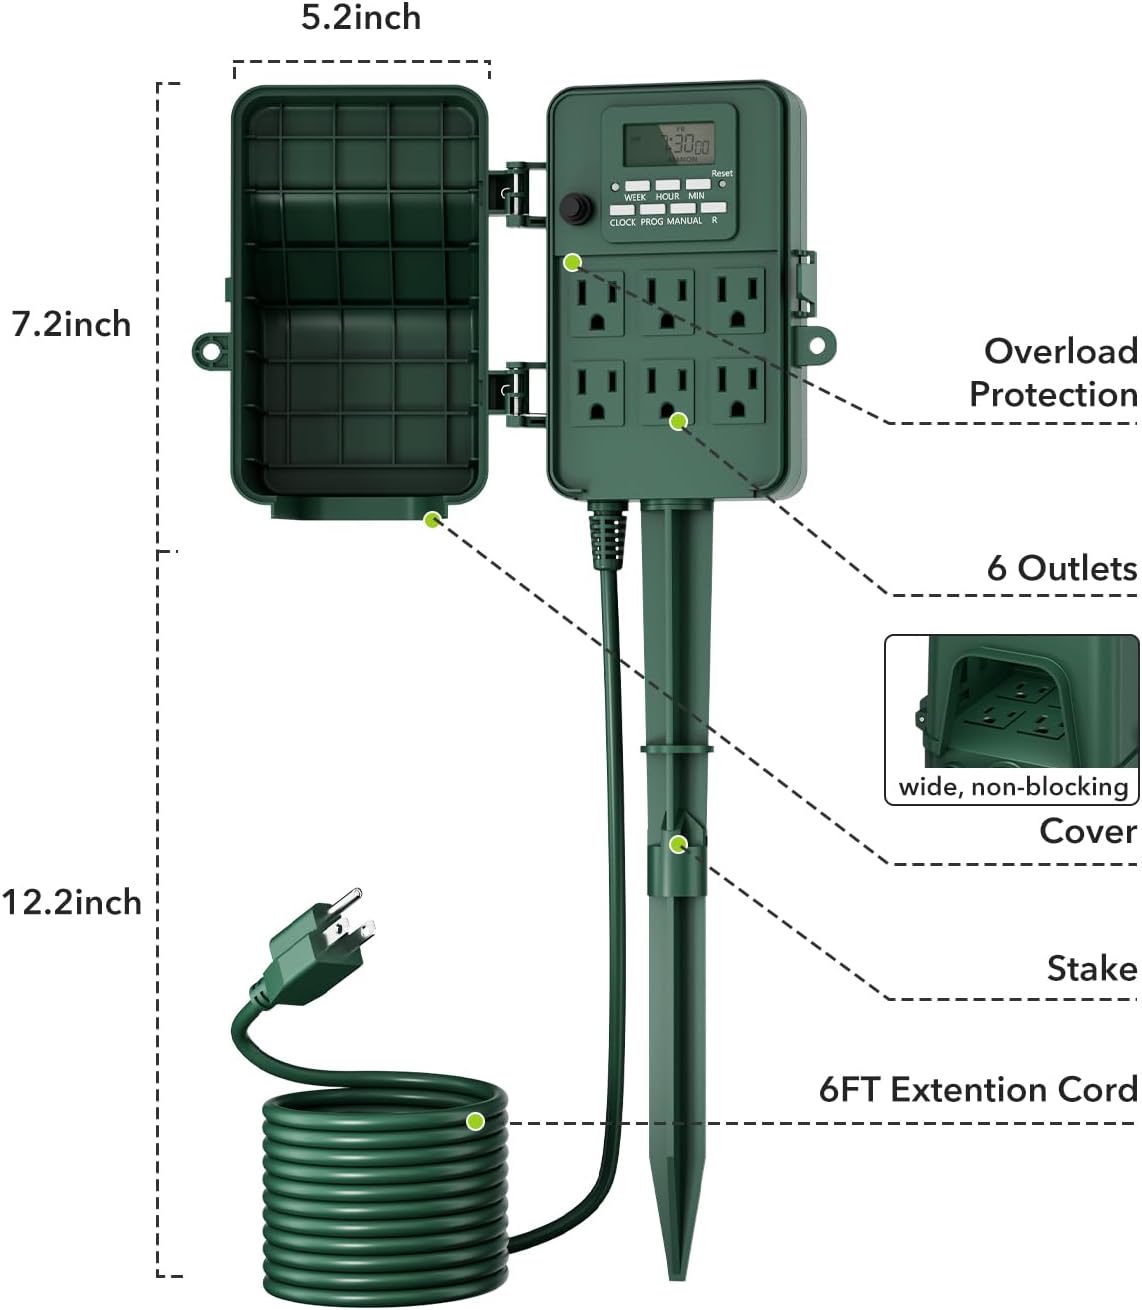
Figure 2: Diagram illustrating the dimensions of the BN-LINK outdoor power stake (19.4 inches total height, 5.2 inches width) and labeling key components such as the 6 outlets, overload protection, cover, stake, and 6-foot extension cord.
Setup Instructions
- Unpack the Unit: Carefully remove the power stake from its packaging.
- Initial Charge (Important): Before first use, plug the timer into a standard indoor outlet for at least 24 hours to fully charge the internal backup battery. This ensures the timer retains settings during power outages.
- Select Location: Choose a suitable outdoor location with a GFCI-protected outlet. Ensure the ground is firm enough to support the stake.
- Install Stake: Firmly push the ground stake into the soil until the unit is stable and the outlets are elevated at least 1 foot above ground level.
- Connect to Power: Plug the 6-foot extension cord into a GFCI-protected outdoor electrical outlet.
- Connect Devices: Plug your outdoor lights or appliances into the 6 grounded outlets. Ensure the protective cover can close properly over all connections.

Figure 3: The weatherproof design of the timer box, protecting the internal components and outlets from rain, dust, and debris. The stake elevates the unit approximately 1 foot above ground.
Operating Instructions
The BN-LINK BNC-U3S offers up to 8 ON/OFF programs and 7-day programmability.

Figure 4: Close-up of the digital display and control buttons, illustrating the 8 ON/OFF programs and 7-day programmable options for daily, specific day, weekday, or weekend settings.
1. Setting Current Time:
- Press and hold the CLOCK button.
- While holding CLOCK, press WEEK to set the current day of the week.
- While holding CLOCK, press HOUR to set the current hour (AM/PM).
- While holding CLOCK, press MIN to set the current minute.
- Release CLOCK to save the time.
2. Programming ON/OFF Cycles:
The timer allows up to 8 ON/OFF programs. Each program consists of an ON time and an OFF time.
- Press the PROG button once. The display will show "1 ON".
- Press WEEK to select the day(s) for this program (e.g., MO TU WE TH FR SA SU, MO-FR, SA SU, etc.).
- Press HOUR and MIN to set the desired ON time.
- Press PROG again. The display will show "1 OFF".
- Press WEEK to select the day(s) for this OFF program (usually the same as ON).
- Press HOUR and MIN to set the desired OFF time.
- Repeat steps 1-6 for additional programs (2 ON/OFF through 8 ON/OFF).
- After setting all desired programs, press the CLOCK button to return to the current time display.
3. Manual Override and Mode Selection:
Press the MANUAL button to cycle through operating modes:
- AUTO ON: The timer will follow programmed ON times and then switch to OFF according to programmed OFF times.
- AUTO OFF: The timer will follow programmed OFF times and then switch to ON according to programmed ON times.
- ON: All outlets are continuously ON, overriding all programs.
- OFF: All outlets are continuously OFF, overriding all programs.
For automatic operation, ensure the timer is set to either AUTO ON or AUTO OFF, depending on your desired starting state.
4. Resetting the Timer:
To clear all settings and reset the timer to factory defaults, use a small pointed object (like a pen tip) to press the R (Reset) button. You will need to reprogram the time and all desired ON/OFF cycles after a reset.
Maintenance
- Cleaning: Disconnect the power stake from the main power source before cleaning. Wipe the exterior with a damp cloth. Do not use harsh chemicals or abrasive cleaners.
- Inspection: Periodically inspect the power cord, plug, and outlets for any signs of damage, wear, or corrosion. If damage is found, discontinue use and replace the unit.
- Storage: When not in use for extended periods, clean the unit and store it in a dry, protected area away from extreme temperatures.
Troubleshooting
| Problem | Possible Cause | Solution |
|---|---|---|
| Timer display is blank or dim. | Internal battery is low or depleted. | Plug the timer into a live outlet for at least 24 hours to charge the battery. |
| Outlets are not powering devices. | 1. Timer is in OFF or incorrect AUTO mode. 2. Overload protection tripped. 3. GFCI outlet tripped. | 1. Press MANUAL to cycle to ON or AUTO ON/OFF. 2. Unplug devices, press the reset button on the timer (if available), and reduce load. 3. Reset the GFCI outlet. |
| Programs are not activating. | 1. Timer is not in AUTO mode. 2. Incorrect program settings. 3. Internal battery not sufficiently charged. | 1. Press MANUAL until AUTO ON/OFF is displayed. 2. Review and re-enter program settings carefully. 3. Ensure the timer has been charged for 24 hours. |
| Protective cover is difficult to close. | Cords are obstructing the latch or internal space. | Arrange cords neatly within the enclosure. Use cable ties if necessary to compact wires and ensure they align with the sliding slats at the bottom. |
Specifications
- Model: BNC-U3S
- Input Voltage: 125VAC, 60Hz
- Max Load: 15A Resistive, 1875W
- Outlets: 6 Grounded Outlets
- Cord Length: 6 Feet (SJTW 14/3C)
- Programmability: 7-Day, 8 ON/OFF Programs
- Material: Polypropylene
- Dimensions: 4.88"D x 5.2"W x 19.4"H
- Item Weight: 1.77 Pounds
- Certifications: ETL Listed
Warranty and Support
BN-LINK products are designed for reliability and performance. For warranty information or technical support, please contact BN-LINK customer service. Keep your purchase receipt as proof of purchase.
BN-LINK Customer Service: Refer to the contact information provided with your product packaging or visit the official BN-LINK website for support.
Related documentsBNC-U3S


Ask a question about this manual
Ask about setup, troubleshooting, compatibility, parts, safety, or missing instructions. Manuals+ will review the question and use this page’s manual context to help answer it.