
Retevis RT622
Contents
Retevis RT622 PMR446 Mini Professional Walkie Talkie User Manual
Model: RT622
1. Introduction
Thank you for choosing the Retevis RT622 PMR446 Mini Professional Walkie Talkie. This device is designed for reliable, license-free communication, ideal for various professional and recreational uses. This manual provides essential information for the safe and efficient operation of your walkie talkie. Please read it thoroughly before use.
2. Product Overview
2.1 Package Contents
The standard package includes the following items:
- 4 x Retevis RT622 Walkie Talkie units
- 4 x Lithium-ion Battery (1000mAh)
- 4 x Earpiece
- 4 x Type-C Charging Cable
- 4 x Belt Clip
- 2 x User Manual

Figure 2.1: Package Contents
2.2 Device Layout and Controls
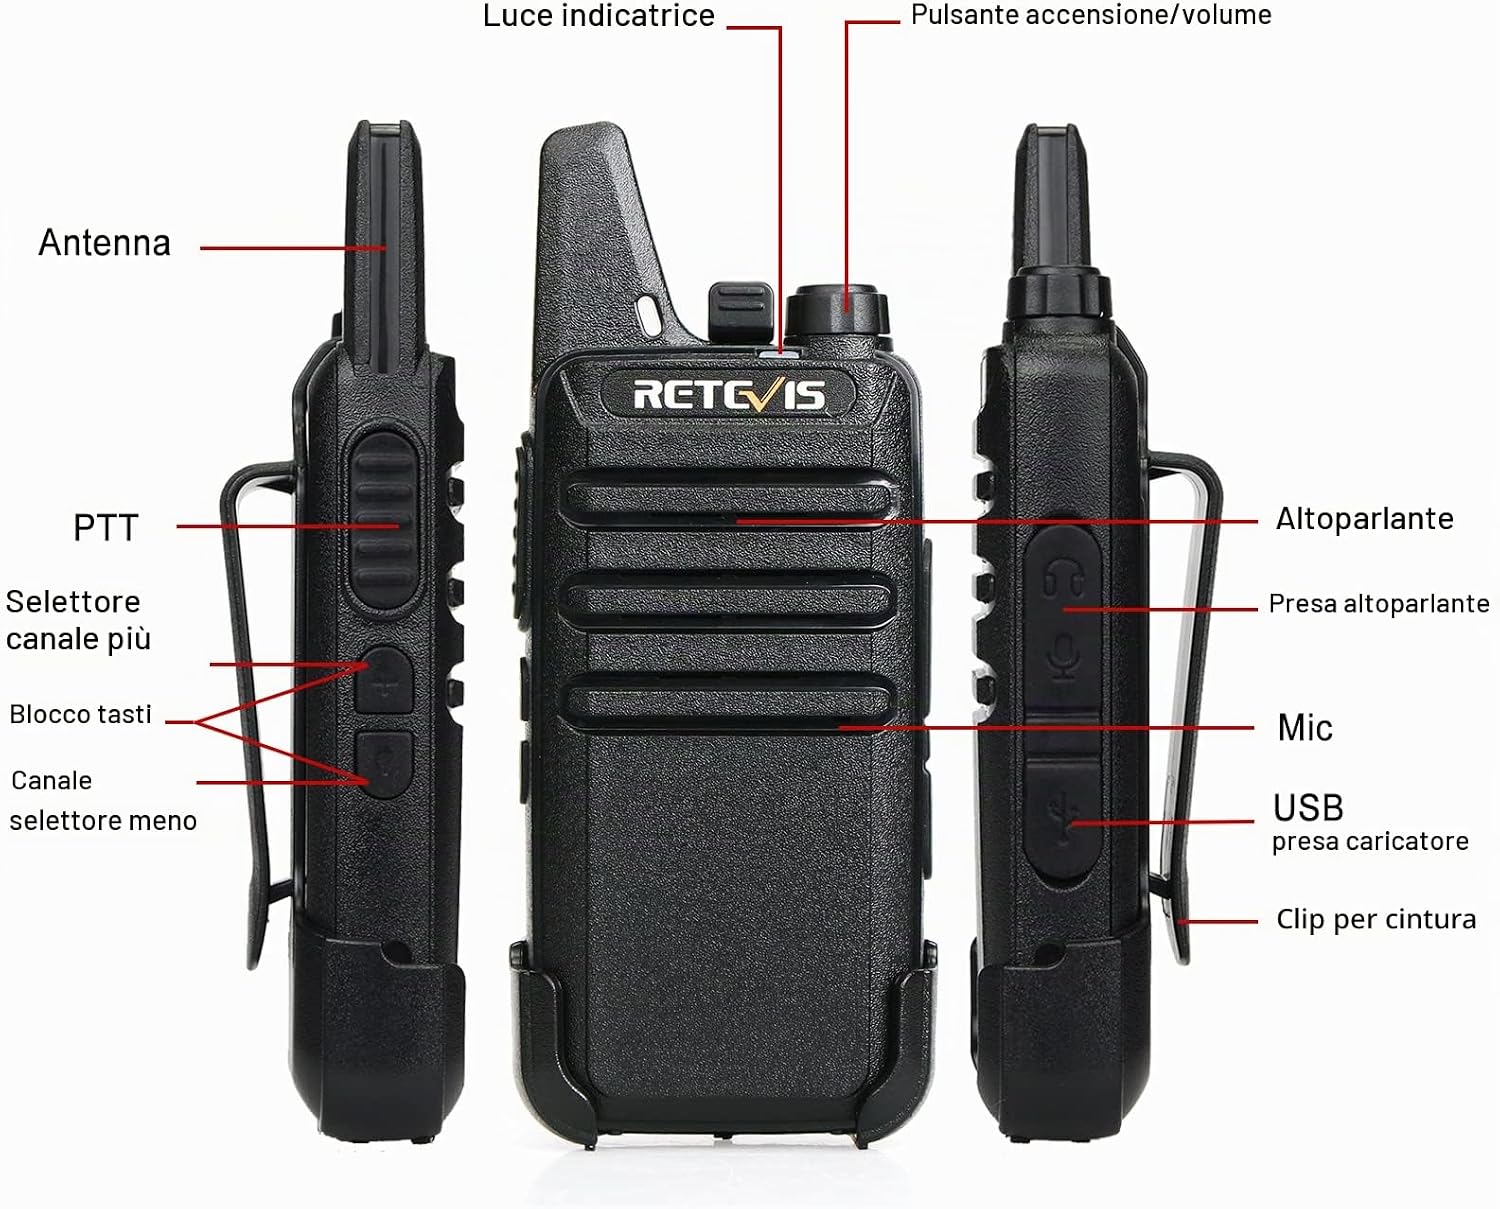
Figure 2.2: Front, Back, and Side Views with Labeled Components

Figure 2.3: Side Controls and Ports
- Antenna: Fixed for optimal signal.
- Indicator Light: Shows status (e.g., transmitting, receiving, charging).
- Power/Volume Knob: Rotate to turn on/off and adjust volume.
- PTT (Push-to-Talk) Button: Press and hold to transmit, release to receive.
- Channel Selector: Use the up/down buttons to change channels (1-16).
- Key Lock: Prevents accidental changes to settings.
- Speaker: For audio output.
- Microphone (Mic): For voice input.
- Earpiece Jack: Standard Kenwood 2-pin connector for accessories.
- USB Charging Port: Type-C port for charging.
- Belt Clip: For convenient carrying.
3. Setup
3.1 Battery Installation
- Ensure the walkie talkie is powered off.
- Locate the battery compartment cover on the back of the unit.
- Slide the cover downwards or unlatch it to open.
- Insert the Lithium-ion battery (Model: BL22, 1000mAh, 3.7V) into the compartment, ensuring the contacts align correctly.
- Replace the battery compartment cover and secure it.

Figure 3.1: Battery Installation
3.2 Charging the Battery
The walkie talkie uses a 1000mAh Lithium-ion battery. For optimal performance, fully charge the battery before first use.
- Connect the provided Type-C charging cable to the USB charging port on the side of the walkie talkie.
- Connect the other end of the cable to a 5V/1A USB power adapter (not included) or a compatible USB power source.
- The indicator light will show the charging status (typically red while charging, green when fully charged).
- Charging time may vary. A full charge can provide up to 10 hours of average use and up to 72 hours of standby time.

Figure 3.2: Charging the Walkie Talkie

Figure 3.3: Multiple Charging Options
3.3 Attaching the Belt Clip
- Align the belt clip with the designated slots on the back of the walkie talkie.
- Slide the clip upwards until it clicks into place, ensuring it is securely fastened.
- To remove, push the release tab (if present) and slide the clip downwards.
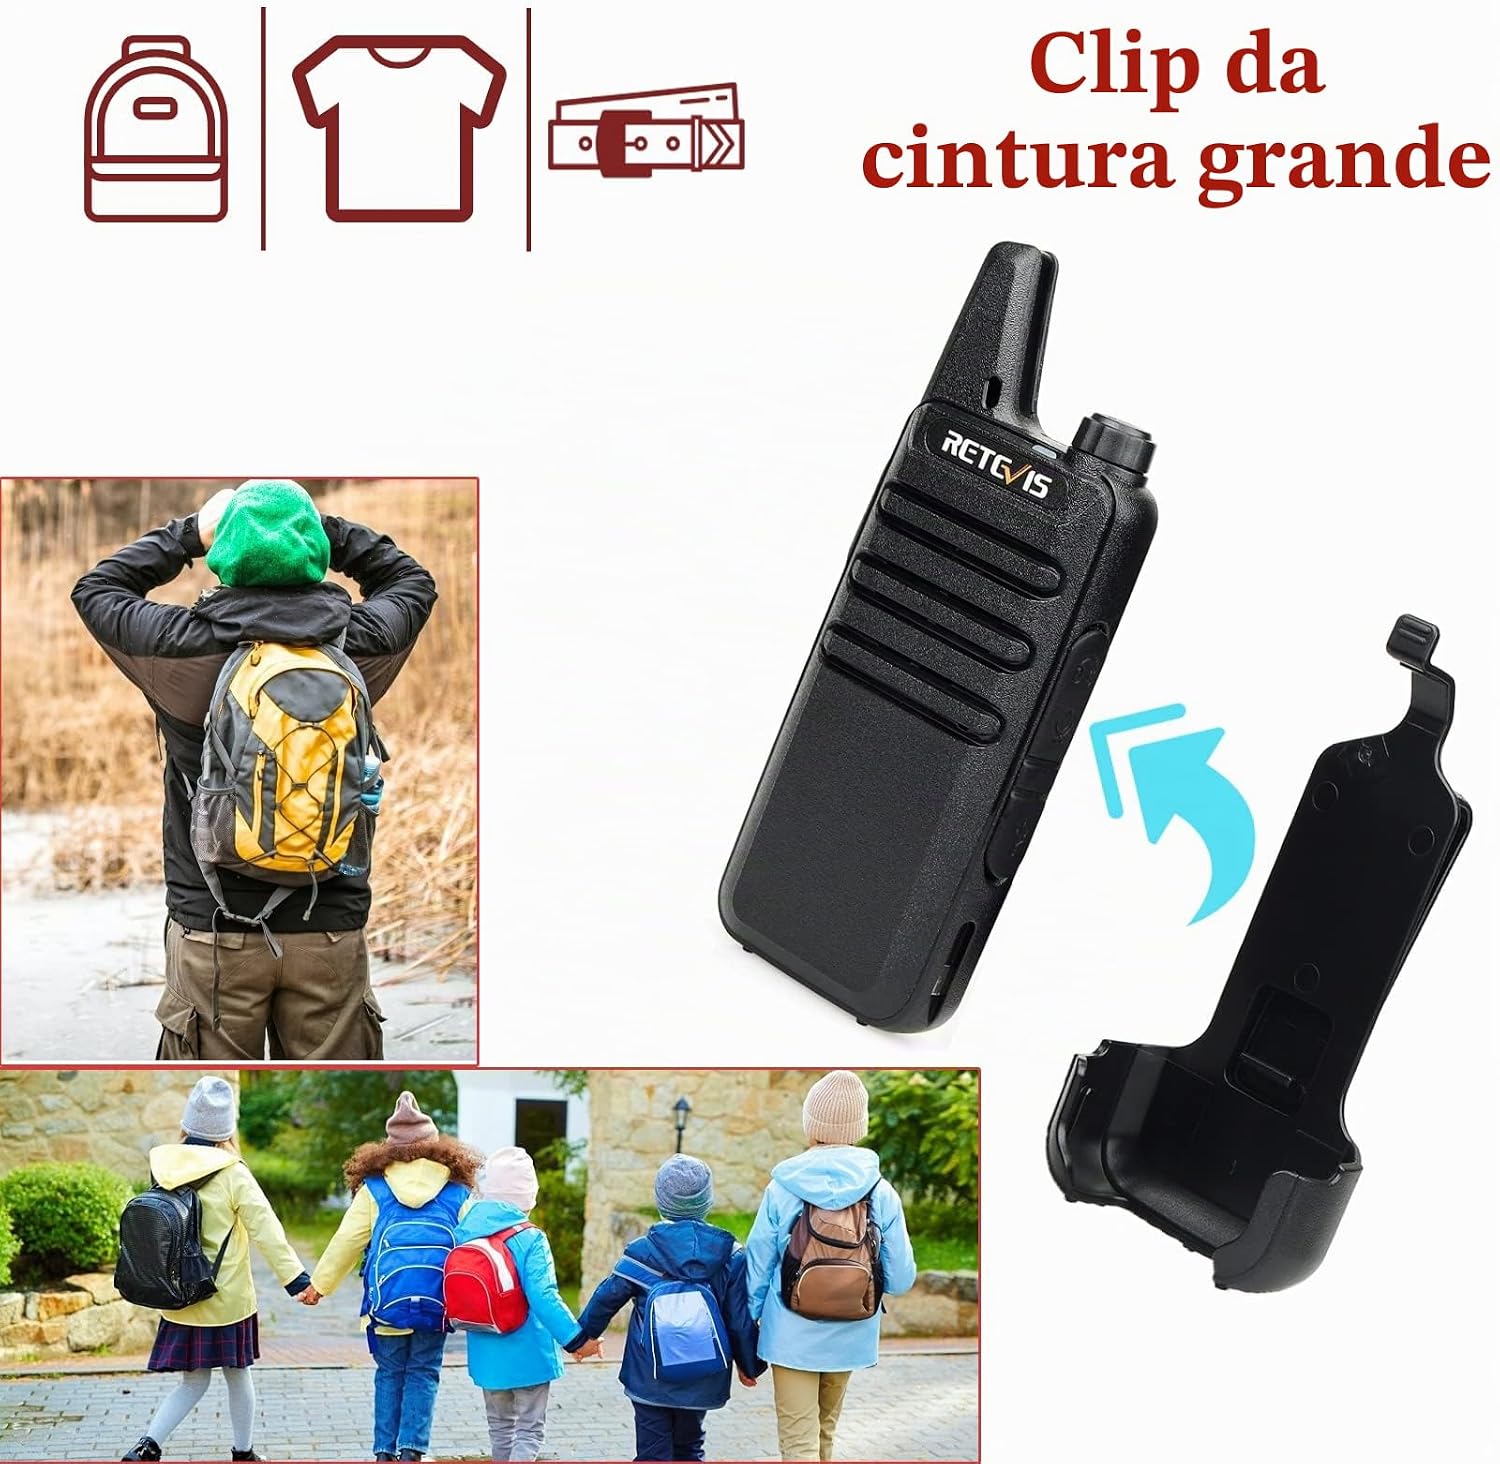
Figure 3.4: Attaching the Belt Clip
3.4 Connecting the Earpiece
The RT622 supports standard Kenwood 2-pin earpieces for private communication and hands-free operation.
- Locate the 2-pin earpiece jack on the side of the walkie talkie.
- Insert the earpiece connector firmly into the jack.
- Ensure the connection is secure for clear audio.
4. Operating Instructions
4.1 Power On/Off and Volume Adjustment
- To power on, rotate the Power/Volume knob clockwise until you hear a click and the unit powers on.
- Continue rotating the knob clockwise to increase the volume, and counter-clockwise to decrease it.
- To power off, rotate the knob counter-clockwise until you hear a click and the unit shuts down.
4.2 Channel Selection
The RT622 has 16 PMR446 channels. To communicate with other walkie talkies, ensure all units are set to the same channel.
- Use the Channel Selector Up/Down buttons on the side of the walkie talkie to cycle through the available channels.
- The current channel number is typically indicated by a voice prompt or a display (if available on your model).
4.3 Transmitting and Receiving
- To transmit, press and hold the PTT (Push-to-Talk) button. Speak clearly into the microphone. The indicator light will typically glow red.
- Release the PTT button to stop transmitting and return to receive mode. The indicator light will typically glow green when receiving a signal.
- Ensure you are on the same channel as the person you wish to communicate with.
4.4 VOX Function (Voice Operated Exchange)
The VOX function allows for hands-free operation, enabling transmission when your voice is detected, without needing to press the PTT button.
- The VOX function can be activated or deactivated through programming software (refer to advanced settings if applicable) or specific button combinations (check your specific model's quick guide).
- When VOX is active, speak into the microphone to initiate transmission. Adjust VOX sensitivity to prevent accidental transmissions from background noise.

Figure 4.1: VOX Function in Action
4.5 Squelch Function
The squelch function automatically mutes the speaker when no signal is present, reducing background noise and static. This ensures clear and smooth audio quality.

Figure 4.2: Clear Audio Quality
5. Maintenance
5.1 Battery Care
- Avoid overcharging or completely draining the battery to prolong its lifespan.
- Store batteries in a cool, dry place when not in use.
- If the battery performance significantly degrades, consider replacing it with an original Retevis battery.
5.2 Cleaning
- Clean the walkie talkie's exterior with a soft, damp cloth.
- Do not use harsh chemicals or abrasive cleaners.
- Ensure all ports are dry before charging or connecting accessories.
5.3 Water Resistance
The Retevis RT622 is designed to be water-repellent. While it can withstand light splashes, it is not fully waterproof. Avoid submerging the device in water or exposing it to heavy rain.
6. Troubleshooting
| Problem | Possible Cause | Solution |
|---|---|---|
| No power | Battery depleted or not installed correctly. | Charge the battery. Reinstall the battery, ensuring proper contact. |
| Cannot transmit or receive | Incorrect channel, out of range, or low battery. | Verify both units are on the same channel. Move closer to the other unit. Charge the battery. |
| Poor audio quality / Static | Weak signal, interference, or squelch level too low/high. | Move to an open area. Adjust squelch level (if programmable). Check earpiece connection. |
| VOX not working | VOX disabled or sensitivity too low. | Ensure VOX is enabled. Increase VOX sensitivity. |
7. Specifications
| Feature | Detail |
|---|---|
| Brand | Retevis |
| Model Number | EUA9121HX2-C9158AX4 |
| Color | Black |
| Number of Channels | 16 |
| Special Feature | VOX |
| Frequency Range | 446.00625-446.19375MHz (PMR446) |
| Maximum Talk Range | 3 Kilometers (approx. 1.86 miles) |
| Voltage | 3 Volts |
| Water Resistance Level | Water-repellent |
| Product Dimensions (D x W x H) | 2.1 x 5.2 x 13.6 cm (0.83 x 2.05 x 5.35 inches) |
| Weight | 113 Grams (approx. 0.25 lbs) |
| Battery Type | Lithium-ion (1000mAh) |
| Average Battery Life | 10 Hours (average use) |
| Compatible Devices | RT24, RT619, RT618, RT27, and other compatible walkie talkies |
| Operating Temperature Range | -20 to 50°C (-4 to 122°F) |

Figure 7.1: Compact Size and Lightweight Design
8. Warranty and Support
8.1 Product Warranty
Retevis provides a 2-year warranty for the radio body and a 1-year warranty for accessories from the date of purchase. Additionally, a 30-day return policy is offered for any reason.
Beyond the warranty period, maintenance services are still available, with buyers responsible for corresponding costs. We aim to process requests as simply as possible.
8.2 Customer Support
For any questions, issues, or support needs, please contact us through Amazon. We commit to responding within 12 hours.
For more information and resources, visit the official Retevis store on Amazon: Retevis Amazon Store
Ask a question about this manual
Ask about setup, troubleshooting, compatibility, parts, safety, or missing instructions. Manuals+ will review the question and use this page’s manual context to help answer it.