1. Product Overview
The Ruckus R320 is an indoor 802.11ac Wave 2 wireless access point designed for small and medium-sized businesses, retail, restaurants, and branch offices. It features dual-band connectivity (2.4 GHz and 5 GHz) and operates with Ruckus Unleashed firmware, providing controller-less Wi-Fi management. This device offers reliable and high-performance wireless access without the need for a separate hardware controller or subscription.
Key features include:
- Dual-Band (2.4 GHz and 5 GHz) 802.11ac Wave 2 Wi-Fi
- Internal Antennas
- Power over Ethernet (PoE) or 12V DC power input
- Designed for indoor deployments
2. Package Contents
Verify that your package contains the following items:
- Ruckus R320 Wireless Access Point
- Antenna (internal)
- Mounting bracket (may vary by region/bundle)
- Quick Start Guide (not included in this digital manual)
If any items are missing or damaged, please contact your vendor or Ruckus Wireless support.
3. Physical Description and Indicators
3.1 Front Panel LEDs

Figure 1: Front view of the Ruckus R320 Access Point, showing the LED indicators for Power (PWR), Control (CTL), Air (AIR), 2.4 GHz, and 5 GHz bands.
The front panel of the Ruckus R320 features several LED indicators that provide status information about the device's operation:
- PWR (Power): Indicates power status.
- CTL (Control): Indicates system status and management activity.
- AIR (Air): Indicates wireless activity.
- 2.4G: Indicates activity on the 2.4 GHz wireless band.
- 5G: Indicates activity on the 5 GHz wireless band.
3.2 Side Panel (PoE Input)

Figure 2: Side view of the Ruckus R320 Access Point, highlighting the Power over Ethernet (PoE IN) port.
One side of the R320 features a single Ethernet port labeled "POEIN". This port is used for both data connectivity and power supply when using Power over Ethernet (PoE).
3.3 Bottom Panel (Ports and Label)
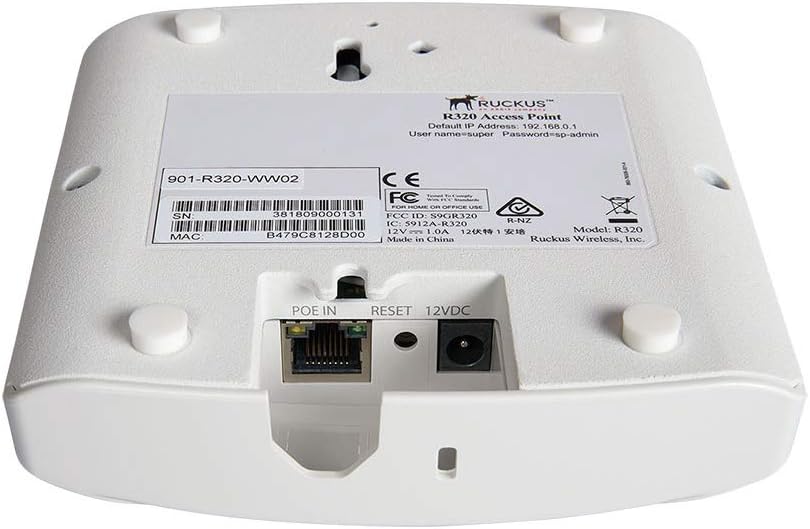
Figure 3: Bottom view of the Ruckus R320 Access Point, showing the PoE IN port, Reset button, 12VDC power input, and the product information label with default IP, username, and password.
The bottom panel contains the primary connectivity options and the product label. You will find:
- POEIN: Ethernet port for data and Power over Ethernet.
- RESET: A small button used to reset the device to factory default settings.
- 12VDC: Power input jack for an optional 12V DC power adapter (not included).
- Product Label: Contains important information such as the serial number (SN), MAC address, model number (R320), default IP address (192.168.0.1), default username (super), and default password (sp-admin). Keep this information secure.
4. Setup Instructions
Follow these steps to set up your Ruckus R320 Access Point:
4.1 Mounting the Access Point
The R320 can be mounted on a wall or ceiling. Use the provided mounting bracket (if applicable) and hardware to secure the access point in your desired location. Ensure the location allows for optimal wireless coverage and easy access to cabling.
4.2 Powering the Access Point
The R320 can be powered in two ways:
- Power over Ethernet (PoE): Connect an Ethernet cable from a PoE-enabled switch or PoE injector to the "POEIN" port on the access point. This method provides both power and data connectivity.
- 12V DC Power Adapter: If PoE is not available, connect a compatible 12V DC power adapter (not included) to the "12VDC" power input jack. Then, connect an Ethernet cable from your network switch or router to the "POEIN" port for data connectivity.
Once powered, the PWR LED on the front panel should illuminate.
4.3 Initial Configuration Access
For initial setup and configuration of the Unleashed firmware:
- Ensure your computer is connected to the same network segment as the R320.
- Open a web browser and navigate to the default IP address: http://192.168.0.1. This IP address is also printed on the product label on the bottom of the device.
- Log in using the default credentials:
Username: super
Password: sp-admin - Follow the on-screen wizard to configure your Unleashed network, including Wi-Fi names (SSIDs), security settings, and administrative passwords. It is highly recommended to change the default administrative password immediately.
5. Operating Instructions
Once configured, the Ruckus R320 Access Point will broadcast your specified Wi-Fi networks. Client devices (laptops, smartphones, tablets) can connect to these networks using the configured SSIDs and passwords.
The Ruckus Unleashed system allows for easy management of your wireless network through a web-based interface. You can:
- Monitor connected clients and network performance.
- Create additional Wi-Fi networks (SSIDs) with different security settings.
- Manage guest access.
- Perform firmware upgrades.
- Adjust advanced wireless settings.
Refer to the Ruckus Unleashed documentation for detailed information on advanced features and configurations.
6. Maintenance
6.1 Firmware Updates
Regularly check for and apply firmware updates to ensure optimal performance, security, and access to new features. Firmware updates are typically managed through the Ruckus Unleashed web interface.
6.2 Cleaning
Clean the exterior of the access point with a soft, dry cloth. Do not use liquid cleaners or aerosol sprays directly on the device. Ensure the device is powered off before cleaning.
6.3 Factory Reset
To restore the access point to its factory default settings, locate the "RESET" button on the bottom panel (refer to Figure 3). With the device powered on, use a paperclip or similar pointed object to press and hold the RESET button for approximately 10 seconds. Release the button when the LEDs indicate a reset sequence (e.g., all LEDs flash). The device will then reboot with factory defaults.
7. Troubleshooting
This section addresses common issues you might encounter.
7.1 No Power / PWR LED Off
- Verify the Ethernet cable is securely connected to the "POEIN" port and to a PoE-enabled switch or injector.
- If using a DC adapter, ensure it is properly connected to the "12VDC" port and the power outlet.
- Test with a different Ethernet cable or power adapter if available.
7.2 Cannot Access Web Interface
- Ensure your computer is on the same network segment as the R320.
- Verify the R320 has powered on correctly (PWR LED is solid).
- Confirm you are using the correct IP address (default is 192.168.0.1). If the AP has already been configured, its IP address might have changed.
- Try clearing your browser's cache or using a different browser.
- If you suspect the IP address has changed or you forgot the password, consider performing a factory reset (see Section 6.3).
7.3 Poor Wireless Performance
- Check for physical obstructions between the access point and client devices.
- Ensure the access point is centrally located for optimal coverage.
- Interference from other wireless devices (e.g., microwaves, cordless phones, neighboring Wi-Fi networks) can degrade performance. Consider changing Wi-Fi channels in the Unleashed interface.
- Verify that client devices are connecting to the appropriate 2.4 GHz or 5 GHz band.
- Ensure the latest firmware is installed.
8. Specifications

Figure 4: Internal view of the Ruckus R320 Access Point, showing the circuit board and components.
The following table lists the technical specifications for the Ruckus R320 Access Point:
| Feature | Description |
|---|---|
| Model Name | R320 |
| Item Model Number | 9U1-R320-US02 |
| Brand | Ruckus Wireless |
| Wireless Standard | 802.11ac Wave 2 |
| Frequency Band Class | Dual-Band (2.4 GHz, 5 GHz) |
| Antenna Type | Internal |
| Connectivity Technology | Wireless, Ethernet |
| Power Input | PoE (802.3af/at) or 12V DC |
| Operating System | Ruckus Unleashed (firmware) |
| Recommended Uses | Small and Midsize Businesses, Retail, Restaurants, Small Offices, Branch Offices |
| Item Weight | 1.19 pounds (0.54 kg) |
| Package Dimensions | 6.42 x 6.1 x 2.87 inches (16.3 x 15.5 x 7.3 cm) |
9. Safety Information
- Do not expose the device to water or excessive humidity.
- Do not open the device casing. Refer all servicing to qualified personnel.
- Use only approved power sources (PoE or 12V DC adapter).
- Ensure proper ventilation around the device to prevent overheating.
- Keep the device away from heat sources and direct sunlight.
10. Warranty and Support
For warranty information, please refer to the documentation provided with your purchase or visit the official Ruckus Wireless website. Warranty terms and conditions may vary by region and reseller.
For technical support, product updates, and additional resources, please visit the Ruckus Wireless support portal or contact your authorized Ruckus reseller. Ensure you have your product model number (R320) and serial number (found on the bottom label) available when seeking support.


