
Introduction
This manual provides comprehensive instructions for the installation, operation, and maintenance of your Xprite Amber LED Surface Mount Strobe Lights Kit. This kit features an ultra-thin flush mount design with 12 high-intensity LED chips and a flood lens for maximum coverage and high visibility. The included control box allows for easy selection of 16 different strobe patterns and 3 directional patterns, with a last pattern memory recall function. Designed to withstand harsh weather conditions, these lights are suitable for various vehicles requiring enhanced safety and visibility.
Safety Information
- Always disconnect the vehicle's battery before beginning any electrical installation to prevent electrical shock or damage.
- Ensure all wiring connections are secure and properly insulated to prevent short circuits.
- Mount the lights in a location that does not obstruct the driver's view or interfere with vehicle safety systems.
- Verify that the operating voltage of the lights (12-24V) matches your vehicle's electrical system.
- Consult local regulations regarding the use of emergency warning lights on public roads.
- If the mounting surface is not flat, extra clear silicone sealant is recommended for a secure and waterproof seal.
Package Contents
Verify that all components are present before beginning installation:
- Emergency Strobe Lights (Quantity: 4 Amber lights for this specific model)
- Control Box
- Mounting Gaskets
- Mounting Screws
- 1.64ft Cigarette Lighter Plug
- 6.56ft Power Cable

Image: Overview of the Xprite Amber LED Surface Mount Strobe Lights Kit components.
Specifications
| Brand | Xprite |
| Model Number | 52027-4-Y |
| Color | Amber |
| Light Source Type | LED |
| Working Voltage | 12-24 Volts |
| Wattage | 48 watts |
| Lifespan | Over 50,000 hours |
| Material | Aluminum Alloy Base & PC Lens |
| Strobe Patterns | 16 Flashing Modes |
| Directional Patterns | 3 Directional Patterns |
| Control System | Digital Display Control Box with Last Pattern Memory Recall |
| Lens Material | Polycarbonate |
| Lens Color | Clear |
| Automotive Fit Type | Universal Fit |

Image: Ultra-thin design for flush surface mounting.
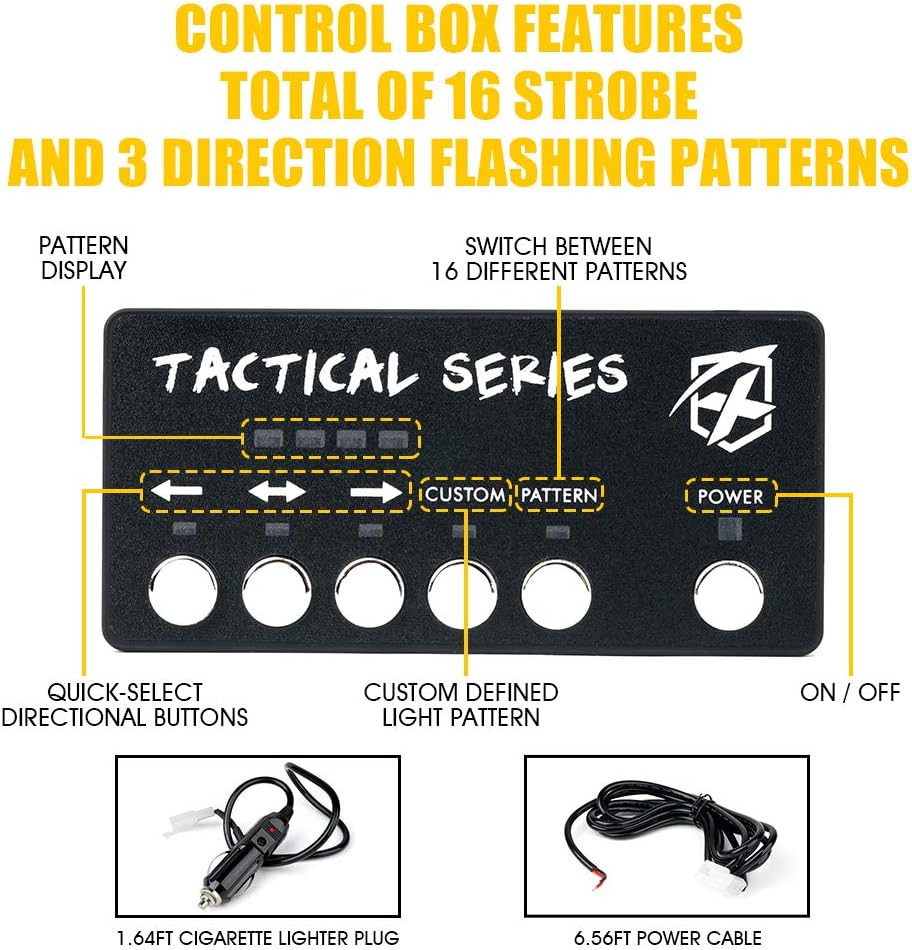
Image: Super bright LED chips for high visibility.
Setup and Installation
- Plan Mounting Locations: Determine the desired locations for each strobe light head on your vehicle. Common locations include the grille, side markers, or other flat surfaces. Ensure the chosen locations do not obstruct vehicle lights or sensors.
- Prepare Mounting Surface: Clean the mounting surface thoroughly. If the surface is not perfectly flat, apply extra clear silicone sealant around the edges of the light head during installation to ensure a waterproof seal.
- Mount Light Heads: Use the provided mounting gaskets and screws to securely attach each LED light head to the vehicle. Ensure a tight fit to prevent vibration and moisture ingress.
- Wire Light Heads to Control Box: Connect the wiring from each light head to the corresponding ports on the control box. Follow the wiring diagram provided with your kit for correct connections. Ensure all connections are secure.
- Connect Control Box Power: The control box is designed to plug directly into any vehicle with a standard 12V cigarette port using the included 1.64ft cigarette lighter plug. For permanent installation or if a longer reach is needed, a 10FT Extension Cable Wire (ASIN: B07XRQJTB2, sold separately) can be used to connect to a 12V power source. Ensure proper fusing for direct wiring.
- Mount Control Box: Secure the control box in an accessible location within the vehicle's cabin, ensuring it does not interfere with driving controls.

Image: Examples of universal application on various vehicles.
Operating Instructions
The Xprite Amber LED Strobe Lights Kit features a user-friendly control box for managing light patterns.
- Power On/Off: Use the POWER button on the control box to turn the strobe lights on or off.
- Change Strobe Patterns: Press the CUSTOM PATTERN button to cycle through the 16 different strobe patterns. The control box has a last pattern memory recall function, so it will remember your last selected pattern when powered off and on.
- Select Directional Patterns: Use the three QUICK-SELECT DIRECTIONAL BUTTONS (left arrow, right arrow, center arrows) to activate the 3 available directional flashing patterns. These patterns are useful for directing traffic.
- Pattern Display: The PATTERN DISPLAY on the control box indicates the currently active strobe or directional pattern.

Image: Control box features for pattern selection.
Maintenance
- Cleaning: Regularly clean the light lenses with a soft cloth and mild soap to ensure maximum light output. Avoid abrasive cleaners that could scratch the lens.
- Inspection: Periodically inspect all wiring and connections for signs of wear, corrosion, or damage. Ensure mounting screws remain tight.
- Seal Integrity: Check the integrity of the seals around the light heads, especially if extra silicone was used during installation, to prevent water intrusion.
- Weather Protection: The lights are designed to be weatherproof, but extreme conditions may require additional inspection.

Image: High quality and weatherproof design.
Troubleshooting
| Problem | Possible Cause | Solution |
|---|---|---|
| Lights do not turn on. | No power to the control box; loose connection; blown fuse. | Check if the cigarette lighter plug is fully inserted. Inspect all wiring connections. Check the vehicle's fuse for the cigarette lighter port. If direct wired, check the inline fuse. |
| One or more lights are not flashing. | Faulty light head; loose connection to the control box. | Inspect the wiring connection for the non-working light at the control box. If connections are secure, the light head may be faulty and require replacement. |
| Patterns do not change. | Control box malfunction; button not registering. | Ensure the button is pressed firmly. If the issue persists, the control box may be faulty. |
| Lights flicker or dim. | Insufficient power; loose wiring; voltage drop. | Check power source and all wiring for secure connections. Ensure the vehicle's electrical system is providing stable 12-24V. |
Warranty and Support
Warranty: This Xprite product comes with a 1-YEAR WARRANTY from the date of purchase, covering manufacturing defects. Please retain your proof of purchase for warranty claims.
Customer Support: For technical assistance, troubleshooting not covered in this manual, or warranty inquiries, please contact Xprite customer service. Our products are designed for functionality and durability, and we are committed to providing support for our customers.
For more information and contact details, please visit the official Xprite store or website.
Note: Xprite is dedicated to offering quality products at reasonable prices, ensuring our products meet high standards for functionality and durability.