1. Introduction
Thank you for choosing the Jansite Portable Cordless Tire Inflator. This device is designed for convenient and efficient inflation of various items, including car tires, bicycle tires, motorcycle tires, sports balls, and inflatable toys. Featuring a powerful 150PSI capacity, a 3000mAh rechargeable battery, a digital LED display, and an automatic shut-off function, this inflator provides a reliable solution for your inflation needs. Please read this manual thoroughly before use to ensure proper operation and safety.

This image displays the main unit of the Jansite Portable Cordless Tire Inflator alongside its flexible inflation hose and a set of interchangeable nozzles for different applications.
2. Safety Instructions
To prevent injury or damage, always observe the following safety precautions:
- Keep the device away from children.
- Do not operate the inflator in wet conditions or near flammable liquids or gases.
- Avoid prolonged continuous operation. Allow the device to cool down after 10-15 minutes of use to prevent overheating.
- Ensure the correct pressure setting for the item being inflated. Over-inflation can cause serious injury or damage.
- Do not point the inflation nozzle at people or animals.
- Use only the provided accessories and charging cable.
- If the device shows signs of damage, do not use it. Contact customer support.
3. Package Contents
Please check the package to ensure all items are present:

This image displays all items included in the product package: the main inflator unit, inflation hose, various nozzles, a carrying pouch, a user manual, and a USB charging cable.
- Jansite Portable Cordless Tire Inflator Unit
- Flexible Inflation Hose
- Presta Valve Adapter
- Ball Needle
- Swim Ring Nozzle
- USB Charging Cable
- Storage Pouch
- User Manual (this document)
4. Product Overview
Familiarize yourself with the components and controls of your inflator:

A detailed diagram illustrating the physical dimensions of the inflator (221mm height, 55mm width) and labeling its control panel components, including the power display, power switch, unit switch, digital LCD display, pressure value adjustment buttons, USB input/output, and internal storage for small nozzles.
- Power Display: Indicates battery level.
- Power Switch: Turns the device on/off.
- Unit Switch: Cycles through pressure units (PSI, BAR, KPA, KG/CM²).
- Digital LCD Display: Shows current and preset pressure.
- Pressure Value Adjustment Buttons (+/-): Increases or decreases target pressure.
- USB Input: For charging the inflator.
- Output for Power Bank: For charging external devices.
- Small Nozzle Storage: Convenient compartment for accessories.
5. Charging the Device
Before first use, fully charge the inflator. The device features a 3000mAh rechargeable battery.
- Connect the provided USB charging cable to the USB input port on the inflator.
- Connect the other end of the USB cable to a suitable USB power adapter (not included) or a computer USB port.
- The power display will indicate the charging status. Once fully charged, the indicator will show a full battery.
- A full charge typically takes several hours.

This image highlights the inflator's separate battery design, emphasizing its long standby time of approximately 120 days, which contributes to extended battery life.
6. Operation
6.1. Basic Inflation Steps
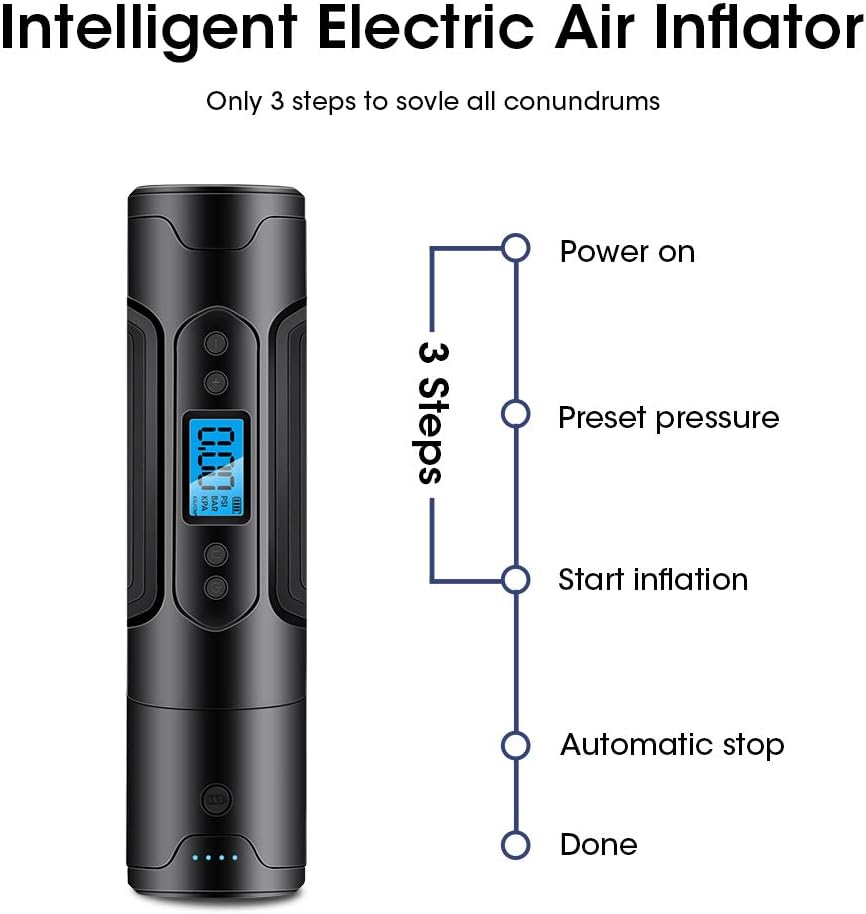
This diagram outlines the simple three-step process for using the inflator: Power on, Preset pressure, and Start inflation, followed by automatic stopping when the target pressure is reached.
- Power On: Press the Power Switch to turn on the device. The digital display will illuminate.
- Select Unit: Press the Unit Switch to cycle through desired pressure units (PSI, BAR, KPA, KG/CM²).
- Set Target Pressure: Use the Pressure Value Adjustment Buttons (+/-) to set your desired target pressure. Refer to the item's manufacturer recommendations for correct pressure.
- Connect Hose: Screw the flexible inflation hose onto the inflator's air outlet. Attach the appropriate nozzle to the hose if needed (e.g., for balls or swim rings).
- Connect to Item: Securely connect the inflation hose/nozzle to the valve stem of the item you wish to inflate.
- Start Inflation: Press the Power Switch again to begin inflation. The display will show the current pressure increasing.
- Automatic Stop: The inflator will automatically stop once the preset target pressure is reached.
- Disconnect: Carefully disconnect the hose from the item and then from the inflator.
6.2. Using the LED Light
The inflator is equipped with an LED light for illumination in low-light conditions.
- To turn on the LED light, press and hold the Power Switch for 3 seconds while the device is on.
- To turn off the LED light, press and hold the Power Switch for 3 seconds again.
6.3. Power Bank Function
The detachable battery can be used as a power bank to charge other USB-powered devices.

An illustration showing the inflator's dual functionality: its detachable battery can act as a power bank to charge mobile devices, and the integrated LED light provides emergency illumination for up to 7 hours at 80 lumens.
- Ensure the inflator's battery is charged.
- Connect your device's USB charging cable to the USB output port on the inflator.
- The inflator will begin charging your device.

An illustration showcasing the key features of the Jansite air pump, including its digital pressure display, integrated power bank functionality, LED light for illumination, and automatic shut-off capability upon reaching the preset pressure.

An image demonstrating the versatility of the inflator, showing its use for inflating car tires, bicycle tires, sports balls, and various swim rings or inflatable toys.
7. Maintenance
- Cleaning: Wipe the device with a soft, dry cloth. Do not use harsh chemicals or abrasive cleaners.
- Storage: Store the inflator in a cool, dry place, away from direct sunlight and extreme temperatures. Ensure the battery is partially charged (around 50%) if storing for extended periods to prolong battery life.
- Battery Care: Charge the battery regularly, even if not in use, to maintain its health. Avoid completely draining the battery frequently.
8. Troubleshooting
| Problem | Possible Cause | Solution |
|---|---|---|
| Device does not turn on. | Battery is depleted. | Charge the device fully. |
| Inflation is slow or not working. | Hose or nozzle not securely connected; incorrect pressure unit selected; item valve is faulty. | Ensure all connections are tight. Verify the pressure unit. Check the item's valve. |
| Device stops prematurely. | Target pressure reached; battery low; overheating. | Check preset pressure. Recharge battery. Allow device to cool down. |
| Battery life is shorter than expected. | Frequent full discharge; old battery; extreme temperatures. | Avoid frequent full discharges. Store in moderate temperatures. Consider battery replacement if very old. |
9. Specifications
| Feature | Detail |
|---|---|
| Brand | Jansite |
| Model Name | f7ff6f26-bf6b-4b89-90da-7a343c3540b0 |
| Max Pressure | 150 PSI |
| Battery Capacity | 3000mAh (Lithium Polymer) |
| Voltage | 3.7 Volts |
| Power Source | Battery Powered |
| Special Features | Automatic Shut-Off, LED Light, Portable, Power Bank Function |
| Item Weight | 1.26 pounds |
| Package Dimensions | 10.63 x 3.7 x 3.43 inches |
| UPC | 759337623894 |
10. Warranty and Support
Jansite is committed to providing quality products. For any questions, technical support, or warranty inquiries regarding your Portable Cordless Tire Inflator, please refer to the contact information provided with your purchase or visit the official Jansite website.
Please retain your proof of purchase for warranty claims.


