
1. Introduction
This manual provides detailed instructions for the installation, operation, and maintenance of your MekedeTech Android Car Radio Stereo. Please read this manual thoroughly before using the product to ensure proper function and safety.
2. Product Overview
2.1 Key Features
- Android 13 Operating System
- 10-inch Touch Screen Display (1024x600 resolution)
- 4 Core Processor, 2GB RAM, 32GB ROM
- Built-in Wireless CarPlay and Android Auto
- Integrated Bluetooth for hands-free calling and wireless music streaming
- Built-in Wi-Fi for internet connectivity
- Support for Steering Wheel Control
- GPS Navigation with support for various map applications
- Rear Camera input support
- Split Screen Display functionality
- Mirror Link for smartphone integration
2.2 Compatibility
This head unit is designed for Honda Civic models from 2006 to 2011. Please verify your vehicle's dashboard size and configuration before installation.
Important Note: This unit does not support vehicles with a factory amplifier or those with a passenger airbag on/off switch in the original radio location.
2.3 What's in the Box
- 1 x 10-inch Car Touch Screen Head Unit
- 1 x External Microphone
- 1 x Power Cable
- 1 x RCA Cable
- 1 x Reversing Cable
- 1 x GPS Antenna
- 1 x USB Cable
- 1 x 4G Antenna (if applicable to specific model variant)

Image: Comparison of a Honda Civic dashboard before and after the installation of the MekedeTech Android Car Radio Stereo.

Image: Front view of the MekedeTech Android Car Radio Stereo, showcasing its 10-inch display and the Android operating system interface.

Image: Rear view of the MekedeTech Android Car Radio Stereo, detailing the various connection ports for power, RCA, USB, and other accessories.

Image: MekedeTech brand logo.
3. Safety Information
- Always ensure the vehicle is turned off and the battery is disconnected before beginning any installation or wiring work.
- Improper installation can lead to electrical shorts, damage to the vehicle's electrical system, or personal injury. If you are unsure about any step, consult a professional installer.
- Do not operate the device in a manner that distracts you from driving. Always prioritize road safety.
- Avoid exposing the unit to extreme temperatures, direct sunlight for prolonged periods, or excessive moisture.
- Use only approved accessories and wiring provided with the unit or recommended by MekedeTech.
4. Installation Guide
Installation of the MekedeTech Android Car Radio Stereo requires basic automotive electrical knowledge. It is recommended to have the unit installed by a qualified professional.
4.1 Pre-Installation Checks
- Verify all components listed in "What's in the Box" are present.
- Ensure the unit is compatible with your Honda Civic model (2006-2011) and does not have a factory amplifier.
- Disconnect the vehicle's negative battery terminal to prevent electrical shorts.
4.2 Wiring Connections
Connect the provided wiring harnesses to the corresponding ports on the head unit and your vehicle's wiring.
- Power Cable: Connect the main power harness to the vehicle's power supply. Ensure proper connection of constant power (B+), accessory power (ACC), and ground (GND).
- RCA Cable: Use for external amplifier connections, subwoofer output, or auxiliary audio/video input/output.
- USB Cable: Connect the USB extension cable for external USB devices, such as flash drives or for wired CarPlay/Android Auto (if applicable).
- GPS Antenna: Mount the GPS antenna in a location with a clear view of the sky, typically on the dashboard or under the windshield, ensuring it is not obstructed by metal.
- External Microphone: Connect the external microphone for improved call quality during hands-free operation. Position it near the driver for optimal voice pickup.
- Reversing Cable: Connect this cable to your vehicle's reverse light signal and the video input for a rear camera. This enables automatic display of the rear camera feed when shifting into reverse.
- 4G Antenna (Optional): If your unit includes 4G connectivity, connect the 4G antenna and mount it appropriately for best signal reception.

Image: Icons representing various GPS navigation applications supported by the head unit.
4.3 Mounting the Head Unit
- Carefully remove the factory radio and dashboard trim.
- Connect all necessary wiring harnesses to the new head unit.
- Secure the MekedeTech head unit into the dashboard opening using the appropriate mounting brackets.
- Reinstall the dashboard trim, ensuring all clips are properly seated.
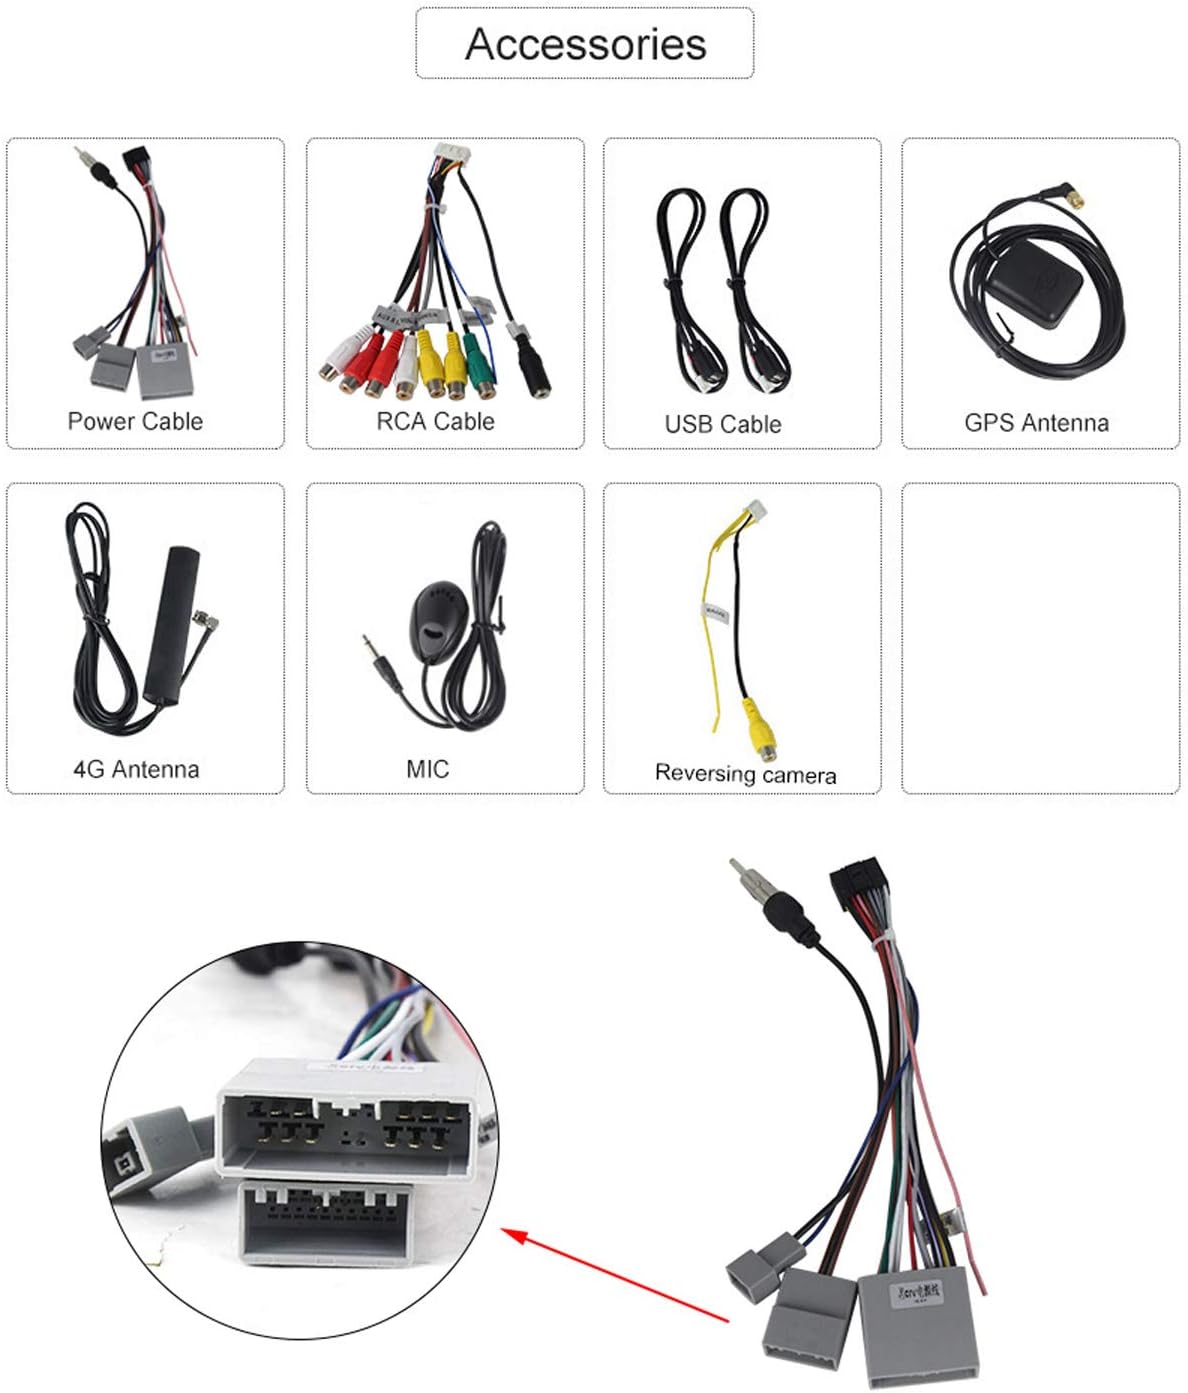
Image: The MekedeTech Android Car Radio Stereo fully installed in the dashboard of a Honda Civic, displaying its large screen and seamless integration.
5. Operating Instructions
5.1 Initial Power On and Setup
- Reconnect the vehicle's negative battery terminal.
- Turn on the vehicle's ignition. The head unit should power on automatically.
- Follow the on-screen prompts for initial setup, including language selection, time zone, and Wi-Fi connection.

Image: Android operating system logo, indicating the system running on the head unit.
5.2 Basic Functions
- Home Screen: Navigate through applications and widgets.
- Volume Control: Adjust volume using the on-screen controls or steering wheel buttons (if configured).
- Radio: Access FM/AM radio stations.
- Music/Video Player: Play media from internal storage, USB devices, or streaming apps.
5.3 Bluetooth Connectivity
Pair your smartphone via Bluetooth for hands-free calling and audio streaming.
- Go to the Bluetooth settings on the head unit.
- Enable Bluetooth on your smartphone and search for available devices.
- Select the head unit's name (e.g., "MekedeTech Car Stereo") from your phone's list and confirm the pairing code.
- Once paired, you can make/receive calls and play music wirelessly.

Image: Bluetooth icon indicating wireless connectivity for audio and calls.
5.4 Wi-Fi Connection
Connect to a Wi-Fi hotspot (e.g., from your smartphone) to access online features, download apps, and browse the internet.
- Navigate to the Wi-Fi settings on the head unit.
- Turn on Wi-Fi and select your desired network from the list.
- Enter the password if prompted and connect.

Image: Wi-Fi connection icon, demonstrating internet access for applications.
5.5 Wireless CarPlay and Android Auto
Connect your iPhone or Android smartphone wirelessly to access navigation, music, messages, and other apps in a car-friendly interface.
- Ensure Bluetooth and Wi-Fi are enabled on both the head unit and your smartphone.
- Open the "CarPlay" or "Android Auto" application on the head unit.
- Follow the on-screen instructions to pair your phone. For Android Auto, you may need to install the Android Auto app on your phone.
5.6 GPS Navigation
Utilize the built-in GPS module and pre-installed or downloaded navigation apps for turn-by-turn directions.
- Ensure the GPS antenna is properly installed and has a clear signal.
- Open your preferred navigation application (e.g., Google Maps, iGO, Navitel).
- Enter your destination and follow the voice and visual prompts.
5.7 Steering Wheel Control (SWC)
Configure your vehicle's steering wheel buttons to control the head unit's functions (e.g., volume, track skip, mode).
- Access the "Steering Wheel Control" settings in the head unit's menu.
- Follow the on-screen instructions to program each button by pressing the button on your steering wheel and then selecting the corresponding function on the screen.

Image: Interface for programming steering wheel controls on the head unit.
5.8 Split Screen Display
Run two applications simultaneously on the screen, such as navigation and music player.
- Open the first application.
- Press and hold the recent apps button (usually a square icon) or drag from the side to activate split-screen mode.
- Select the second application to display on the other half of the screen.

Image: Example of the split-screen feature, displaying navigation and a music player simultaneously.
5.9 Mirror Link
Mirror your smartphone's screen onto the head unit display.
- Open the "Mirror Link" application on the head unit.
- Follow the instructions to connect your smartphone, typically via USB or Wi-Fi.

Image: Illustration of the Mirror Link function, showing a smartphone screen duplicated on the head unit.
5.10 Rear Camera Display
When a compatible rear camera is connected and the vehicle is in reverse, the head unit will automatically display the camera feed.
- Ensure the reversing cable is correctly connected to the vehicle's reverse light signal.
- The camera feed will appear on the screen when reverse gear is engaged.

Image: Rear camera view displayed on the head unit screen, complete with parking guidelines.
6. Maintenance
- Screen Cleaning: Use a soft, lint-free cloth to gently wipe the screen. For stubborn smudges, slightly dampen the cloth with water or a screen-safe cleaner. Avoid harsh chemicals or abrasive materials.
- Software Updates: Periodically check for software updates through the system settings or MekedeTech's official website to ensure optimal performance and access to new features.
- General Care: Keep the unit free from dust and debris. Ensure proper ventilation around the unit to prevent overheating.
7. Troubleshooting
| Problem | Possible Cause | Solution |
|---|---|---|
| No Power | Loose power connection; Blown fuse; Vehicle battery issue. | Check power cable connections. Inspect vehicle fuses and replace if necessary. Verify vehicle battery health. |
| No Sound | Volume too low; Mute activated; Incorrect audio source; Wiring issue; Incompatible with factory amplifier. | Increase volume. Check mute status. Select correct audio source. Verify speaker wiring. Note: Not compatible with factory amplifiers. |
| Bluetooth Not Connecting | Bluetooth off on device/unit; Device not in pairing mode; Interference. | Ensure Bluetooth is enabled on both devices. Put phone in pairing mode. Try restarting both devices. |
| GPS Signal Lost/Inaccurate | GPS antenna obstructed or improperly installed; Software issue. | Ensure GPS antenna has a clear view of the sky. Check antenna connection. Restart the unit. |
| Touch Screen Unresponsive | Temporary software glitch; Screen damage. | Restart the unit. If issue persists, contact customer support. |
| CarPlay/Android Auto Not Working | Incorrect connection method; App not installed/updated; Phone settings. | Ensure correct wireless/wired connection. Update phone apps. Check phone permissions for CarPlay/Android Auto. |
For further assistance, please refer to the support section or contact MekedeTech customer service.
8. Specifications
| Feature | Detail |
|---|---|
| Operating System | Android 13 |
| Processor | 4 Core |
| RAM | 2GB |
| Internal Storage (ROM) | 32GB |
| Display Size | 10 Inches |
| Display Resolution | 1024x600 |
| Connectivity | Bluetooth, USB, Wi-Fi |
| Special Features | Bluetooth, Spotify, Touchscreen, WiFi, Wireless CarPlay, Android Auto |
| Map Type Support | North America, Satellite (via compatible apps) |
| Mounting Type | Dashboard |
| Product Dimensions | 9.84 x 5.71 x 1.18 inches |
| Item Weight | 4.19 pounds |
9. Warranty and Support
MekedeTech products are designed for reliability and performance. For warranty information, please refer to the documentation included with your purchase or visit the official MekedeTech website.
If you encounter any issues not covered in this manual or require technical assistance, please contact MekedeTech customer support through their official channels. When contacting support, please have your product model number (4 Core 2G+32G) and purchase details ready.
