
1. Introduction
This manual provides detailed instructions for the installation, operation, and maintenance of your Autotek AYA-2100.4 Alloy Series Four Channel Car Audio Amplifier. Please read this manual thoroughly before attempting installation or operation to ensure proper function and to prevent damage to the unit or your vehicle's audio system.
The Autotek AYA-2100.4 is a Class A/B four-channel amplifier designed to deliver clear audio output for your car's speakers or subwoofers. It features a compact design, built-in electronic crossovers, and high-level inputs for versatile integration with various audio systems.

Figure 1.1: Front view of the Autotek AYA-2100.4 Alloy Series Four Channel Car Audio Amplifier. This image displays the amplifier's sleek silver casing with the Autotek logo and model number AYA-2100.4 prominently displayed, along with "2100 WATTS" indicating its power rating.
2. Safety Information
Observe the following safety precautions during installation and operation:
- Always disconnect the vehicle's battery negative terminal before starting any electrical work.
- Ensure all wiring is properly routed and secured to prevent damage from sharp edges or moving parts.
- Use appropriate gauge wiring for power and ground connections as specified in this manual to prevent overheating and potential fire hazards.
- Install the amplifier in a location that allows for adequate ventilation to prevent overheating.
- Avoid installing the amplifier in areas exposed to moisture or excessive vibration.
- If you are unsure about any part of the installation process, consult a qualified car audio professional.
- This product contains chemicals known to the State of California to cause cancer and birth defects or other reproductive harm (Proposition 65 warning).
3. Package Contents
Verify that all items are present in the package:
- Autotek AYA-2100.4 Four Channel Car Audio Amplifier
- User Manual
4. Product Features
The Autotek AYA-2100.4 amplifier incorporates several design elements for optimal performance:
- Minimize Distortion: High-quality RCA materials are used to prevent interference and distortion in the signal path. High-level inputs allow integration with OEM audio systems lacking RCA outputs.
- Built for Powerful Sound: Features high-speed Pro-Fi MOSFET components for maximized power efficiency, improved sound quality, and minimal distortion. A high-energy power supply is designed to deliver power with minimal impact on the vehicle's electrical system.
- Class A/B Amplifier: Utilizes Class A/B topology and low-noise preamplifier circuitry to produce high-quality sound and achieve high power levels with minimal distortion.
- Aluminum Heat Sink: Quick Thermal Dispersion (QTD) technology ensures additional mass in the aluminum heat sink, keeping the amplifier cool and maintaining low distortion levels during normal operation.
- High Quality Connections: Nickel-plated brass connections and screw-down terminals provide secure connections and resist corrosion, allowing for easy access with hand tools.
5. Setup and Installation
Proper installation is crucial for the performance and longevity of your amplifier. Follow these guidelines carefully.
5.1 Mounting Location
Choose a mounting location that is dry, well-ventilated, and protected from direct sunlight or excessive heat. Ensure there is sufficient space around the amplifier for air circulation. Common locations include under seats, in the trunk, or behind panels.
5.2 Wiring Connections
Before making any connections, disconnect the negative terminal of your vehicle's battery.

Figure 5.1: Power and Speaker Terminal Side of the Autotek AYA-2100.4 Amplifier. This image shows the power input terminals (GND, REM, +12V), fuse holders (10A x 2), and the bridged and unbridged speaker output terminals for channels CH1, CH2, CH3, and CH4.
5.2.1 Power Connections
- Ground (GND): Connect a heavy-gauge wire (e.g., 8 AWG or larger) from the amplifier's GND terminal to a clean, unpainted metal surface on the vehicle's chassis. Ensure a solid electrical connection.
- Remote (REM): Connect a remote turn-on wire from your head unit's remote output to the amplifier's REM terminal. This wire turns the amplifier on and off with your head unit.
- +12V (Power): Connect a heavy-gauge wire (e.g., 8 AWG or larger) from the amplifier's +12V terminal directly to the positive terminal of your vehicle's battery. Install an in-line fuse holder (rated appropriately for the amplifier's total current draw) within 18 inches of the battery.
5.2.2 Speaker Connections
Connect your speakers to the amplifier's speaker output terminals. The AYA-2100.4 is a four-channel amplifier, allowing for various configurations:
- Four-Channel Stereo: Connect one speaker to each channel (CH1, CH2, CH3, CH4).
- Two-Channel Bridged: Bridge channels (e.g., CH1+CH2 for one speaker, CH3+CH4 for another) for higher power output to two speakers or subwoofers. Refer to the amplifier's terminal markings for correct bridging.
- Three-Channel Mode: Bridge two channels for a subwoofer and use the remaining two channels for stereo speakers.
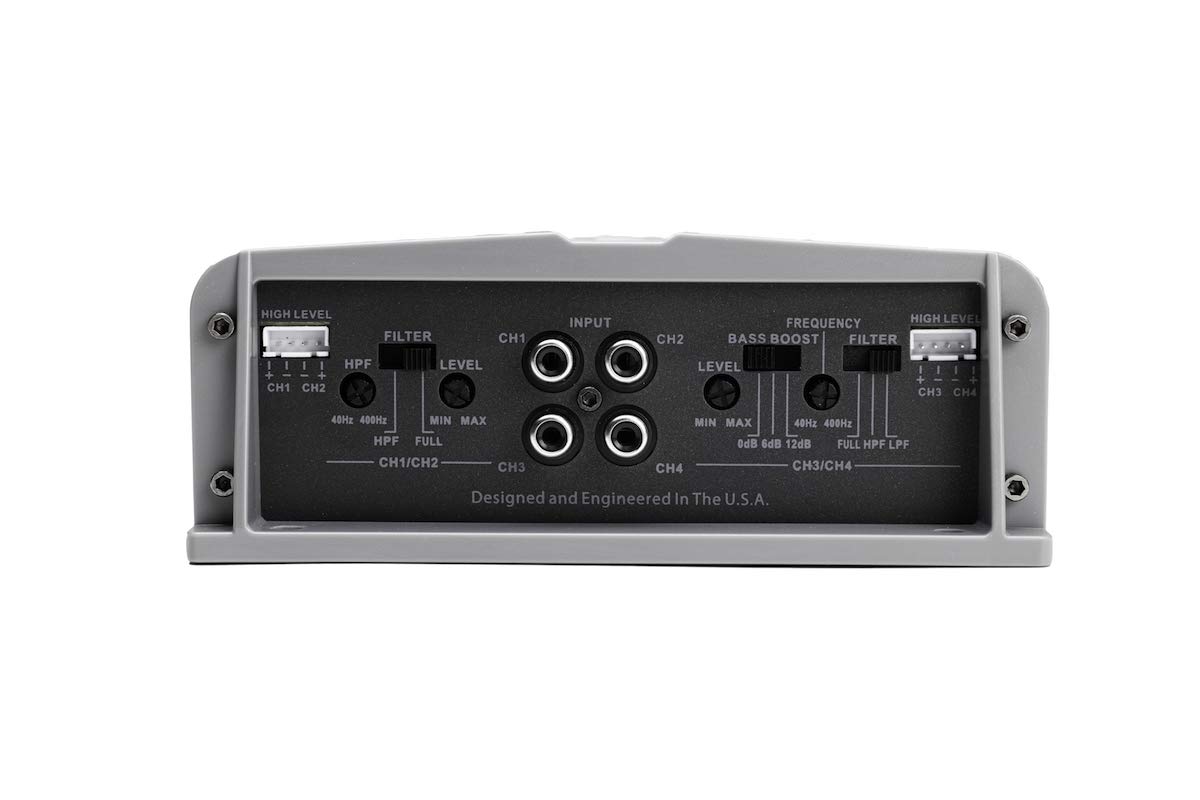
Figure 5.2: Input and Control Panel Side of the Autotek AYA-2100.4 Amplifier. This image details the high-level inputs, RCA inputs (CH1, CH2, CH3, CH4), gain controls (LEVEL), and crossover settings (HPF, LPF, BASS BOOST, FREQUENCY) for precise audio tuning.
5.2.3 Signal Input
- RCA Inputs: Connect RCA cables from your head unit's pre-amp outputs to the amplifier's RCA inputs (CH1, CH2, CH3, CH4).
- High-Level Inputs: If your head unit does not have RCA outputs, use the high-level inputs. Connect the speaker wires from your head unit directly to the amplifier's high-level input terminals.
6. Operating Instructions
Once installed, the amplifier requires proper adjustment for optimal sound quality.
6.1 Initial Power-Up
After all connections are made and verified, reconnect the vehicle's battery negative terminal. Turn on your head unit. The amplifier should power on automatically via the remote turn-on wire, indicated by a power LED.
6.2 Adjusting Controls (Refer to Figure 5.2)
- LEVEL (Gain Control): This control matches the amplifier's input sensitivity to the output level of your head unit. Start with the gain set to minimum. Play a familiar track at about 75% of your head unit's maximum volume. Slowly increase the amplifier's gain until you hear slight distortion, then back off slightly.
- FILTER (Crossover):
- HPF (High Pass Filter): Allows frequencies above the set point to pass through. Useful for speakers to prevent them from playing low bass, which can cause distortion.
- LPF (Low Pass Filter): Allows frequencies below the set point to pass through. Essential for subwoofers to ensure they only reproduce bass frequencies.
- FULL: Disables the crossover, allowing the full frequency range to pass.
- BASS BOOST: This control provides an adjustable bass enhancement at a specific frequency. Use sparingly to avoid distortion and speaker damage.
It is recommended to make small adjustments and listen carefully to the sound output to achieve the desired audio balance.
7. Maintenance
The Autotek AYA-2100.4 amplifier is designed for reliable operation with minimal maintenance. However, periodic checks can help ensure its longevity:
- Cleaning: Keep the amplifier clean and free of dust and debris. Use a soft, dry cloth to wipe the exterior. Do not use harsh chemicals or solvents.
- Connections: Periodically check all power, ground, remote, and speaker connections to ensure they are secure and free from corrosion. Loose connections can lead to poor performance or damage.
- Ventilation: Ensure that the amplifier's heat sink fins are not obstructed, allowing for proper airflow and cooling.
- Fuses: If the amplifier stops working, check the fuses. Replace blown fuses only with fuses of the same type and rating (10A x 2).
8. Troubleshooting
If you experience issues with your amplifier, consult the following table before contacting support:
| Problem | Possible Cause | Solution |
|---|---|---|
| No Power / Amplifier does not turn on |
|
|
| No Sound Output |
|
|
| Distorted Sound |
|
|
| Amplifier Overheating |
|
|
9. Specifications
Key technical specifications for the Autotek AYA-2100.4 Amplifier:
| Feature | Detail |
|---|---|
| Brand | Autotek |
| Model Number | AYA-2100.4 |
| Number of Channels | 4 |
| Amplifier Class | Class A/B |
| Maximum Power Output | 2100 Watts (Peak) |
| Mounting Type | Surface Mount |
| Product Dimensions (L x W x H) | 13 x 10 x 3 inches |
| Item Weight | 5.31 Pounds |
| Date First Available | August 19, 2020 |
| Manufacturer | Maxxsonics USA |
10. Warranty and Support
10.1 Warranty Information
Specific warranty details for the Autotek AYA-2100.4 amplifier are typically provided with the product packaging or can be found on the manufacturer's official website. Please retain your proof of purchase for warranty claims. Warranty coverage usually includes defects in materials and workmanship for a specified period from the date of purchase.
10.2 Customer Support
For technical assistance, troubleshooting beyond this manual, or warranty inquiries, please contact Autotek customer support. Refer to the official Autotek website or product packaging for the most current contact information.