
DDPAI Mola N3 GPS
DDPAI Mola N3 GPS Front Dash Cam Instruction Manual
Model: DDPAI-N3
Brand: DDPAI
1. Introduction
This manual provides detailed instructions for the installation, operation, and maintenance of your DDPAI Mola N3 GPS Front Dash Cam. Please read this manual thoroughly before using the device to ensure proper functionality and safety. The DDPAI Mola N3 is designed to record high-quality video footage of your journeys, offering features such as GPS logging, 24-hour parking mode, and Wi-Fi connectivity for easy access via a smartphone application.
2. What's in the Box
Verify that all items listed below are included in your package:
- Memory Card
- User Manual
- Cable
- Suction Cup

3. Setup
3.1 Physical Installation
For optimal recording, install the dash cam on your vehicle's windshield, ideally behind the rearview mirror to ensure a clear view of the road without obstructing your driving vision. Ensure the lens is clean and free from obstructions.

3.2 App Installation and Wi-Fi Connection
The DDPAI app is essential for managing your dash cam, viewing footage, and adjusting settings. Follow these steps to install the app and connect to your device:
- Download the DDPAI App: Search for "DDPAI" in your smartphone's app store (Google Play Store for Android or Apple App Store for iOS) and install it.
- Ensure necessary permissions are granted for the app, including location and local network access.
- Open the DDPAI App and select your device type (e.g., Screen-less Dash Cam).
- Turn on your phone's Wi-Fi and search for the dash cam's hotspot (usually named DDPAI_XXXX).
- Connect to the dash cam's Wi-Fi network. The default password is 1234567890.
3.3 Hardwire Kit Installation (Optional)
For continuous 24-hour parking monitoring, a hardwire kit is required. This kit connects the dash cam directly to your car's fuse box, providing constant power even when the vehicle is turned off. Ensure the car is stalled before beginning installation.
Key steps for hardwire kit installation:
- Locate your car's fuse box (typically under the dashboard or in the engine bay).
- Remove the fuse box cover.
- Identify the ACC (Accessory) and VCC (Constant Power) fuse positions using a multimeter. ACC provides power only when the car is on, while VCC provides constant power.
- Select the correct fuse tap size for your car's original fuses.
- Insert the original car fuse into the appropriate slot on the fuse tap, and the new DDPAI fuse into the other slot.
- Connect the red wire of the hardwire kit to the ACC fuse slot and the yellow wire to the VCC fuse slot.
- Connect the black ground wire to a metal screw on the car's chassis.
- Route the hardwire cable neatly along the car's interior edges using a wire trim tool to conceal it.
- Connect the Type-C cable end to the dash cam.
4. Operating the Dash Cam
4.1 Automatic Recording
Once powered on, the DDPAI Mola N3 dash cam automatically begins recording. It features loop recording, which means it continuously records and overwrites the oldest footage when the memory card is full. Important footage can be protected from being overwritten.
4.2 G-Sensor and Emergency Recording
The built-in G-Sensor detects sudden movements or collisions. In the event of an impact, the dash cam automatically locks the current video segment, preventing it from being overwritten by loop recording. These emergency videos are stored in a separate folder.
4.3 App Features: Live Preview, Playback, and Download
The DDPAI app allows you to interact with your dash cam in real-time and manage recorded footage:
- Live Preview: View a real-time feed from your dash cam on your smartphone. This is useful for adjusting the camera angle during installation.
- Playback: Access recorded videos directly from the dash cam's memory card. You can scroll through the timeline to find specific moments. G-Sensor triggered events are highlighted on the timeline.
- Download: Select and download video clips to your smartphone's local album. This allows for easy sharing or backup without removing the SD card.
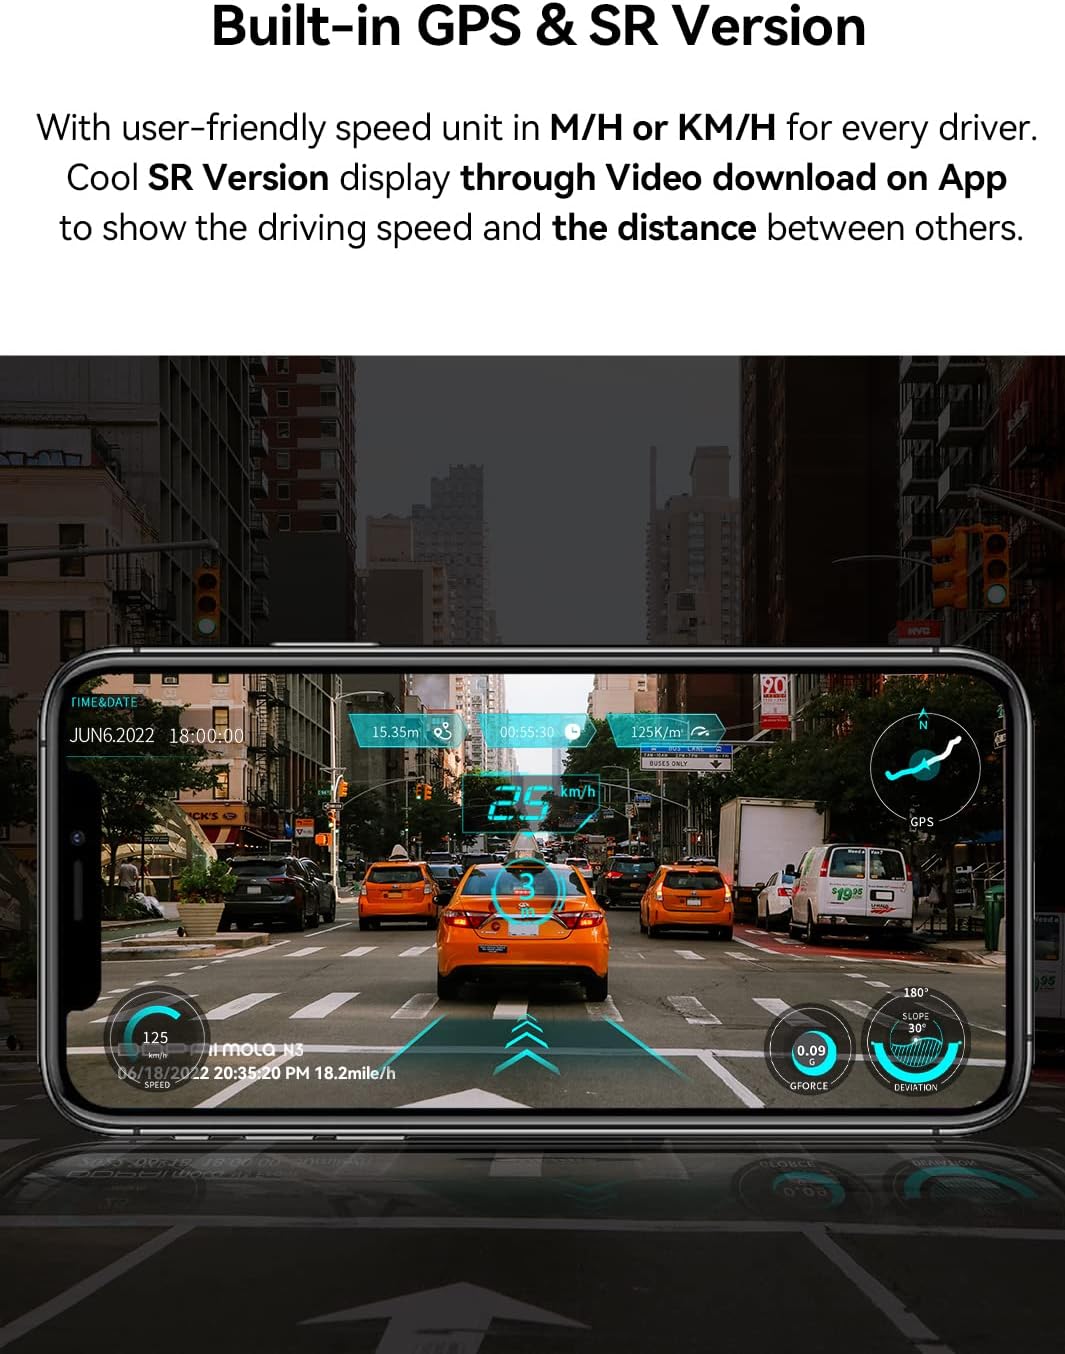
- SR Virtual Vision: For GPS-enabled models, the app can overlay driving data (speed, distance) onto your video footage, creating a more immersive viewing experience.
4.4 App Settings
You can customize various dash cam settings through the DDPAI app:
- Recording Resolution: Adjust the video resolution (e.g., 1600P, 2K). Higher resolutions offer better detail but consume more memory and take longer to download.
- G-Sensor Sensitivity: Modify the sensitivity of the G-Sensor. If the camera is triggering emergency recordings too often or not enough, adjust this setting.
- Parking Monitoring: If using a hardwire kit, configure parking monitoring modes (e.g., time-lapse, collision detection, motion detection).
- Measurement Unit: Change speed display between miles per hour (mph) or kilometers per hour (km/h).
- Firmware Updates: Check for and install the latest firmware updates for improved performance and new features.
5. Maintenance
5.1 SD Card Management
Regularly format the memory card (at least once a month) through the DDPAI app to ensure stable recording performance and prevent data corruption. Use a high-quality Class 10 or U3 microSD card from a reputable brand.
5.2 Cleaning
Wipe the dash cam lens periodically with a soft, lint-free cloth to ensure clear video quality. Avoid using abrasive cleaners or solvents that could damage the lens or casing.
5.3 Firmware Updates
Check for firmware updates regularly via the DDPAI app. Updates often include bug fixes, performance improvements, and new features. Follow the app's instructions carefully during the update process.
6. Troubleshooting
If you encounter issues with your DDPAI Mola N3 Dash Cam, refer to the solutions below. For further assistance, contact DDPAI customer support.
| Problem | Possible Cause | Solution |
|---|---|---|
| Camera does not power on. | Loose power connection, car not started, reversed ACC/VCC wiring (for hardwire kit). | Ensure car starts normally. Check that the power cable is securely plugged into the dash cam and the car's power source. If using a hardwire kit, verify ACC and VCC connections are correct and tightly inserted. |
| Wi-Fi connection fails. | Incorrect password, phone too far from camera, app permissions. | Confirm the Wi-Fi password (default: 1234567890). Keep your phone within 2 meters of the device. Check that the DDPAI app has local network and location permissions enabled. |
| Video footage is blurry or unclear. | Dirty lens, protective film on lens, improper focus. | Clean the camera lens with a soft cloth. Remove any protective film from the lens. Ensure the camera is securely mounted and not vibrating. |
| G-Sensor is too sensitive/not sensitive enough. | G-Sensor sensitivity setting is too high/low. | Adjust the G-Sensor sensitivity in the DDPAI app settings. |
| Parking monitoring not working. | Hardwire kit not installed, incorrect settings, insufficient power. | Ensure the hardwire kit is correctly installed and connected to constant power (VCC). Verify parking monitoring settings in the app. |
| SD card error. | Corrupted card, incompatible card, full card. | Format the SD card via the app. If the issue persists, try a different high-quality Class 10 or U3 microSD card. |
7. Specifications
| Feature | Detail |
|---|---|
| Model Name | N3 |
| Item Weight | 3.6 ounces |
| Product Dimensions | 1.69 x 4.33 x 2.2 inches |
| Item Model Number | DDPAI-N3 |
| Batteries | 1 AAA batteries required (for internal clock/settings retention) |
| Display Type | LCD (via app) |
| Media Playback Supported | Wi-Fi (802.11a/b/g/n) |
| Connectivity Technology | Wi-Fi, USB |
| Special Feature | Night Vision, Built-In GPS |
| Video Capture Resolution | 1600p (2K) |
| Mounting Type | Windshield Mount |
| Manufacturer | DDPAI Technology Limited |
| First Available Date | August 19, 2020 |
8. Warranty and Support
The DDPAI Mola N3 GPS Front Dash Cam comes with a Fully 2-Year Warranty. For warranty claims, technical support, or any inquiries not covered in this manual, please refer to the contact information provided on the official DDPAI website or through the DDPAI app's feedback section.
Related documentsMola N3 GPS


Ask a question about this manual
Ask about setup, troubleshooting, compatibility, parts, safety, or missing instructions. Manuals+ will review the question and use this page’s manual context to help answer it.