
Introduction
Thank you for choosing DAYBETTER 100Ft Smart LED Strip Lights. This manual provides detailed instructions for the installation, operation, and maintenance of your new LED strip lights. Please read this manual thoroughly before use to ensure proper functionality and safety.

Image: DAYBETTER 100Ft Smart LED Strip Lights kit, including two 50ft rolls, a remote, and a power adapter, shown with the product packaging.
Product Overview
What's in the Box
- 2 x 50ft LED Strip Lights (Total 100ft)
- 1 x Remote Control
- 1 x Power Adapter
- 1 x IR Receiver/Controller Box
Key Features
- Smart Control: Control your LED lights via a dedicated smartphone app (Bluetooth connectivity) or the included IR remote.
- Music Sync Mode: Lights change colors and patterns in sync with music, creating dynamic party effects.
- Timer Function: Schedule automatic turn on/off times for convenience and energy saving.
- Easy Installation: Features double adhesives for secure mounting.
- Vibrant Colors: Offers 16 million adjustable colors for personalized ambiance.
- Indoor Use: Designed for indoor decoration.

Image: Illustration showing the dual control methods: traditional remote control and smartphone app control for the LED strip lights.

Image: The built-in microphone feature allows the LED lights to synchronize and dance with music, enhancing the atmosphere.
Setup Instructions
- Clean the Surface: Ensure the surface where you plan to install the LED strips is clean, dry, and smooth. Dust or uneven surfaces can affect adhesion.
- Unroll the Strips: Carefully unroll the two 50ft LED strip lights. Do not power on the lights while they are still rolled up, as this can cause overheating.
- Connect Components:
- Connect the LED strip lights to the IR Receiver/Controller Box. Ensure the arrow on the strip connector aligns with the arrow on the controller box connector.
- Connect the IR Receiver/Controller Box to the Power Adapter.
- Insert the Power Adapter into a standard wall outlet.
- Test Before Adhering: Before peeling off the adhesive backing, plug in the lights and test them to ensure they function correctly. Use the remote or app to check colors and modes.
- Adhere the Strips: Peel off the adhesive backing gradually and firmly press the LED strip onto the desired surface. Apply pressure evenly along the strip.
- Remote Control Activation: If using the remote, pull out the clear plastic battery insulator tab from the remote control before first use.
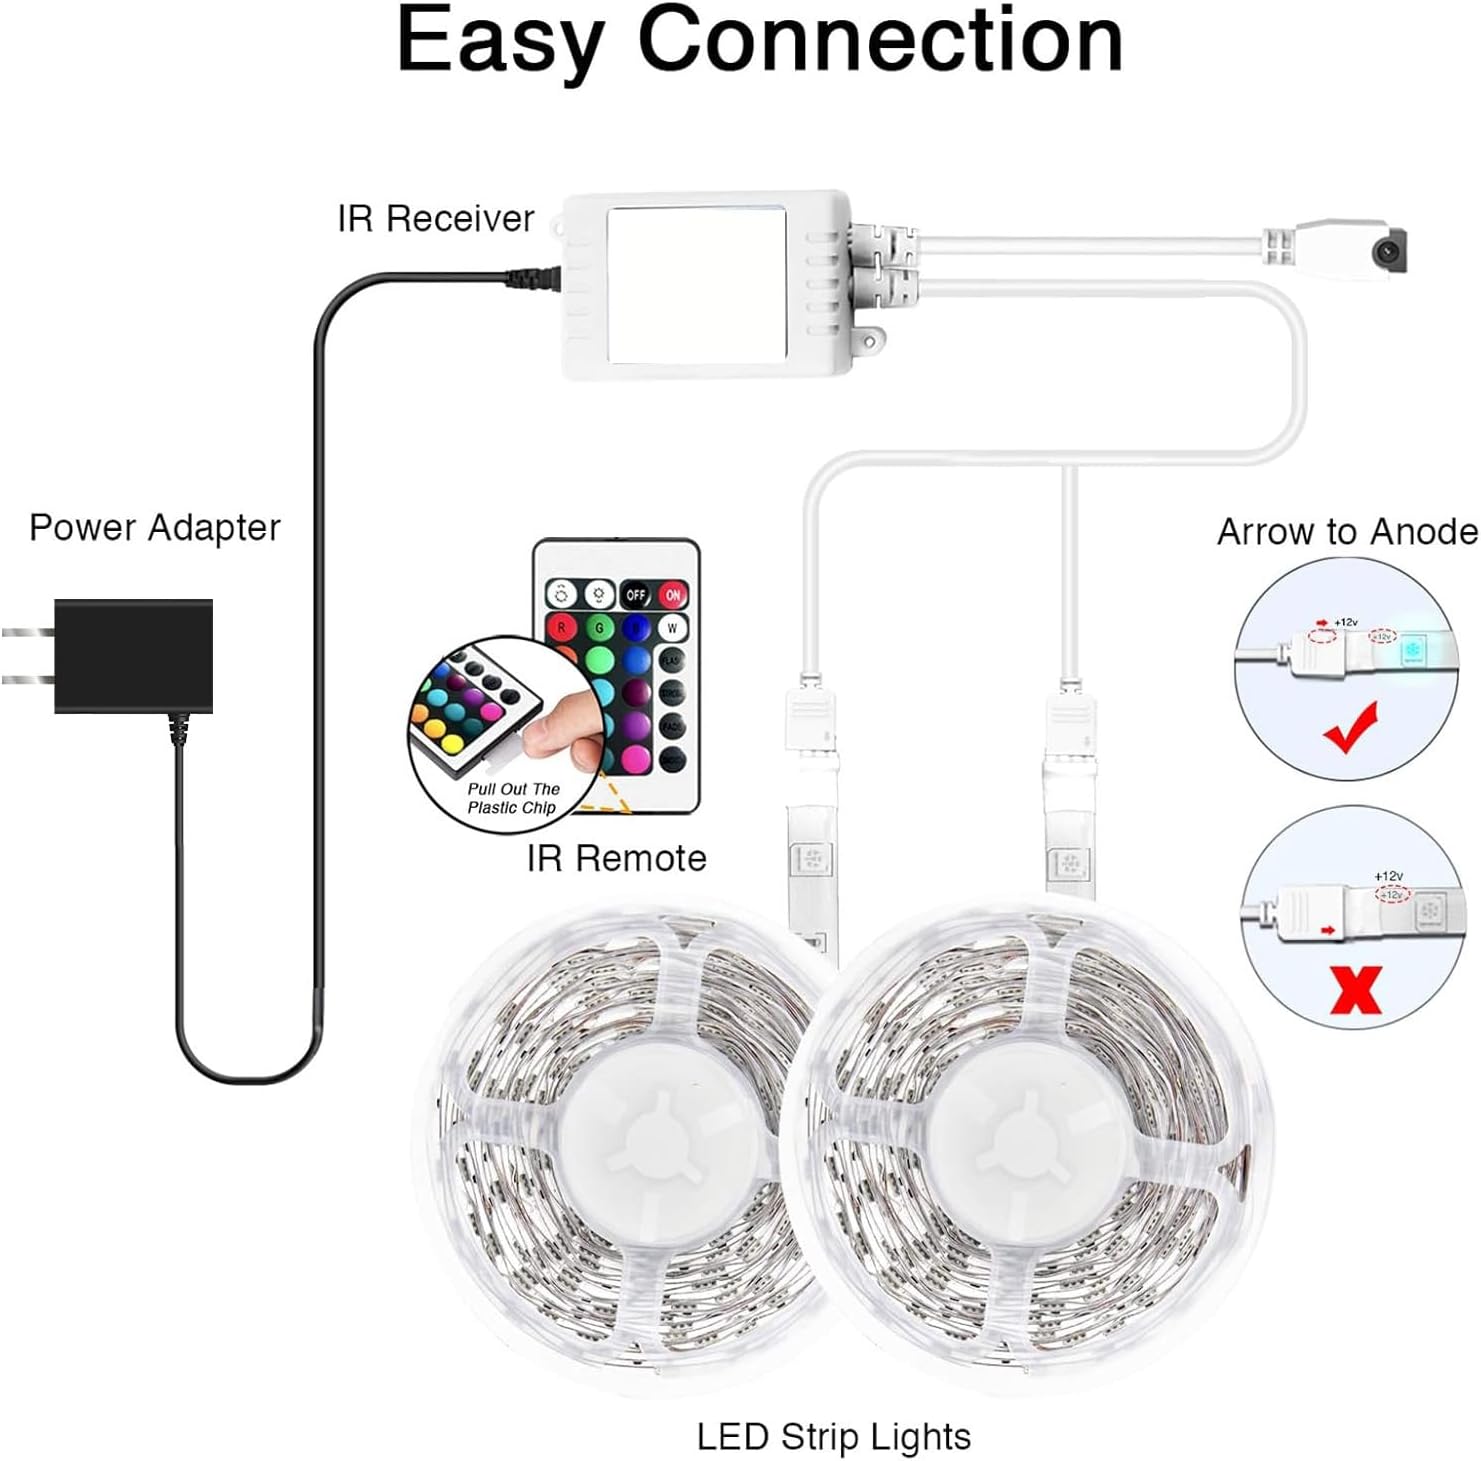
Image: A clear diagram illustrating the connection process for the LED strip lights, showing how to connect the power adapter, IR receiver, and LED strips, with a note on aligning arrows for proper connection.
Operating Instructions
Using the Remote Control
The included IR remote control allows for basic functions:
- ON/OFF: Power the lights on or off.
- Brightness Adjustment: Increase or decrease light intensity.
- Color Selection: Choose from preset static colors.
- Mode Selection: Cycle through various dynamic modes (e.g., flash, fade, jump).
- DIY Colors: Some remotes allow for custom color mixing.
Using the Smartphone App (Bluetooth)
For advanced features, download the recommended app (usually "HappyLighting" or similar, check product packaging for QR code or name) from your app store.
- Download App: Search for the app name (e.g., "HappyLighting") in your device's app store (iOS App Store or Google Play Store).
- Enable Bluetooth: Ensure Bluetooth is enabled on your smartphone.
- Open App: Launch the app. It should automatically detect and connect to your DAYBETTER LED lights.
- App Features:
- Color Wheel: Select from 16 million colors with precise control.
- Brightness/Saturation: Adjust brightness and color saturation.
- Music Mode: Activate the music sync feature. The built-in microphone in the controller box will pick up sound, and the lights will react.
- Timer Function: Set specific times for the lights to turn on or off. This is ideal for waking up or falling asleep.
- DIY Modes: Create and save custom lighting patterns and sequences.
- Scene Modes: Choose from pre-programmed scenes for different moods or occasions.

Image: The app's timing setting feature allows users to schedule automatic turn-on and turn-off times, promoting healthy sleep patterns and gentle wake-ups.
Maintenance
- Cleaning: Gently wipe the LED strips with a dry, soft cloth if they accumulate dust. Do not use liquid cleaners or immerse the strips in water.
- Adhesion: If the strips begin to peel, you can reinforce them with additional adhesive clips or double-sided tape suitable for LED strips.
- Storage: If removing the lights for storage, carefully roll them up and store them in a cool, dry place away from direct sunlight.
- Power Adapter: Ensure the power adapter is kept in a well-ventilated area and not covered, to prevent overheating.
Troubleshooting
| Problem | Possible Cause | Solution |
|---|---|---|
| Lights do not turn on. |
|
|
| Remote control not working. |
|
|
| App cannot connect to lights. |
|
|
| Lights show incorrect colors or only one color. |
|
|
Specifications
| Feature | Detail |
|---|---|
| Model Number | FLSLB5031802RGBDUS |
| Length | 100 Feet (2 x 50ft rolls) |
| LED Type | 5050 RGB LED |
| Color | Multicolor (16 Million Colors) |
| Control Method | App Control (Bluetooth), Remote Control |
| Power Source | DC |
| Voltage | 12 Volts |
| Wattage | 36 Watts |
| Indoor/Outdoor Usage | Indoor Only |
| Water Resistance Level | Not Water Resistant |
| Material | Plastic |
| Item Weight | 7.4 ounces |
| Package Dimensions | 8.27 x 8.15 x 0.67 inches |
Warranty and Support
DAYBETTER products are designed for quality and reliability. For any issues or questions regarding your LED strip lights, please contact DAYBETTER customer support. Please refer to your purchase documentation or the official DAYBETTER website for specific warranty terms and contact information.
Manufacturer: DAYBETTER
Date First Available: August 19, 2020
For further assistance, visit the DAYBETTER Store on Amazon.
Important Safety Information
- Do not cut the LED strips unless specifically marked for cutting. Cutting at unmarked points will damage the circuit.
- Ensure the power supply is disconnected before installation or maintenance.
- Do not expose the LED strips or power adapter to water or high humidity, as they are not water resistant.
- Keep out of reach of children.
- Do not cover the power adapter or controller box during operation to prevent overheating.
- Avoid bending the LED strips sharply, as this can damage the internal circuitry.