
1. Introduction
This manual provides essential instructions for the safe and efficient use of your Epson TM-T20III thermal receipt printer. Please read this manual thoroughly before operating the printer and keep it for future reference. The Epson TM-T20III is designed for reliable, high-speed receipt printing in various business environments.
2. Safety Information
- Always use the power supply provided with the printer.
- Do not expose the printer to water or excessive moisture.
- Avoid placing the printer in direct sunlight or near heat sources.
- Ensure proper ventilation around the printer.
- The paper cutter is sharp; exercise caution when handling or performing maintenance.
- Unplug the printer from the power outlet before cleaning or performing any maintenance.
3. Package Contents
Verify that all items are present in the package:
- Epson TM-T20III Thermal Receipt Printer
- Power Supply Unit
- USB Cable
- Starter Paper Roll (may vary by region)
- Setup Guide (this document)
4. Product Overview
Familiarize yourself with the main components of your Epson TM-T20III printer.
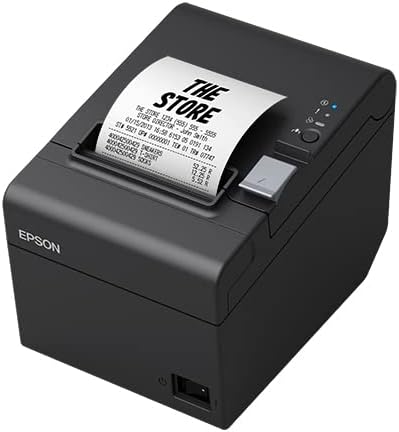
Figure 4.1: Front and Side View of the Epson TM-T20III Printer with Receipt
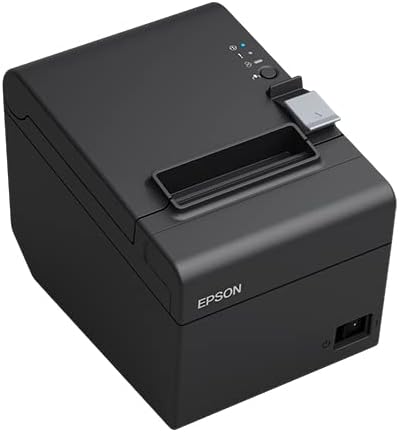
Figure 4.2: Front and Side View of the Epson TM-T20III Printer
Control Panel
- Power Button: Turns the printer on or off.
- Paper Feed Button: Manually feeds paper.
- Status Indicators: LEDs for Power, Error, and Paper Out.
Rear Panel

Figure 4.3: Rear View of the Epson TM-T20III Printer
- Power Port: Connects to the power supply unit.
- USB Port: Connects to a host device via USB cable.
- RS-232 (Serial) Port: Connects to a host device via serial cable.
5. Setup
5.1 Unpacking
- Remove the printer and all accessories from the packaging.
- Retain the packaging for future transport or storage.
5.2 Connecting Power
- Connect the power supply unit to the power port on the rear of the printer.
- Plug the power cord into a standard electrical outlet.
5.3 Connecting to a Host Device
The TM-T20III supports both USB and RS-232 (Serial) connections.
USB Connection
- Ensure the printer is powered off.
- Connect one end of the USB cable to the USB port on the rear of the printer.
- Connect the other end of the USB cable to an available USB port on your computer or host device.
- Power on the printer. Your operating system may automatically detect the printer and prompt for driver installation.
RS-232 (Serial) Connection
- Ensure the printer is powered off.
- Connect one end of the RS-232 serial cable to the serial port on the rear of the printer.
- Connect the other end of the serial cable to an available serial port on your computer or host device.
- Power on the printer. You may need to configure serial port settings on your host device to match the printer's settings (e.g., baud rate, data bits, parity, stop bits).
5.4 Loading Paper
- Push the cover open lever to open the printer's roll paper cover.
- Insert a new roll of thermal paper into the paper compartment, ensuring the paper feeds from the bottom of the roll.
- Pull a small amount of paper past the cutter.
- Close the roll paper cover firmly until it clicks into place. The printer will automatically feed the paper to the correct position.
6. Operation
6.1 Power On/Off
- To turn on: Press the power button. The power indicator will light up.
- To turn off: Press and hold the power button until the power indicator turns off.
6.2 Indicator Lights
- Power (Blue): Indicates the printer is powered on.
- Error (Red): Indicates a printer error (e.g., paper jam, print head error). Refer to the Troubleshooting section.
- Paper Out (Orange): Indicates the paper roll is empty or nearly empty. Replace the paper roll.
6.3 Test Print
To perform a self-test print:
- Ensure the printer is powered off and paper is loaded.
- While holding down the paper feed button, press the power button to turn on the printer.
- Release the paper feed button once the printer starts printing. The printer will print a self-test page, including firmware version and interface settings.
7. Maintenance
7.1 Cleaning the Printer
Regular cleaning helps maintain print quality and extends printer life.
- Exterior: Wipe the printer's exterior with a soft, damp cloth. Do not use abrasive cleaners or solvents.
- Print Head: If print quality degrades, gently wipe the thermal print head with an alcohol swab. Ensure the printer is powered off and cooled down before cleaning.
- Paper Path: Remove any paper dust or debris from the paper path using a soft brush or compressed air.
7.2 Replacing the Paper Roll
Follow these steps when the paper out indicator lights up or when the paper roll is depleted.
- Push the cover open lever to open the printer's roll paper cover.
- Remove the empty paper core.
- Insert a new roll of thermal paper into the paper compartment, ensuring the paper feeds from the bottom of the roll.
- Pull a small amount of paper past the cutter.
- Close the roll paper cover firmly until it clicks into place. The printer will automatically feed the paper to the correct position.
8. Troubleshooting
This section addresses common issues you might encounter.
| Problem | Possible Cause | Solution |
|---|---|---|
| Printer does not power on. | Power cable not connected; power outlet faulty. | Check power cable connections; try a different outlet. |
| No printing occurs. | No paper; data cable disconnected; incorrect driver/settings. | Load paper; check data cable connection; verify driver installation and printer settings. |
| Error indicator is lit. | Paper jam; print head error; cover open. | Open cover, clear any jammed paper; ensure cover is closed properly; power cycle the printer. |
| Poor print quality. | Low quality paper; dirty print head. | Use recommended thermal paper; clean the print head as per Maintenance section. |
9. Specifications
Key technical specifications for the Epson TM-T20III printer.
- Brand: Epson
- Model Name: EPSON TM-T20III
- Model Number: C31CH51011
- Printing Technology: Thermal Line Printing
- Print Speed: 250 mm/second
- Printer Output: Monochrome
- Connectivity Technology: USB, RS-232 (Serial)
- Hardware Interface: USB
- Item Weight: 1.7 Kilograms
- Compatible Devices: PCs, Smartphones (with appropriate drivers/SDKs)
- Color: Glossy Black
10. Warranty and Support
For detailed warranty information, please refer to the warranty card included with your product or visit the official Epson website. For technical support, driver downloads, and further assistance, please visit the Epson Store or the main Epson support portal.


