1. Introduction
The Rademacher Start2Smart Belt Winder Starter Kit provides an easy entry into the world of smart home automation for your roller shutters. This kit includes a RolloTron Basis DuoFern 1200-UW electric radio belt winder and a Smart Home Bridge, allowing you to control your roller shutters conveniently via a free app or voice commands. It is designed for simple installation and integration into existing smart home ecosystems.
2. Safety Instructions
- Read this instruction manual completely before installation and operation.
- Ensure the power supply is disconnected before performing any installation or maintenance work.
- This device is intended for indoor use only. Do not expose it to moisture or extreme temperatures.
- Do not open the device housing. Repairs should only be carried out by qualified personnel.
- Keep packaging materials away from children to prevent suffocation hazards.
- Ensure the roller shutter belt is in good condition and free from damage before installation.
3. Package Contents
Please check that all components are present in your package:
- 1x RolloTron Basis DuoFern 1200-UW Electric Radio Belt Winder
- 1x Smart Home Bridge
- 1x Power Supply Unit for Bridge
- 1x LAN Cable
- Mounting Accessories (screws, wall plugs)
- 1x Cover Cap
- Instruction Manual

Image: Overview of the kit's components, including the RolloTron belt winder, the Bridge, and various accessories.
4. Product Overview
The Rademacher Start2Smart kit consists of two main components: the RolloTron Basis DuoFern 1200-UW belt winder and the Smart Home Bridge. The belt winder replaces your manual roller shutter winder, automating the opening and closing of your shutters. The Bridge acts as the central control unit, connecting the belt winder to your home network and enabling app and voice control.

Image: The Rademacher Start2Smart kit showing the belt winder, the Bridge, and the smartphone app interface for smart home control.
5. Setup
5.1. Installing the RolloTron Belt Winder
- Remove the old manual belt winder: Carefully detach your existing manual belt winder from the wall.
- Feed the belt: Guide the roller shutter belt into the new RolloTron belt winder and secure it according to the instructions.
- Connect the power cable: Connect the power supply cable to the belt winder.
- Mount the winder: Install the RolloTron belt winder into the wall opening.
- Set upper and lower end points: Follow the on-screen or manual instructions to define the upper and lower limits for your roller shutter's movement. This typically involves pressing and holding specific buttons on the device.
5.2. Connecting the Smart Home Bridge
- Connect to router: Use the provided LAN cable to connect the Bridge to your internet router.
- Connect power: Plug the power supply unit into the Bridge and then into a power outlet.
- Wait for LED: Wait until the LED indicator on the Bridge lights up continuously, indicating a stable connection.
5.3. App Setup and Device Registration
- Download the app: Download the "Smart Home HomePilot" app from the Google Play Store or Apple App Store.
- Create an account: Open the app and follow the instructions to create a new user account.
- Add the Bridge: Within the app, add your Smart Home Bridge by following the on-screen prompts.
- Register the belt winder: Put the RolloTron belt winder into registration mode (usually by pressing specific buttons on the device until an LED blinks). Then, use the app to search for and register the device.

Image: Detailed steps for installing the belt winder and connecting the Bridge.

Image: Instructions for app setup and voice assistant integration.
6. Operating Instructions
6.1. Manual Operation
The RolloTron belt winder features physical buttons for direct control. Use the UP button to raise the roller shutter and the DOWN button to lower it. A short press will initiate full movement to the set end point, while a longer press may allow for incremental adjustments or stop the movement.
6.2. App Control
Once the belt winder and Bridge are set up in the "Smart Home HomePilot" app, you can control your roller shutters from anywhere:
- Open/Close: Use the virtual buttons or sliders in the app to fully open or close your roller shutters.
- Positioning: Set the roller shutter to any desired intermediate position.
- Schedules: Create automated schedules for your roller shutters to open and close at specific times, e.g., sunrise/sunset.
- Status Check: View the current status (open/closed percentage) of your roller shutters from the app.
6.3. Voice Control
The Start2Smart system is compatible with Amazon Alexa and Google Assistant. To enable voice control:
- Enable Skill/Service: In your Alexa or Google Home app, search for and enable the Rademacher skill or service.
- Link Account: Link your Rademacher Smart Home account with your voice assistant account.
- Discover Devices: Ask your voice assistant to discover new devices (e.g., "Alexa, discover devices" or "Hey Google, sync my devices").
- Voice Commands: You can now control your roller shutters using voice commands, such as "Alexa, open the living room shutter" or "Hey Google, set the bedroom shutter to 50%".
6.4. Expansion Possibilities
The Rademacher Start2Smart system can be expanded with other DuoFern components and integrated into broader smart home setups:
- Additional DuoFern Devices: Integrate other Rademacher DuoFern products, such as lighting controls, heating thermostats, or additional roller shutter motors.
- Third-Party Integration: Combine Rademacher DuoFern products with other Alexa or Google Assistant compatible devices to create comprehensive smart home routines and scenarios.

Image: Examples of how the Start2Smart system can be expanded to include heating, lighting, and other smart home components.
7. Maintenance
To ensure the longevity and optimal performance of your Rademacher Start2Smart kit, follow these simple maintenance guidelines:
- Cleaning: Clean the surfaces of the belt winder and Bridge with a soft, dry, or slightly damp cloth. Do not use abrasive cleaners, solvents, or harsh chemicals.
- Ventilation: Ensure that the Bridge is placed in a location with adequate ventilation to prevent overheating.
- Belt Inspection: Periodically inspect the roller shutter belt for any signs of wear, fraying, or damage. Replace damaged belts immediately to prevent malfunction.
- Firmware Updates: Regularly check the "Smart Home HomePilot" app for available firmware updates for your Bridge and belt winder to ensure you have the latest features and security enhancements.
8. Troubleshooting
If you encounter issues with your Rademacher Start2Smart kit, refer to the following troubleshooting tips:
- Device Not Responding:
- Check if the belt winder and Bridge are properly connected to their power sources.
- Ensure the Bridge is connected to your router and its LED is lit continuously.
- Restart the Bridge and your router.
- App Connectivity Issues:
- Verify your smartphone has an active internet connection.
- Ensure the "Smart Home HomePilot" app is updated to the latest version.
- Log out and log back into the app.
- Voice Control (Alexa/Google Assistant) Not Working:
- Confirm that the Rademacher skill/service is enabled in your voice assistant app.
- Ensure your Rademacher account is correctly linked.
- Ask your voice assistant to "discover devices" or "sync my devices" again.
- Note: Some users have reported regional limitations or issues with Alexa connectivity. Check Rademacher's official support channels for the latest compatibility information in your region.
- Roller Shutter Not Moving or Incorrectly Positioned:
- Check for any physical obstructions preventing the roller shutter from moving.
- Verify that the belt is correctly installed and not slipping.
- Recalibrate the upper and lower end points of the belt winder as described in the setup section.
9. Specifications
Detailed technical specifications for the Rademacher Start2Smart Kit:
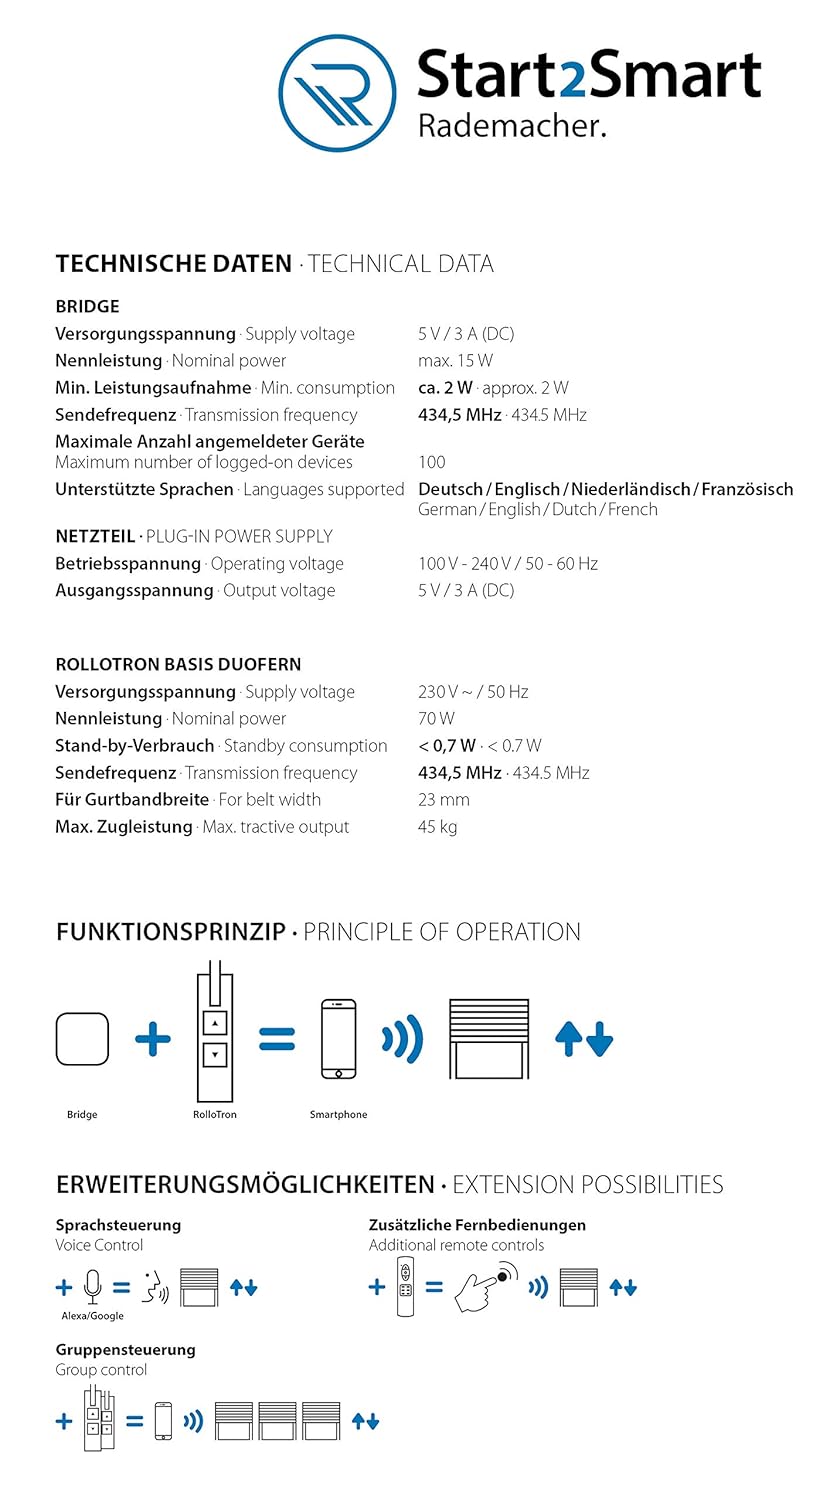
Image: Technical data and principle of operation for the Bridge and RolloTron.
Image: Dimensions of the RolloTron belt winder and a list of included components.
| Feature | Detail |
|---|---|
| Brand | RADEMACHER |
| Model Number | Start2Smart-Kit Gurtwickler |
| Manufacturer | Rademacher Geräte-Elektronik GmbH |
| ASIN | B08F54YRQM |
| Product Dimensions | 23.5 x 15.7 x 19 cm |
| Product Weight | 500 g |
| Color | White |
| Material | Plastic |
| Mounting Type | Surface Mount |
| Switch Type | Smart |
| Power Source | Mains Powered (Plug In) |
| Feature | Detail |
|---|---|
| Supply Voltage | 5 V / 3 A (DC) |
| Nominal Power | max. 15 W |
| Min. Power Consumption | approx. 2 W |
| Transmission Frequency | 434.5 MHz |
| Max. Number of Registered Devices | 100 |
| Supported Languages | German, English, Dutch, French |
| Feature | Detail |
|---|---|
| Supply Voltage | 230 V ~ / 50 Hz |
| Nominal Power | 70 W |
| Standby Consumption | < 0.7 W |
| Transmission Frequency | 434.5 MHz |
| For Belt Width | 23 mm |
| Max. Tractile Output | 45 kg |
10. Warranty and Support
For information regarding warranty coverage, terms, and conditions, please refer to the official Rademacher website or the warranty card included with your product. For technical support, troubleshooting assistance beyond this manual, or spare parts, please contact Rademacher customer service directly. Contact details can typically be found on the manufacturer's website or in the product packaging.
Online Resources:
- Visit the official RADEMACHER website for FAQs, updated manuals, and support information.
- Check the "Smart Home HomePilot" app for the latest firmware updates and in-app support features.


