
Introduction
Welcome to your Acer Nitro XV272 Xbmiiprx 27-inch Full HD IPS Gaming Monitor. This manual provides comprehensive instructions for the proper setup, operation, and maintenance of your monitor. To ensure optimal performance and longevity, please read this manual thoroughly before using your monitor and retain it for future reference.
Package Contents
Before proceeding with the setup, please verify that all items listed below are present in your package. If any items are missing or appear damaged, contact your retailer or Acer customer support immediately.
- Acer Nitro XV272 Xbmiiprx Monitor
- Monitor Stand (Base and Neck)
- Power Cable
- HDMI Cable
- User Manual (this document)
Setup
1. Monitor Assembly
Carefully remove the monitor and its components from the packaging. Place the monitor face down on a soft, clean surface to prevent scratches.
- Attach the stand neck to the back of the monitor until it clicks into place or is secured with screws (refer to specific instructions in the quick start guide if provided).
- Connect the stand base to the stand neck, ensuring it is firmly attached.
- Carefully lift the assembled monitor and place it on a stable, flat surface.

Figure 1: Front view of the Acer Nitro XV272 Xbmiiprx monitor fully assembled on its stand.
2. Connecting Your Monitor
Ensure your computer and monitor are powered off before making any connections.
- Power Connection: Connect the power cable to the monitor's power input and then to a power outlet.
- Video Connection:
- For optimal performance, use the included HDMI cable to connect your computer's HDMI output to one of the monitor's HDMI 2.0 ports.
- Alternatively, connect a DisplayPort cable (not included) from your computer's DisplayPort output to the monitor's DisplayPort 1.2.
- USB Connections: The monitor features 4 USB 3.0 ports. Connect a USB upstream cable (not included) from your computer to the monitor's USB upstream port to enable the monitor's USB hub functionality.
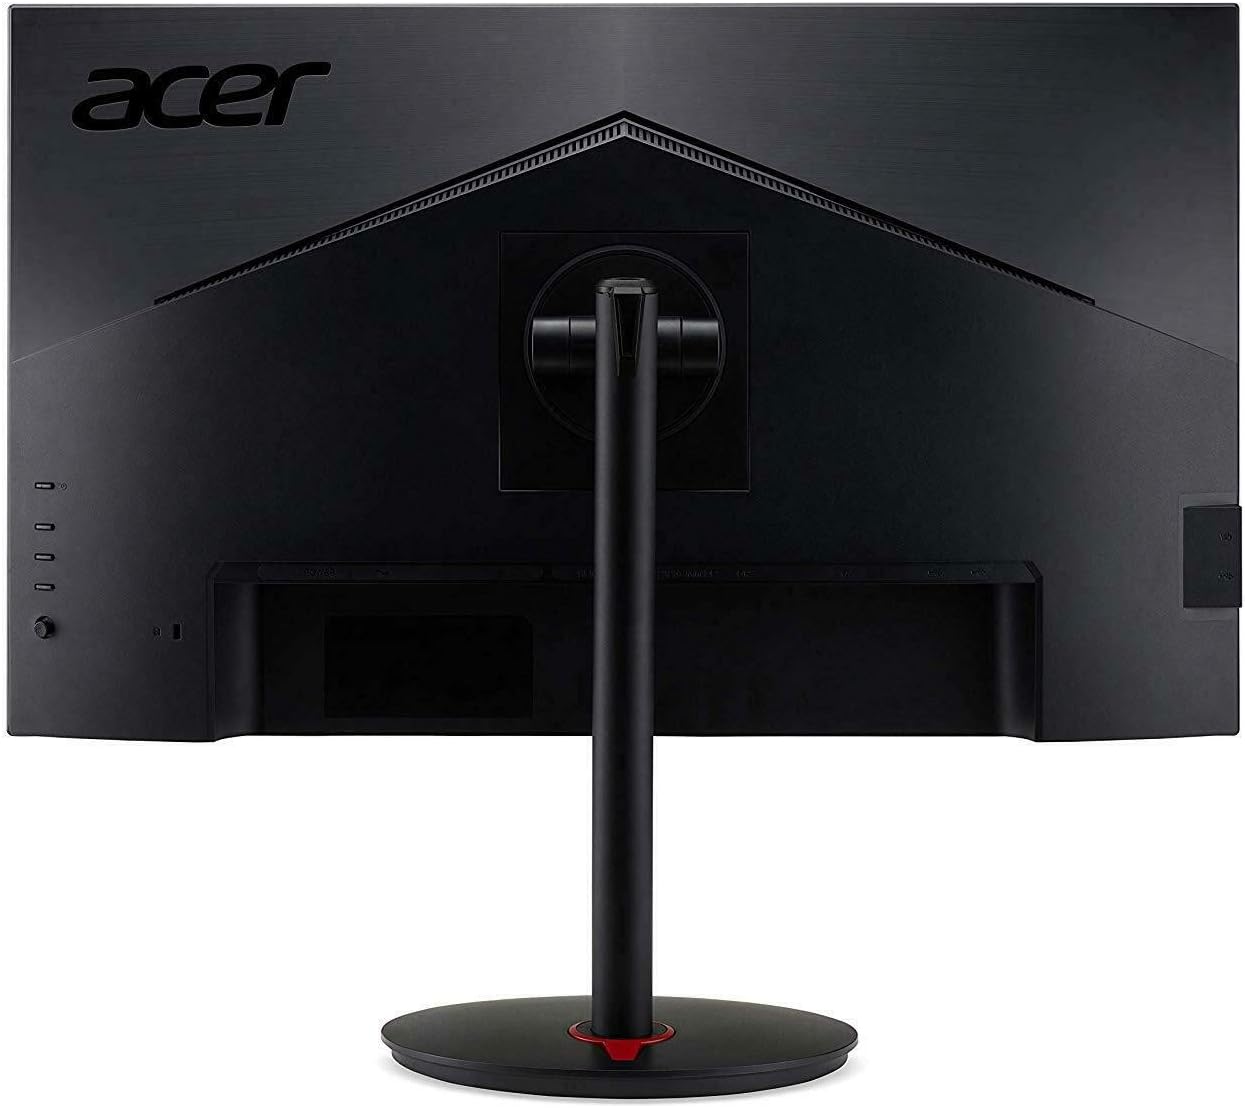
Figure 2: Rear view illustrating the monitor's input and output ports.

Figure 3: Side view highlighting the accessible USB 3.0 ports.
Operating Instructions
1. Power On/Off
Press the power button, typically located on the bottom right or rear of the monitor, to turn the monitor on or off. The power indicator light will illuminate when the monitor is active.
2. On-Screen Display (OSD) Navigation
The monitor's settings can be adjusted using the On-Screen Display (OSD) menu. Access the OSD by pressing the OSD button or navigating with the joystick (if present) usually located on the back or bottom of the monitor.
- Use the navigation controls (joystick or buttons) to move through menu options.
- Press the select button to confirm a selection or enter a sub-menu.
- Use the back/exit button to return to the previous menu or exit the OSD.
3. Display Settings
Adjust various display parameters through the OSD menu to optimize your viewing experience.
- Brightness/Contrast: Adjust the overall luminance and contrast ratio.
- Color Settings: Modify color temperature, gamma, and individual RGB levels.
- Input Select: Manually switch between HDMI and DisplayPort inputs.
- Refresh Rate: Ensure your operating system and graphics card settings are configured to utilize the monitor's 240Hz refresh rate for smooth motion.
- HDR (High Dynamic Range): Enable or disable DisplayHDR 400 for enhanced contrast and color depth with compatible content.
4. Audio Settings
The monitor includes two 2-watt speakers. Adjust the volume through the OSD menu or your computer's audio settings.
5. AMD Radeon FreeSync Technology
This monitor supports AMD Radeon FreeSync Technology, which synchronizes the monitor's refresh rate with your AMD graphics card's frame rate. This eliminates screen tearing and reduces stuttering for a smoother gaming experience.
- Ensure your computer has a compatible AMD graphics card and the latest drivers installed.
- Enable FreeSync in your graphics card's control panel software.
- Verify that FreeSync is enabled in the monitor's OSD menu (if applicable).
Maintenance
Proper maintenance ensures the longevity and optimal performance of your monitor.
- Cleaning the Screen: Gently wipe the screen with a soft, lint-free cloth. For stubborn marks, lightly dampen the cloth with water or a non-ammonia, non-alcohol based screen cleaner. Never spray cleaner directly onto the screen.
- Cleaning the Casing: Use a soft, dry cloth to wipe the monitor casing. Avoid abrasive cleaners or solvents.
- Storage: If storing the monitor for an extended period, power it off, disconnect all cables, and store it in a cool, dry place, preferably in its original packaging.
Troubleshooting
If you encounter issues with your monitor, refer to the following common troubleshooting steps.
- No Power:
- Ensure the power cable is securely connected to both the monitor and a working power outlet.
- Check if the power outlet is functional by plugging in another device.
- No Signal:
- Verify that the video cable (HDMI or DisplayPort) is securely connected to both the monitor and your computer.
- Ensure the correct input source is selected in the monitor's OSD menu.
- Check if your computer is powered on and not in sleep mode.
- Image Distortion or Incorrect Resolution:
- Adjust the resolution settings in your computer's display settings to 1920 x 1080.
- Ensure your graphics card drivers are up to date.
- Dead Pixels:
A small number of non-functioning pixels is inherent in LCD technology. Acer's pixel policy defines the acceptable tolerance for dead or stuck pixels. Refer to Acer's official website or warranty documentation for specific details.
- No Audio from Speakers:
- Check the volume settings in the monitor's OSD and your computer's operating system.
- Ensure the audio source is correctly routed to the monitor (e.g., via HDMI or DisplayPort).
Specifications
| Feature | Specification |
|---|---|
| Screen Size | 27 Inches |
| Resolution | Full HD (1920 x 1080) |
| Panel Type | IPS |
| Refresh Rate | 240Hz |
| Response Time | 1ms (G to G) - Up to 0.1ms (G to G) |
| Brightness | VESA Certified DisplayHDR 400 |
| Color Gamut | 99% sRGB |
| Video Inputs | 2 x HDMI 2.0, 1 x DisplayPort 1.2 |
| USB Ports | 4 x USB 3.0 (requires upstream connection) |
| Speakers | 2 x 2 Watt Speakers |
| Dimensions (LxWxH) | 24.2 x 9.2 x 20.5 inches |
| Weight | 17.01 pounds |
Warranty and Support
Your Acer Nitro XV272 Xbmiiprx monitor is covered by a limited warranty. For detailed information regarding warranty terms, conditions, and registration, please refer to the warranty card included with your product or visit the official Acer support website.
For technical assistance, driver downloads, or further support, please visit the Acer support portal: www.acer.com/support.