1. Introduction
Thank you for choosing the Philips Alarm Clock Radio. This device is designed to provide a reliable alarm function, sleep timer, and clear radio reception, ensuring a peaceful wake-up and enjoyable listening experience. This manual provides essential information for setting up, operating, and maintaining your new alarm clock radio.

Image: Philips Alarm Clock Radio, angled view, showing the LED display and control buttons.
2. Safety Information
Please read all safety warnings and instructions carefully before using this product. Keep this manual for future reference.
- Do not expose the device to dripping or splashing.
- Do not place any sources of danger on the device (e.g., liquid filled objects, lighted candles).
- Ensure adequate ventilation around the device.
- Only use attachments/accessories specified by the manufacturer.
- Do not remove the casing of this device.
- Do not place the device on other electrical equipment.
- The device shall not be exposed to excessive heat such as sunshine, fire or the like.
- Risk of explosion if battery is replaced by an incorrect type.
3. Package Contents
Verify that all items are present in your package:
- Philips Alarm Clock Radio (Model TAR3205/12)
- Power Adapter
- User Manual (this document)
4. Product Overview
Familiarize yourself with the various parts and controls of your Philips Alarm Clock Radio.
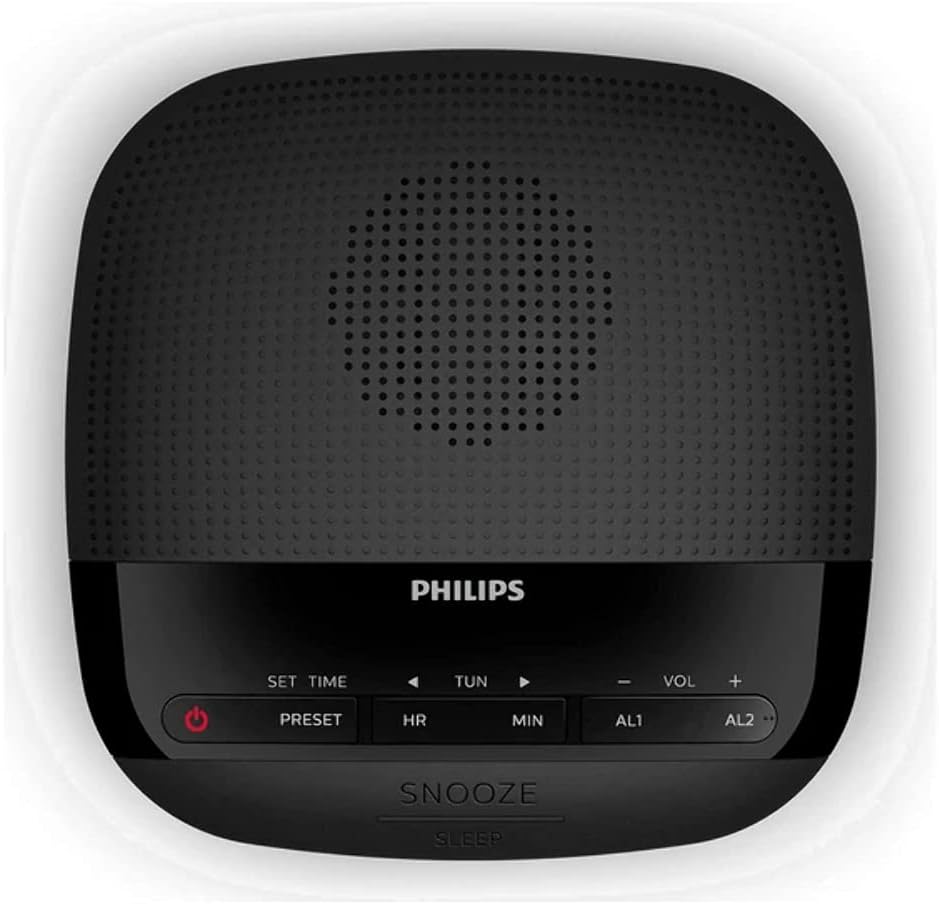
Image: Top view of the Philips Alarm Clock Radio, highlighting the control buttons for setting time, tuning, volume, and alarms.
Front Panel:
- LED Display: Shows time, alarm status, and radio frequency.

Image: Front view of the Philips Alarm Clock Radio, clearly showing the green LED display with time and alarm indicators.
Top Panel Controls:
- Power Button: Turns the unit on/off.
- SET TIME / PRESET Button: Used to set the time and save/recall radio presets.
- HR (Hour) Button: Adjusts the hour during time/alarm setting.
- MIN (Minute) Button: Adjusts the minute during time/alarm setting.
- TUN (Tune) Buttons (Left/Right Arrows): Tunes radio frequency or navigates menus.
- VOL (Volume) Buttons (+/-): Adjusts the volume level.
- AL1 Button: Sets or activates Alarm 1.
- AL2 Button: Sets or activates Alarm 2.
- SNOOZE / SLEEP Button: Activates snooze during an alarm or sets the sleep timer.
Rear Panel:
- FM Antenna: For radio reception.
- DC IN Jack: For connecting the power adapter.
- Battery Compartment: For battery backup (1 Lithium Ion battery required, not included).
5. Setup
5.1 Power Connection
- Plug the power adapter into the DC IN jack on the back of the alarm clock radio.
- Plug the other end of the power adapter into a wall outlet.
- The unit will power on and the display will light up.
5.2 Battery Backup Installation
The alarm clock radio requires 1 Lithium Ion battery (not included) for battery backup. This ensures that time and alarm settings are retained during a power outage.
- Open the battery compartment cover on the bottom of the unit.
- Insert 1 Lithium Ion battery, observing the correct polarity (+/-) as indicated inside the compartment.
- Close the battery compartment cover securely.
5.3 FM Antenna Setup
For optimal FM radio reception, fully extend the wire antenna located at the back of the unit. Adjust its position for the best signal.
6. Operating Instructions
6.1 Setting the Time
- In standby mode, press and hold the SET TIME button until the hour digits start flashing.
- Press the HR button repeatedly to set the hour.
- Press the MIN button repeatedly to set the minute.
- Press the SET TIME button again to confirm and exit time setting mode.
6.2 Setting Alarms (AL1 and AL2)
The alarm clock radio features two independent alarms, AL1 and AL2.
- Press and hold the AL1 or AL2 button until the hour digits of the alarm time start flashing.
- Press the HR button repeatedly to set the alarm hour.
- Press the MIN button repeatedly to set the alarm minute.
- Press the AL1 or AL2 button again to select the alarm source (Buzzer or FM Radio). The corresponding indicator (bell icon for buzzer, FM icon for radio) will light up.
- Press the AL1 or AL2 button one more time to confirm and exit alarm setting mode.
To activate or deactivate an alarm, briefly press the corresponding AL1 or AL2 button. The alarm indicator will light up when active and turn off when deactivated.
6.3 Snooze Function
When an alarm sounds, press the SNOOZE / SLEEP button to temporarily silence the alarm for approximately 9 minutes. The alarm will sound again after the snooze period.
6.4 Sleep Timer
The sleep timer allows you to fall asleep to the radio, which will automatically turn off after a set period.
- While the radio is playing, press the SNOOZE / SLEEP button repeatedly to cycle through the sleep timer options (e.g., 120, 90, 60, 30, 15 minutes, OFF).
- The display will show the selected sleep time. The radio will turn off automatically after the chosen duration.
6.5 Radio Operation (FM)
Tuning to a Station:
- Press the Power button to turn on the radio.
- Press the TUN (left/right arrow) buttons briefly to fine-tune the frequency.
- Press and hold the TUN (left/right arrow) buttons to automatically scan for the next available station.
Saving and Recalling Presets:
- Tune to the desired FM station.
- Press and hold the PRESET button until a preset number flashes on the display.
- Use the TUN (left/right arrow) buttons to select the desired preset number (P01-P10).
- Press the PRESET button again to confirm and save the station.
- To recall a saved preset, briefly press the PRESET button repeatedly to cycle through your saved stations.
6.6 Volume Control
While the radio is playing, press the VOL + button to increase the volume or the VOL - button to decrease the volume.
7. Maintenance
7.1 Cleaning
- Disconnect the power adapter before cleaning.
- Use a soft, damp cloth to clean the exterior of the unit.
- Do not use abrasive cleaners, alcohol, or benzene, as these can damage the surface.
7.2 Battery Replacement (Backup)
If the time and alarm settings are not retained during a power outage, the backup battery may need to be replaced. Follow the instructions in section 5.2 to replace the Lithium Ion battery.
8. Troubleshooting
If you encounter issues with your Philips Alarm Clock Radio, refer to the following common problems and solutions:
| Problem | Solution |
|---|---|
| No power / Display off. | Ensure the power adapter is securely plugged into both the unit and a working wall outlet. Check if the wall outlet has power. |
| Poor radio reception. | Fully extend and reposition the FM wire antenna. Move the unit away from other electronic devices that may cause interference. |
| Alarm does not sound. | Ensure the alarm is activated (indicator light on). Check if the alarm time is set correctly. Verify the volume is not set to minimum if using radio alarm. |
| Time/settings lost after power outage. | The backup battery may be depleted or not installed. Install or replace the 1 Lithium Ion backup battery. |
| Buttons unresponsive. | Unplug the unit from the power outlet for a few minutes, then plug it back in to reset. |
9. Specifications
| Feature | Detail |
|---|---|
| Brand | Philips Audio |
| Model Number | TAR3205/12 |
| Display Type | Digital LED |
| Power Source | AC Power (Adapter included), Battery Powered (for backup) |
| Battery Type (Backup) | 1 Lithium Ion battery (not included) |
| Product Dimensions (W x H) | 5.16" x 2.13" |
| Item Weight | 0.2 Kilograms (7.1 ounces) |
| Radio Bands | FM |
| Alarms | Dual Alarms (Buzzer or Radio) |
| Special Features | Snooze, Sleep Timer, Battery Backup |
10. Warranty and Support
For warranty information and technical support, please refer to the warranty card included with your product or visit the official Philips Audio support website. You may also contact Philips customer service directly for assistance.
Online Support: www.philips.com/support
Please have your model number (TAR3205/12) and purchase details ready when contacting support.