1. Introduction
Thank you for purchasing the Shark EVOPOWER SYSTEM CS200J Cordless Stick Vacuum Cleaner. This innovative cleaning system is designed to provide powerful and convenient cleaning for your home. Its unique flooring head ensures thorough dirt removal, and the versatile design allows for easy conversion between stick and handheld modes. Please read this manual carefully before using your new vacuum cleaner to ensure safe and optimal performance.
2. Important Safety Instructions
When using an electrical appliance, basic precautions should always be observed, including the following:
- Read all instructions before using this vacuum cleaner.
- Do not use outdoors or on wet surfaces.
- Do not allow to be used as a toy. Close attention is necessary when used by or near children.
- Use only as described in this manual. Use only manufacturer's recommended attachments.
- Do not handle plug or vacuum cleaner with wet hands.
- Do not put any object into openings. Do not use with any opening blocked; keep free of dust, lint, hair, and anything that may reduce airflow.
- Keep hair, loose clothing, fingers, and all parts of body away from openings and moving parts.
- Turn off all controls before unplugging.
- Use extra care when cleaning on stairs.
- Do not use to pick up flammable or combustible liquids, such as gasoline, or use in areas where they may be present.
- Do not pick up anything that is burning or smoking, such as cigarettes, matches, or hot ashes.
- Do not use without dust cup and/or filters in place.
3. Package Contents
Your Shark EVOPOWER SYSTEM CS200J package includes the following components:
- Main Vacuum Unit (Stick and Handheld)
- Lithium-ion Battery
- Charging Dock with Accessory Stand
- Crevice Tool with Brush
- Multi-Tool
- Upholstery Tool

Image: The Shark EVOPOWER SYSTEM CS200J vacuum cleaner standing on its charging dock, with various accessories neatly stored on the integrated accessory stand.
4. Setup
4.1 Assembly
- Unpack all components from the packaging.
- Insert the handheld vacuum into the wand until it clicks securely into place.
- Attach the floor nozzle to the bottom of the wand until it clicks securely.
- Place the assembled vacuum onto the charging dock.
4.2 Charging the Battery
Before first use, fully charge the battery. The battery can be charged while attached to the vacuum on the charging dock, or separately if removed.
- Connect the charging adapter to the charging dock and plug it into a wall outlet.
- Place the vacuum onto the charging dock. The indicator lights on the handheld unit will illuminate to show charging status.
- A full charge typically takes approximately 3.5 hours.
5. Operating Instructions
5.1 Using as a Stick Vacuum
The EVOPOWER SYSTEM CS200J is designed for effortless cleaning of various floor types, especially hard floors, with its specialized flooring head.

Image: A person operating the Shark EVOPOWER SYSTEM CS200J in stick vacuum mode on a polished wooden floor, demonstrating its ease of use.
- To start, press the power button located on the handle.
- The lightweight design and swivel steering allow for smooth maneuverability around furniture and into tight spaces.
- For increased suction on stubborn dirt, press the Boost button on the handle.
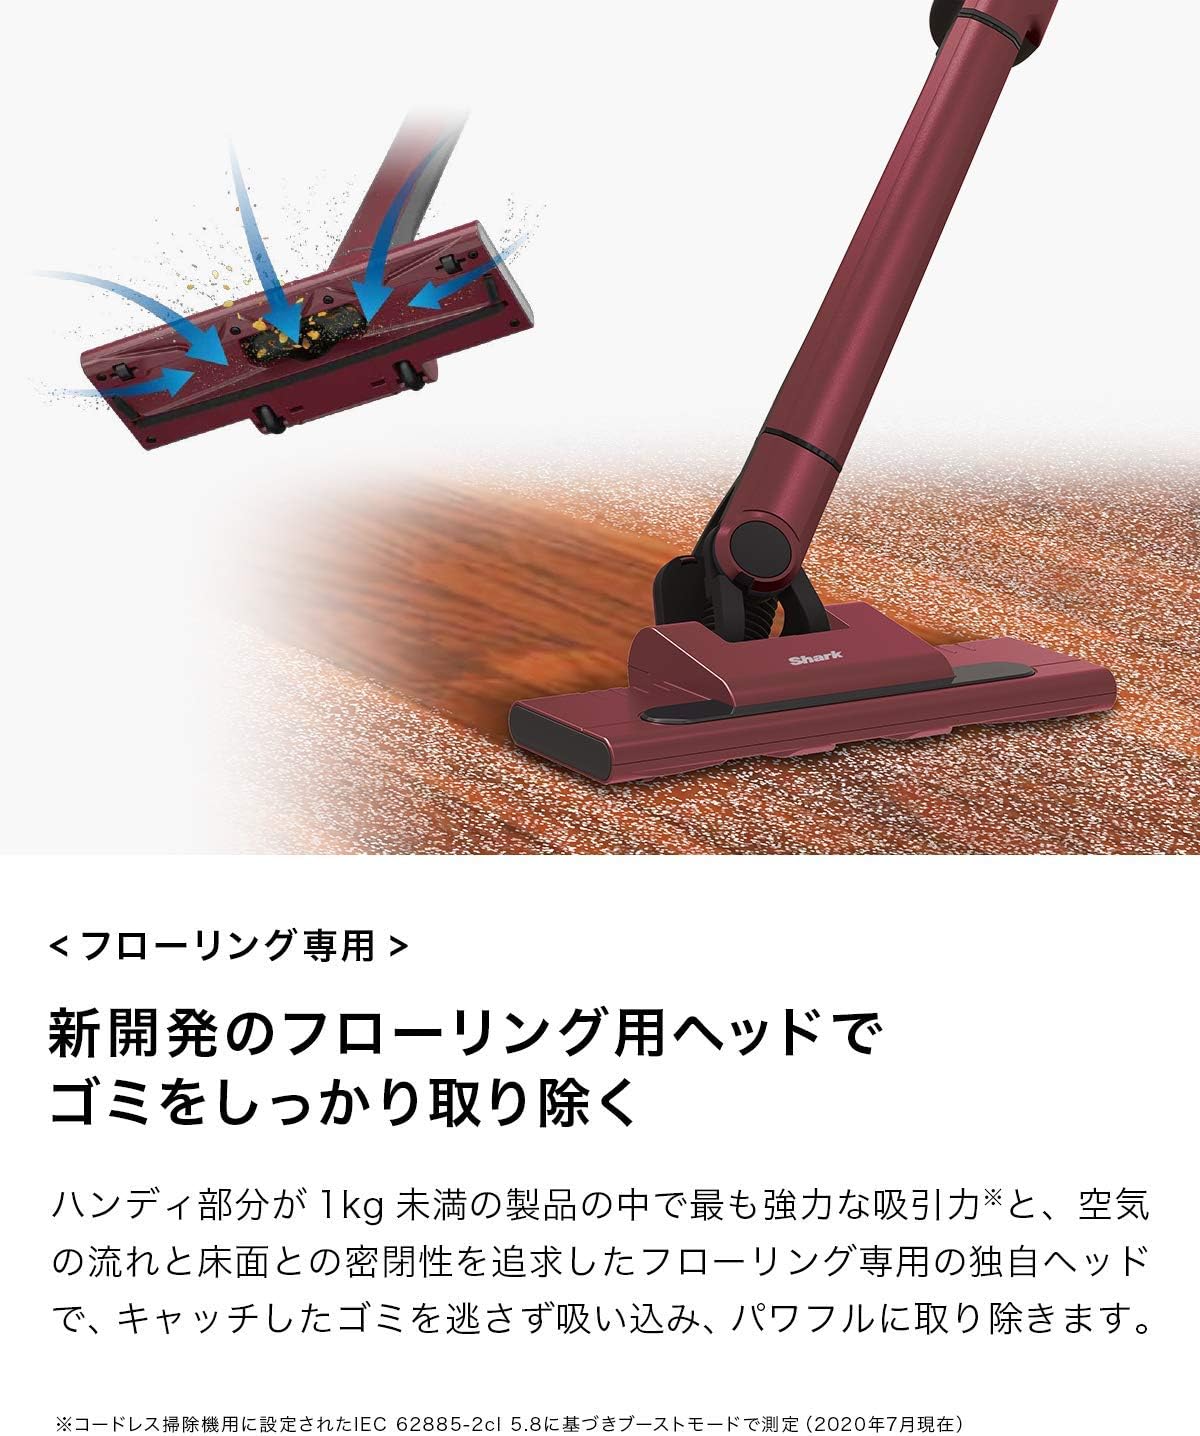
Image: A detailed view of the vacuum's flooring head, illustrating the powerful suction and tight seal with the floor that effectively captures debris.
5.2 Converting to Handheld Vacuum
For quick clean-ups and reaching elevated surfaces, the vacuum easily converts to a powerful handheld unit.

Image: A hand pressing the release button to detach the handheld vacuum unit from the main stick, ready for versatile cleaning.
- Press the release button on the handheld unit to detach it from the wand.
- Attach your desired accessory directly to the handheld unit.
- Press the power button to begin cleaning.
5.3 Using Attachments
The included accessories enhance the versatility of your vacuum, allowing you to clean various surfaces and hard-to-reach areas.

Image: A collage of three images demonstrating the handheld vacuum's versatility: cleaning a narrow crevice, dusting curtains, and vacuuming a sofa with different attachments.
- Crevice Tool with Brush: Ideal for cleaning tight spaces, corners, and along edges. The integrated brush helps dislodge stubborn dirt.
- Multi-Tool: A versatile tool for cleaning upholstery, car interiors, and other delicate surfaces.
- Upholstery Tool: Specifically designed for removing pet hair and debris from fabric surfaces like sofas and mattresses.
6. Maintenance
Regular maintenance ensures your Shark EVOPOWER SYSTEM CS200J continues to perform at its best.
6.1 Emptying the Dust Cup
The one-touch dust disposal system allows for hygienic emptying without touching the dirt.

Image: A handheld vacuum unit being held over a trash can, with dust and debris being released from the dust cup by pressing a button.
- Ensure the vacuum is turned off.
- Hold the handheld unit over a trash bin.
- Press the dust cup release button to open the bottom flap and empty the contents.
- Close the dust cup flap securely until it clicks.
6.2 Cleaning the Dust Cup and Filter
The dust cup and filter are washable, allowing you to keep your vacuum clean and maintain optimal suction.

Image: A hand rinsing the detached dust cup and filter components under running water from a faucet, illustrating the washable design.
- Remove the dust cup from the handheld unit.
- Remove the filter from the dust cup.
- Rinse both the dust cup and filter with cold water. Do not use soap.
- Allow both components to air dry completely for at least 24 hours before reassembling. Do not use a hairdryer or other heating methods.
- Reinsert the dry filter into the dust cup, then reattach the dust cup to the handheld unit.
6.3 Cleaning the Brush Roll
The EVOPOWER SYSTEM CS200J features a brushless power fin, which significantly reduces hair tangling and simplifies brush roll maintenance.
- Ensure the vacuum is turned off and disconnected from the charging dock.
- Inspect the brush roll for any debris or hair that may have accumulated.
- If necessary, use scissors to carefully cut away any tangled hair or fibers.
- Wipe the brush roll and nozzle opening with a dry cloth.
7. Troubleshooting
If you encounter any issues with your vacuum cleaner, refer to the following troubleshooting guide:
| Problem | Possible Cause | Solution |
|---|---|---|
| Vacuum does not turn on | Battery is not charged Battery is not properly inserted | Charge the battery fully Ensure battery is clicked into place |
| Low suction power | Dust cup is full Filter is dirty Nozzle or wand is blocked | Empty the dust cup Clean or wash the filter Check for and remove blockages |
| Brush roll not spinning | Obstruction in brush roll Nozzle not properly attached | Remove any hair or debris from brush roll Ensure floor nozzle is securely attached to the wand |
| Battery not charging | Charger not connected Faulty outlet Battery or charger issue | Ensure charger is securely plugged in Try a different electrical outlet Contact customer support |
8. Specifications
| Feature | Detail |
|---|---|
| Brand | Shark |
| Model Number | CS200J |
| Color | Ruby Red |
| Power Source | Battery-powered |
| Cordless | Yes |
| Filter Type | Cartridge |
| Recommended Surface | Flooring |
| Special Features | Lightweight |
| Item Weight | 5.06 kg |
| Product Dimensions (L x W x H) | 26.7 cm x 12.4 cm x 99.5 cm |
| UPC | 622356238656 |
9. Warranty and Support
9.1 Manufacturer Warranty
The manufacturer's warranty is valid only for products purchased from SharkNinja or its authorized retailers. Product registration is required to activate your warranty. Please register your product after arrival. The warranty period may vary by product; please refer to the specific warranty information provided with your product or on the official Shark website.
9.2 Customer Support
For technical assistance, replacement parts, or warranty inquiries, please contact Shark customer support. Refer to the contact information provided in your product packaging or visit the official Shark website for details.